Easy Crochet Teabag Bookmark Pattern for Beginners
If you’ve been looking for a Crochet Teabag Bookmark Pattern that’s genuinely beginner-friendly, quick to finish, and irresistibly cute, this little teabag amigurumi is going to be your new favorite. It’s the perfect blend of cozy crafting and bookish charm: a small stuffed teabag with a long chain “string” that slips between pages, plus an adorable smiling face and blush cheeks to make every reading session feel extra warm.
This project is also a wonderful Beginner Crochet Bookmark because it uses simple stitches (single crochet, increases, decreases, chains) and a small amount of yarn. Whether you’re making a thoughtful stocking stuffer, a teacher thank-you, a book club favor, or an Easy Crochet Gift Idea, this teabag bookmark is fast, useful, and highly giftable.
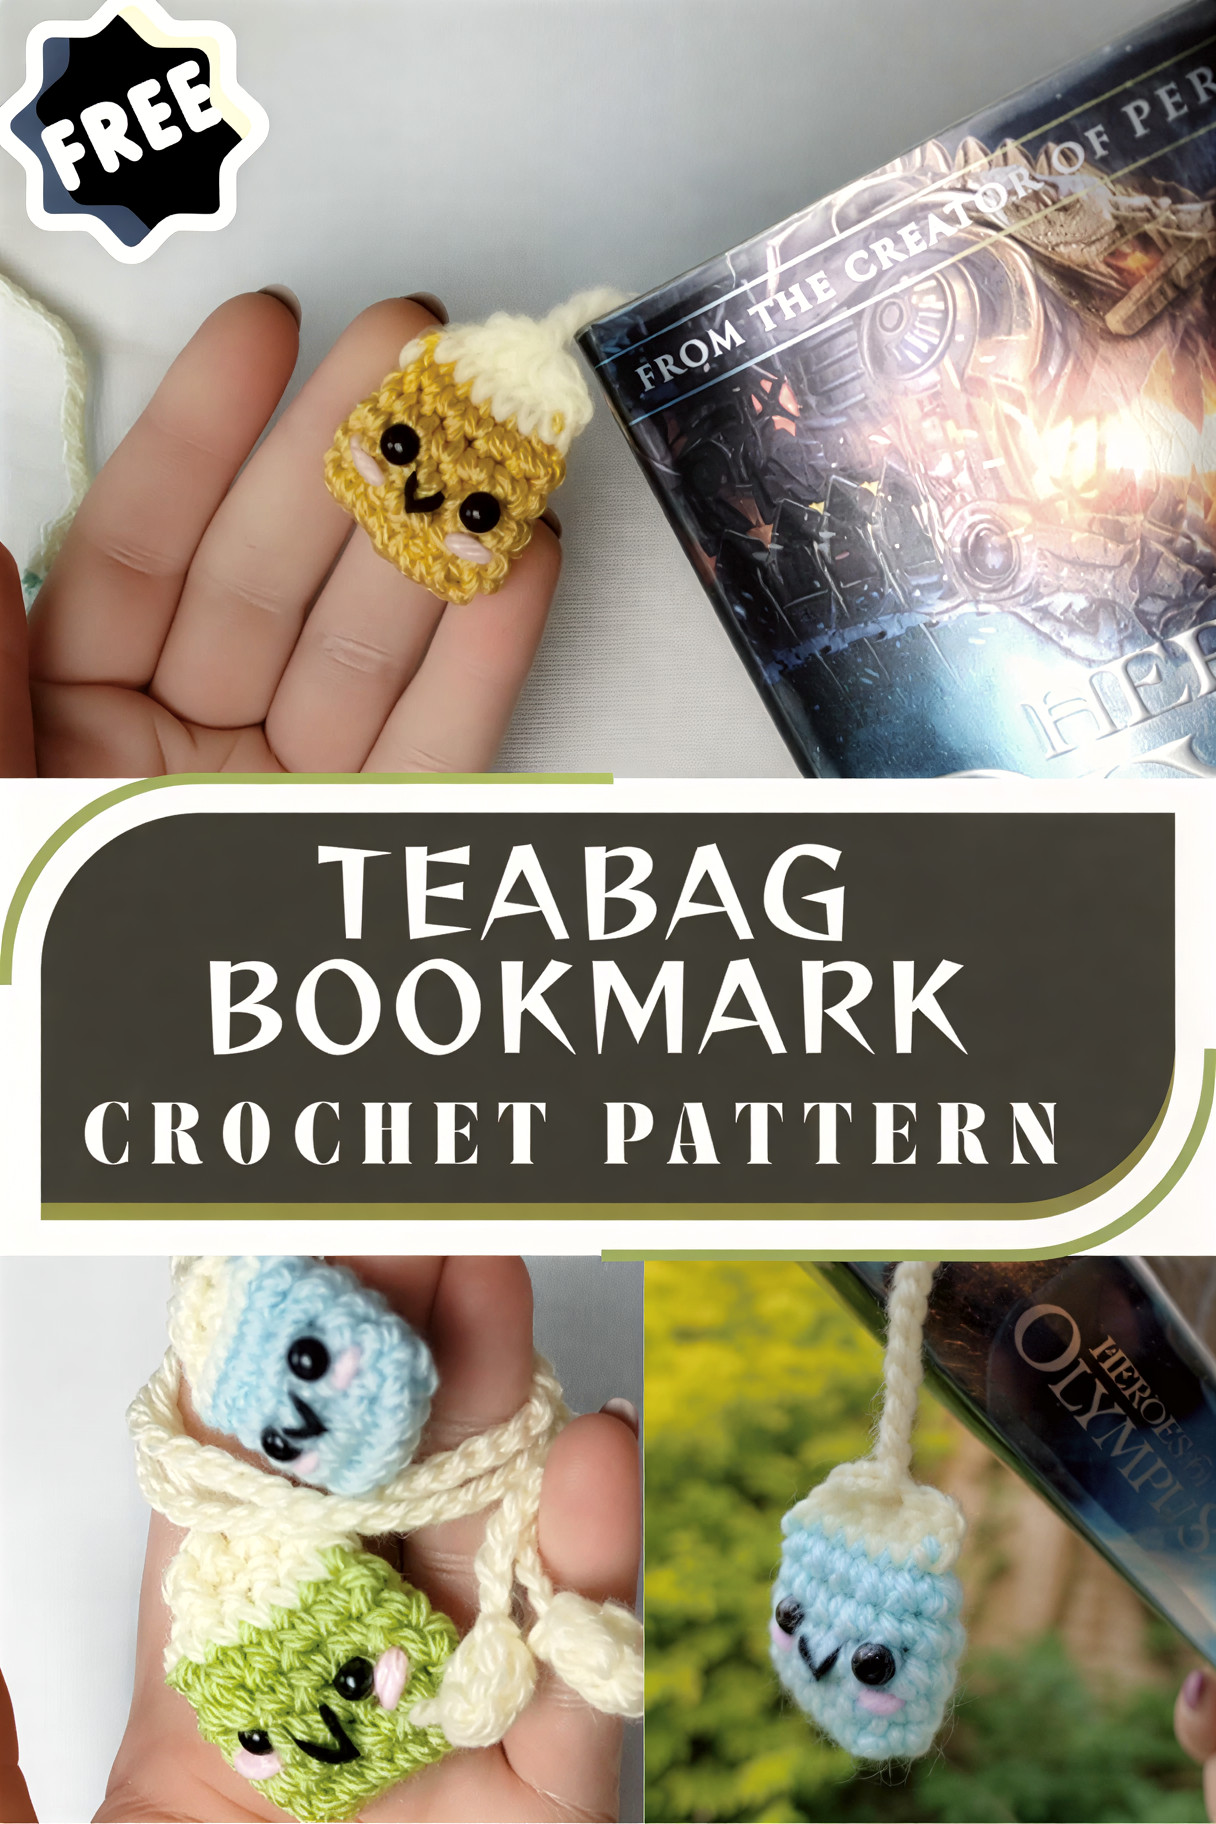
This Cute Crochet Bookmark is a tiny amigurumi teabag with a long chain string that sits inside your book like a real tea bag. Beginner-friendly stitches, quick assembly, and a kawaii face make it the sweetest handmade gift for readers.
Why You’ll Love This Cute Crochet Teabag Bookmark
- Small, portable, and uses minimal yarn
- Great first Amigurumi Bookmark Pattern (simple rounds and shaping)
- Customizable by “tea flavor” colors and facial expressions
- A practical handmade gift that feels special and personal
If you enjoy small amigurumi and functional makes, you may also like: Free Crochet Bookmark Patterns and Easy Amigurumi Keychain Pattern.
Materials
To make this Crochet Teabag Bookmark Pattern, you’ll need:
- Light worsted or DK yarn (cream, pastel blue, or tea-inspired colors)
- Suggested “tea” palette: cream (teabag), pastel blue (accent), light brown (milk tea), soft peach (chai), pale green (matcha)
- 2.5mm or 3.0mm crochet hook (choose a smaller hook for tighter stitches)
- 6mm safety eyes (optional; you can embroider eyes instead)
- Black embroidery thread (for mouth and optional lashes)
- Yarn needle (tapestry needle)
- Scissors
- Fiberfill stuffing
Optional:
- Pink embroidery thread or blush-colored yarn (for cheeks)
- Stitch marker (very helpful for working in continuous rounds)
Abbreviations (US Terms)
- MR = Magic ring
- sc = Single crochet
- inc = Increase (2 sc in same stitch)
- dec = Decrease (single crochet decrease; use invisible decrease if possible)
- ch = Chain
- sl st = Slip stitch
- FO = Fasten off
Gauge
Gauge isn’t critical for this pattern. The most important thing is a tight fabric so stuffing doesn’t show through. If you see gaps, go down a hook size.
Finished Size
Approximately 2–2.5 in (5–6.5 cm) tall for the teabag body, plus a 45–60 chain string (adjustable to fit your book).
Notes Before You Start (Beginner-Friendly)
- Work the teabag body in continuous spirals unless stated otherwise.
- Use a stitch marker to mark the first stitch of each round.
- Stuff lightly. Overstuffing can distort the shape.
- Choose 2.5mm for a firmer, more “amigurumi” look; choose 3.0mm if you crochet very tightly.
Step-by-Step Crochet Pattern: Teabag Body
Teabag Body (Amigurumi)
Use cream or your chosen teabag color.
Round 1: MR, 6 sc (6)
Round 2: inc in each st (12)
Round 3: (sc, inc) x6 (18)
Rounds 4–8: sc around (18)
Round 9: (sc, dec) x6 (12)
Add safety eyes (if using):
- Place eyes between Rounds 6 and 7, about 5–6 stitches apart.
- Adjust spacing based on the look you want (closer = extra cute/kawaii).
Stuff lightly (keep it soft rather than overfilled).
Round 10: dec around (6)
FO leaving a tail. Thread tail through remaining stitches and pull tight to close. Weave in ends.
Beginner Tip: Keep Your Decreases Neat
If you know how, use an invisible decrease (insert hook in front loops only of next two stitches, yarn over, pull through, yarn over, pull through two). This keeps the teabag smooth and reduces holes.
Crochet String (Bookmark Chain)
This is the “tea string” that goes inside your book.
String
- Attach yarn at the top center of the teabag (choose the flattest spot where it feels balanced).
- Ch 45–60 depending on your book size.
- Paperback: usually 45–50 pages
- Hardback or larger books: 55–60 chains
- Sl st back down the chain (sl st into each chain) to make a sturdier cord that won’t stretch as much.
- FO and weave in the end.
Optional Tag (Simple)
Want to add a little “tag” at the end of the string?
- At the end of the chain, make ch 6, sl st back to form a tiny loop, or crochet a small rectangle:
- Ch 6, sc in 2nd ch from hook and across (5 sc), ch 1 turn, 5 sc for 2–3 rows, FO and sew to the string end.
(Keep it simple for a true beginner project.)
Assembly Instructions
- Weave in all ends on the teabag body (top and bottom).
- Check string placement:
- Hold the teabag against a book and let the string fall between pages.
- If it tips forward, move the attachment point slightly toward the center.
- Secure the string:
- If you attached by pulling up a loop and chaining, reinforce by stitching the base of the string to the body with a yarn needle using a few small whip stitches.
Facial Embroidery Instructions (Cute Kawaii Face)
A sweet face turns this into a truly Cute Crochet Bookmark. Here’s an easy, beginner-friendly kawaii face:
Option A: Safety Eyes + Embroidered Mouth (Recommended)
- Insert safety eyes between Rounds 6–7, 5–6 stitches apart.
- Thread black embroidery thread on a needle.
- Embroider a small smile:
- Place the mouth centered between the eyes, about 1 round below the eye line.
- Make a short curved stitch (or a tiny “u” shape).
- Optional: Add tiny mouth corners by making very short angled stitches on each side of the smile.
Option B: Fully Embroidered Face (No Safety Eyes)
- Use black embroidery thread to stitch two small vertical lines or tiny arcs for sleepy eyes.
- Add a small smile centered below.
Blush Cheeks (Cute and Simple)
- Use pink embroidery thread or blush yarn.
- Make two to three small straight stitches on each cheek, just outside and slightly below the eyes.
- Keep cheeks symmetrical for the neatest look.
Tip for Clean Embroidery
Anchor your thread inside the body and run it through the stuffing area so knots don’t show. Pull gently tight enough to sit flat, not tight enough to pucker the fabric.
Customization Ideas (Tea Flavors + Expressions)
This Amigurumi Bookmark Pattern is incredibly customizable. A few fun themes:
Color Variations (Tea Flavors Theme)
- Green Tea/Matcha: pale green body, cream string, pink cheeks
- Earl Grey: light gray body with a tiny lavender “tag”
- Chai: warm beige body, cinnamon-brown cheeks or accents
- Peach Tea: cream body with peach blush and a peachy tag
- Milk Tea/Boba-inspired: tan body with darker brown embroidered details
Change the Face
- Smiling closed eyes (two curved lines)
- A bigger grin (wider “u” stitch)
- Tiny tongue detail (one small pink stitch under the smile)
- Add little eyebrows for extra expression
Add a “Tea Dip” Detail (Optional)
For a dipped-tea look, crochet rounds 4–5 in a slightly darker shade (like light tan), then switch back to cream.
Tips for Beginners (Make It Neat and Stress-Free)
- Use a stitch marker so you don’t lose your place in rounds.
- Count stitches each round amigurumi depends on accurate counts.
- Choose the right hook size: if your stuffing shows, go down to 2.5mm.
- Stuff slowly and lightly: add small bits of fiberfill, not one big clump.
- Practice the magic ring if it’s new to you; it makes the center tight and tidy.
- Slip stitching back on the chain makes a stronger, less stretchy bookmark string.
If you’re newer to small projects, you might also like: Beginner Amigurumi Patterns.
Common Mistakes to Avoid
- Skipping stitch counts: This can turn the teabag lopsided or pointy.
- Overstuffing: Causes gaps, stretched stitches, and an uneven “pillow” shape.
- Loose tension: Stuffing will peek through size down your hook if needed.
- Eyes placed too high/low: Try pinning placement before snapping safety backs.
- String attached off-center: The bookmark may twist when placed in a book; reattach at the top center for balance.
FAQ (Crochet Teabag Bookmark Pattern)
1) Is this Crochet Teabag Bookmark Pattern suitable for complete beginners?
Yes. It uses basic amigurumi techniques: single crochet in the round, increases, decreases, and chains. Take it slow, count stitches, and you’ll do great.
2) What yarn is best for an amigurumi bookmark?
DK or light worsted yarn works beautifully. Choose a smooth yarn (not fuzzy) so stitches and facial details look clean.
3) Do I have to use safety eyes?
No. You can embroider the eyes with black thread, which is also a good option if the bookmark is for a very young child (though bookmarks are generally not baby toys).
4) How long should I make the string?
Most books work well with 45–60 chains. If you’re unsure, chain longer, test it in your book, then shorten by removing chains before slip stitching back.
5) Can I sell finished teabag bookmarks made from this pattern?
If this is a free pattern you’re using from this blog-style post, a common approach is: yes, you may sell finished items in small quantities with credit to the designer, but do not redistribute the written pattern as your own. (Adjust this to your personal terms if you publish it.
Conclusion: A Sweet Little Handmade Bookmark You’ll Actually Use
This Crochet Teabag Bookmark Pattern is the kind of small project that delivers maximum joy: it’s quick, calming to crochet, and incredibly giftable. Whether you make a single cute teabag for your own nightstand reads or a whole set of “tea flavors” for friends, it’s a charming way to combine handmade comfort with your love of books.
If you make this Beginner Crochet Bookmark, I’d love to hear how you customized yours—what tea theme did you pick, and did you go with safety eyes or embroidered eyes?
Pin this pattern, share it with your crochet friends, and drop a comment with your favorite tea flavor idea.
Pin this for later and follow for more free crochet patterns!