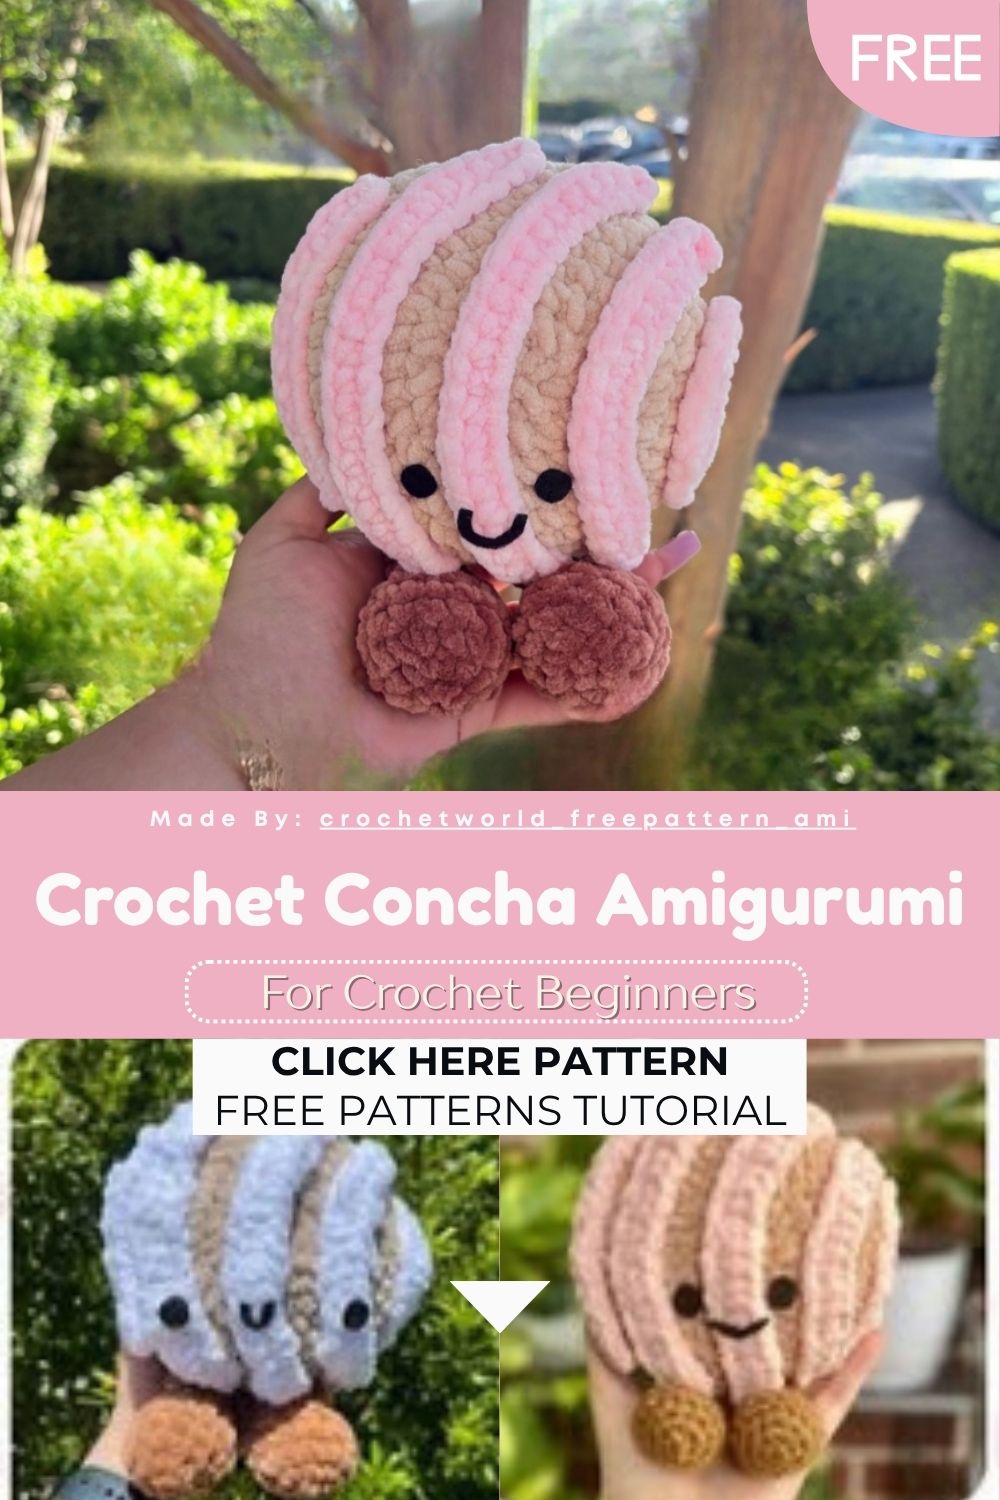
Free Crochet Concha Amigurumi Pattern for Good Vibes
Listen, if you love pan dulce, this one’s for you. This Free Crochet Concha Amigurumi turns the classic Mexican sweet bread into the happiest little character. It’s chunky, it’s cute, and it radiates pure good vibes. Easily the comfiest make around.
So why a concha? Because it’s iconic, that’s why. This little guy captures the shell-patterned top of the real thing, complete with stubby legs and a sweet felt face. The chunky yarn makes him fast to stitch and super huggable. Pick any topping color you love pink, white, brown, you name it. Low-key, you’ll want a whole batch of them.
Pattern Overview
- The Free Crochet Concha Amigurumi “bread” is a single rounded dome worked from a magic ring, increasing out to 54 stitches then decreasing back down basically one big squishy ball.
- A back-loop-only round at R11 creates a subtle ridge that shapes the bread and gives the toppings a ledge to sit against.
- The shell topping isn’t crocheted as a circle. Instead, you make five separate chained-and-DC strips that you arrange and attach across the top.
- Two little legs are worked separately in brown, lightly stuffed, and sewn to the base.
- The face is the easy part: black felt circles for eyes and a “C” shape for the mouth, glued or stitched on.
- Color is wide open go classic pink, white, or brown for the topping, or pick whatever makes you happy.
Skill Level
This is an easy, beginner-friendly pattern. If you can work a magic ring, single crochet, and basic increases and decreases, the concha comes together with zero fuss at all.
Materials Needed
- Crochet hook: 5 mm
- Yarn (I used Premier Parfait Chunky)
- Colors: beige, plus pink, white, brown, or any color you like
- Black felt
- Stuffing
- Scissors
- Yarn needle
- Stitch marker
Abbreviations
- MR: magic ring
- SC: single crochet
- INC: increase
- DEC: decrease
- CH: chain
- SL ST: slip stitch
- BLO: back loop only
- DC: double crochet
- FO: fasten off
Special Techniques
A few easy techniques give the concha its signature look, so here’s the rundown:
- Back loop only (BLO): Round 11 of the bread works into the back loops only. This creates a neat ridge that defines the dome and gives the toppings a ledge to rest against.
- Chain-and-DC strips: Each topping is just a chain worked back along itself in double crochet. Different chain lengths give you long and short strips for that cracked-shell pattern.
- Folding and seaming the legs: After the last round, you fold each leg flat and single crochet across about three-quarters of the opening to close it neatly.
- Felt face: No embroidery needed. Cut simple shapes from black felt and attach — a “C” mouth and two dots is all it takes.
- Adjustable toppings: The strips are fully flexible. Add or drop a few chains so they fit your exact concha size.
The Pattern
Bread (in beige yarn)
- R1: 8 sc in MR (8)
- R2: (inc) x8 (16)
- R3: (sc, inc) x8 (24)
- R4: (3sc, inc) x6 (30)
- R5: (4sc, inc) x6 (36)
- R6: (5sc, inc) x6 (42)
- R7: (6sc, inc) x6 (48)
- R8: (7sc, inc) x6 (54)
- R9–R10: sc around (54) — 2 rounds
- R11: in BLO, sc around (54)
- R12: (7sc, dec) x6 (48)
- R13: (6sc, dec) x6 (42)
- R14: (5sc, dec) x6 (36)
- R15: (4sc, dec) x6 (30) — start stuffing
- R16: (3sc, dec) x6 (24)
- R17: (sc, dec) x8 (16)
- R18: 8 dec (8)
Finish stuffing, sew closed, and fasten off.
Toppings
Feel free to add or subtract chains to fit the size of your concha.
- Topping 1: Ch 14. In the second chain from the hook, DC 13. Fasten off.
- Topping 2: Ch 23. In the second chain from the hook, DC 22. Fasten off. (Leave a long tail if you plan to sew the toppings on instead of gluing.)
- Topping 3: Ch 24. In the second chain from the hook, DC 23. Fasten off.
- Topping 4: Ch 19. In the second chain from the hook, DC 18. Fasten off.
- Topping 5: Ch 10. In the second chain from the hook, DC 9. Fasten off.
Legs (make 2, in brown yarn)
- R1: 5 sc in MR (5)
- R2: (inc) x5 (10)
- R3: (sc, inc) x5 (15)
- R4–R5: sc around (15) — 2 rounds
- R6: (sc, dec) x5 (10) — stuff lightly
- R7: 2sc, (dec) x3, 2sc (7)
- R8–R11: sc around (7) — 4 rounds
Fold the leg in half and sc about three-quarters across. Fasten off, leaving a long tail for sewing.
Assembly
Here’s how the concha comes together at the end:
- Once the bread is stuffed and closed, lay out your five toppings across the top, arranging them left to right to mimic a concha’s shell.
- Sew or glue each topping strip in place, working from one side to the other.
- Stuff the legs lightly, fold and close each one, then attach them to the bottom of the bread between rows 10 and 11.
- Cut two small circles from black felt for the eyes and a “C” shape for the mouth.
- Position the felt face where you like it, step back to check, then sew or glue it down.
- Prefer stitching? You can also embroider the mouth in black yarn instead of using felt.
Common Mistakes
A handful of spots tend to trip people up, so watch for these:
- Stuffing too late. Start filling the bread around round 15, before the opening tightens up, so it stays plump and round.
- Forgetting the BLO round. Skip round 11’s back-loops-only and you lose the ridge that makes a concha look like a concha.
- Making the toppings all the same length. The varied chain counts are what create the shell pattern — keep them different.
- Over-stuffing the legs. They only need a light fill; pack them and they won’t fold and sew flat.
- Attaching the legs too high. They go at the very bottom, between rows 10 and 11, so the concha sits upright.
- Gluing the felt before you’re sure. Lay the eyes and mouth out first and step back once the glue sets, it’s set.
- Rushing the topping placement. Arrange all five strips left to right before attaching anything.
Important Remarks
- The yarn used is Premier Parfait Chunky with a 5 mm hook. The chunky weight gives that soft, bakery-fresh look.
- Beige is the classic bread base, but the topping color is all you pink, white, brown, or anything bright.
- Felt and glue mean this is best as decor or a gift for older kids, not a baby toy.
- Want a bigger concha? Size up your yarn and hook, and add a few chains to each topping to match.
- Keep your stitches snug so the stuffing stays hidden. Chunky yarn can gap if your tension runs loose.
Conclusion
And there you have it a little Free Crochet Concha Amigurumi radiating nothing but good vibes. Here’s the thing: it looks like a fancy bakery piece, but it’s really one of the simplest makes around. The dome, the strips, the felt face all beginner stuff. Make one in classic pink, then a brown one, then a whole little pan dulce squad. They’re great for gifting, shelf styling, or just making someone smile. So grab your beige yarn and let’s get baking crochet style.