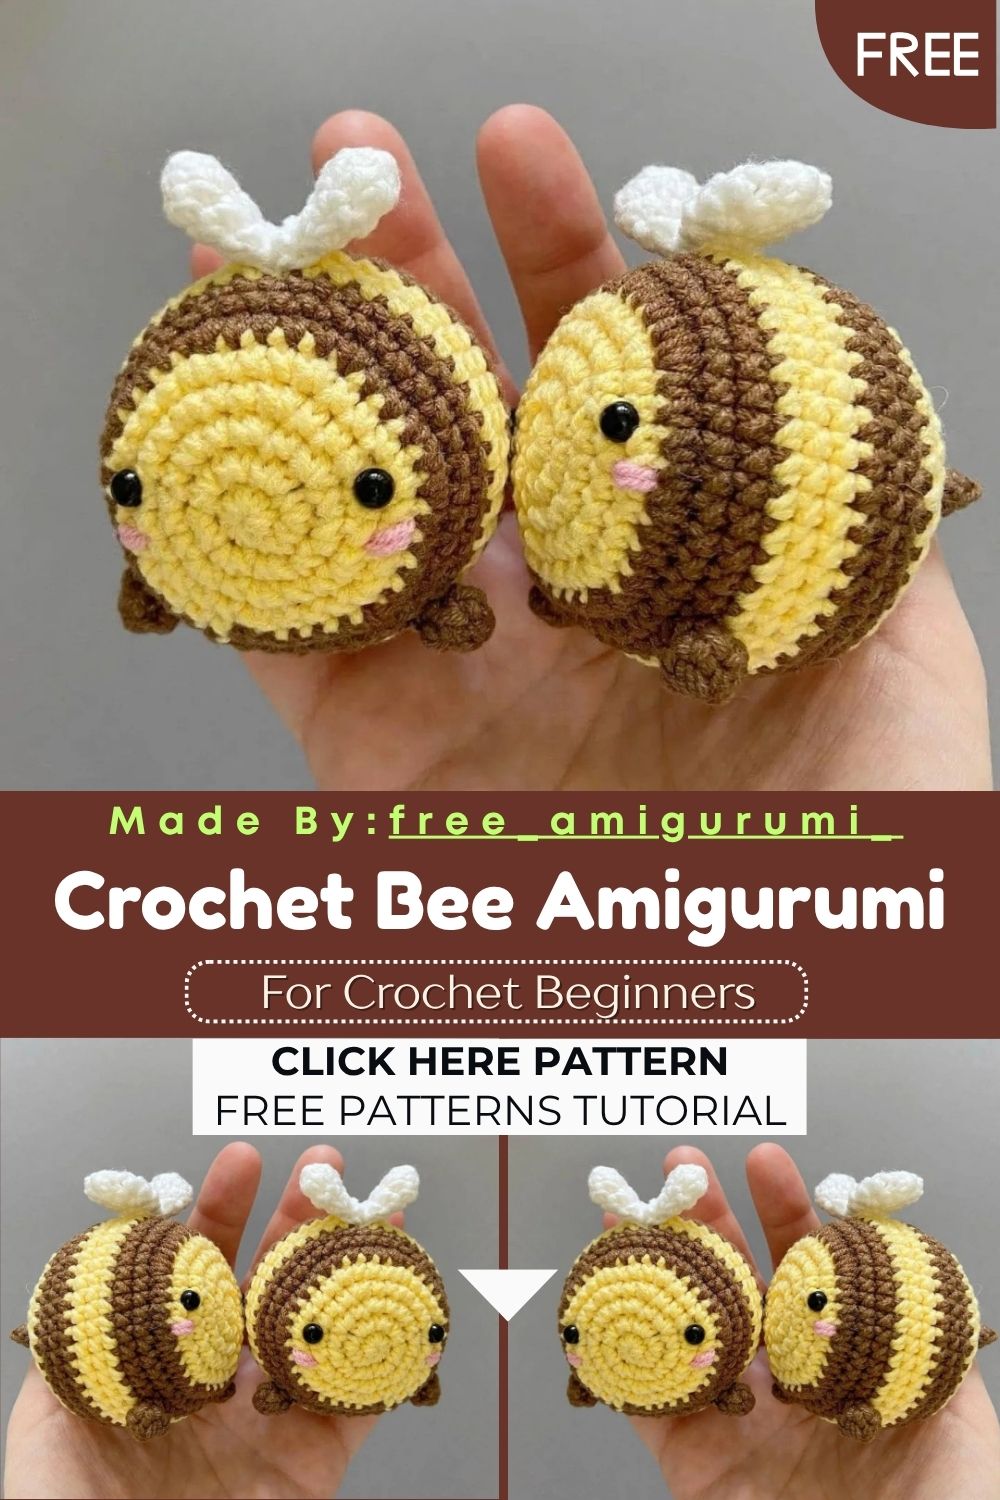
Round Crochet Bee Amigurumi – Free Beginner Project
Yellow stripes, white wings, and the roundest little body you have ever stitched, this tiny bee is proof that the best amigurumi are also the simplest ones!
This bee skips the complicated construction entirely. The whole body is worked from the top down in a single continuous spiral, with the color alternating between yellow and brown every few rounds to create the signature stripe bands. No joining, no seam, no complicated shaping, just a satisfying rhythm of increases at the top, straight rounds through the middle, and gentle decreases that taper the bee down to its characteristic rounded bottom.
The wings are flat, folded, and stitched closed in seconds. The arms are two tiny circles sewn straight onto the sides. Together, the whole bee comes together faster than almost any other amigurumi at this skill level.
Skill Level
Beginner. Standard increases and decreases in continuous rounds are all this pattern asks for. Additionally, the color-change technique between yellow and brown is easy to manage since neither color is cut within its own section.
Materials You Will Need
Yarn Yarn Art Jeans (55% cotton, 45% acrylic, 50g/160m):
- Yellow No. 88 for the bee body stripes
- Brown No. 40 for the bee body stripes and arms
- White No. 01 for the wings
Other Supplies:
- Crochet hook — 2mm or 2.25mm (US B / UK 14)
- Safety eyes — 5mm
- Fiberfill stuffing
- Thick sewing needle
- Scissors
Abbreviations
- MR — Magic Ring
- CH — Chain Stitch
- SC — Single Crochet
- INC — Increase (2 sc in same stitch)
- DEC — Decrease (sc2tog)
- (N) — Total stitch count for that round
- (inc, sc) x N — Repeat N times
Note: Work in continuous rounds throughout without slip stitches between rounds.
Pattern: Body
Starting with yellow yarn
Rnd 1: 7 sc in MR (7) Rnd 2: 7 inc (14) Rnd 3: (inc, 1sc) x7 (21) Rnd 4: (inc, 2sc) x7 (28) Rnd 5: (inc, 3sc) x7 (35)
Connect brown yarn here. Do not cut off the yellow; carry it alongside and pick it up again when needed.
Rnd 6: (inc, 4sc) x7 (42) Rnd 7–8: sc around for 2 rounds (42)
Connect the yellow yarn.
Rnd 9–11: sc around for 3 rounds (42)
Insert safety eyes now between rounds 4 and 5, positioned symmetrically on the front of the body. Check placement from the front before locking the backings in permanently.
Connect brown yarn.
Rnd 12–14: sc around for 3 rounds (42)
Connect the yellow yarn.
Rnd 15: (dec, 5sc) x6 (36) Rnd 16: (dec, 4sc) x6 (30) Rnd 17: (dec, 3sc) x6 (24)
Connect the brown yarn and cut off the yellow at this point.
Rnd 18: (dec, 2sc) x6 (18) Rnd 19: 18 sc (18) Rnd 20: (dec, 1sc) x6 (12) Rnd 21: 12 sc (12)
Stuff the body firmly with fiberfill at this point.
Rnd 22: 6 dec (6) Rnd 23: 6 sc (6) Rnd 24: 3 dec (3)
Cut the yarn and hide the end inside the body. The tapered tip at the bottom gives the bee its classic pointed abdomen shape.
Embroider small blush circles under the eyes using pink yarn or thread for a sweet, rosy-cheeked expression.
Pattern: Wings Make 2
Using white yarn
Rnd 1: 6 sc in MR (6) Rnd 2: 6 inc (12) Rnd 3: 12 sc (12) Rnd 4: (dec, 1sc) x4 (8)
Do not stuff. Fold the wing flat so the stitches of the last round line up opposite each other. Work 4 sc through both layers to close the wing flat.
Cut yarn and leave a long tail. Sew both wings to the top of the body, angled slightly outward so they spread naturally like real wings.
Pattern: Arms Make 2
Using brown yarn
Rnd 1: 6 sc in MR (6) Rnd 2: 6 sc (6)
Cut yarn and leave a long tail. Sew both arms onto the sides of the body at the yellow section around rounds 9 to 11, positioning them evenly on each side.
Assembly Summary
- Eyes: between rounds 4 and 5
- Blush: embroidered below the eyes
- Wings: sewn to the top of the body, spreading outward
- Arms: sewn to the sides at the yellow middle section
Customization and Variation Ideas
- First, swap the brown stripes for black for a more classic bumblebee coloring that looks bold and instantly recognizable.
- Additionally, try the body in lavender and white stripes for a fantasy bee variation that feels whimsical rather than naturalistic.
- Moreover, add a tiny crocheted stinger at the tapered bottom using a short length of brown yarn pulled through and knotted for an extra character detail.
- Furthermore, embroider a small flower shape onto one of the wings using yellow thread before folding and closing it for a painted wing effect.
- Also, make a matching flower using a simple magic ring petal construction and display the bee perched on top of it for a complete nature scene.
- Finally, make three bees in slightly different stripe color combinations and arrange them in a small shadow box frame for a unique handmade wall decoration.
Common Mistakes to Avoid
- First, cutting the yellow yarn too early: The pattern carries yellow alongside brown through several sections rather than cutting and rejoining repeatedly. Cutting either color at the wrong point means rejoining mid-stripe, which creates extra ends and potential gaps at the color change.
- Additionally, inserting safety eyes after round 11: The eyes must go in between rounds 4 and 5 while the head section is still open enough to access from the inside. Mark the position with pins first and confirm symmetry before locking.
- Also, over-stuffing the body: This bee has a naturally rounded top and a tapering bottom. Too much stuffing creates a lumpy surface that disrupts both the stripe alignment and the tapered abdomen shape.
- Furthermore, folding wings unevenly before closing: Align the stitches of the last round precisely opposite each other before working the 4 sc closure. An uneven fold creates an asymmetric wing that reads as slightly crooked when sewn onto the body.
- Moreover, sewing arms too high or too low: The arms should sit comfortably within the yellow mid-section of the body. Placed too high,h they overlap the eye level, el and placed too low, they sit in the brown bottom section, where they look out of place.
- Finally, hiding the body yarn end through the outside surface: Always pull the cut yarn end inward and bury it through the center of the stuffed body. An end worked through the outside surface can pull loose and become visible over time.
Finishing Tips
- First, when carrying the unused yarn alongside the working yarn, keep the carried strand slightly loose rather than taut. This prevents the exterior surface from puckering at the color transition rounds.
- Additionally, after sewing on the wings, gently bend them upward at a slight angle rather than laying them flat. This gives the bee a more energetic, in-flight appearance.
- Moreover, use a single strand of pink or peach floss for the blush embroidery. A full strand creates blush marks that are too heavy and block-like against the fine cotton yarn surface.
- Furthermore, when sewing the arm circles onto the body, anchor each one at two points — top and bottom — rather than a single center stitch, so neither arm can rotate or shift with handling.
- Also, check the stripe alignment from directly in front of the bee before the final stuffing round. Uneven carrying of the non-working yarn can cause stripe lines to drift slightly, which is easiest to correct before the body is closed.
- Finally, photograph the finished bee against a soft green or floral background for the most charming, nature-inspired presentation that makes the yellow and brown stripe colors pop.
Gifting Ideas
- First, nestle the finished bee inside a small wooden box with a sprig of lavender or dried chamomile for a nature-themed gift that smells as lovely as it looks.
- Additionally, pair the bee with a small jar of local honey for a themed gift set that connects the handmade piece to its real-world inspiration.
- Moreover, these bees make wonderful spring and summer craft market sellers, especially when displayed alongside crocheted flowers of various sizes and colors.
- Furthermore, make a matching set of five bees in slightly different stripe colorways and gift them together in a small tin for a collector-style presentation.
- Also, attach a small loop of thread to the top of the bee for a hanging ornament version that works beautifully on a spring wreath or in a window display.
- Finally, gift a bee alongside a packet of wildflower seeds for a pollinator-themed gift bundle that carries a genuinely meaningful seasonal message.
Conclusion
This little bee pattern is a reminder that the most satisfying amigurumi are often the ones with the fewest moving parts. One body, two wings, two arms, and every stripe lands in exactly the right place because the color change rhythm is built directly into the round counts. Therefore, carry rather than cut your color transitions, insert those safety eyes early, and fold the wings carefully before closing. In conclusion, this round little bee is ready to buzz its way off your hook and into the world.