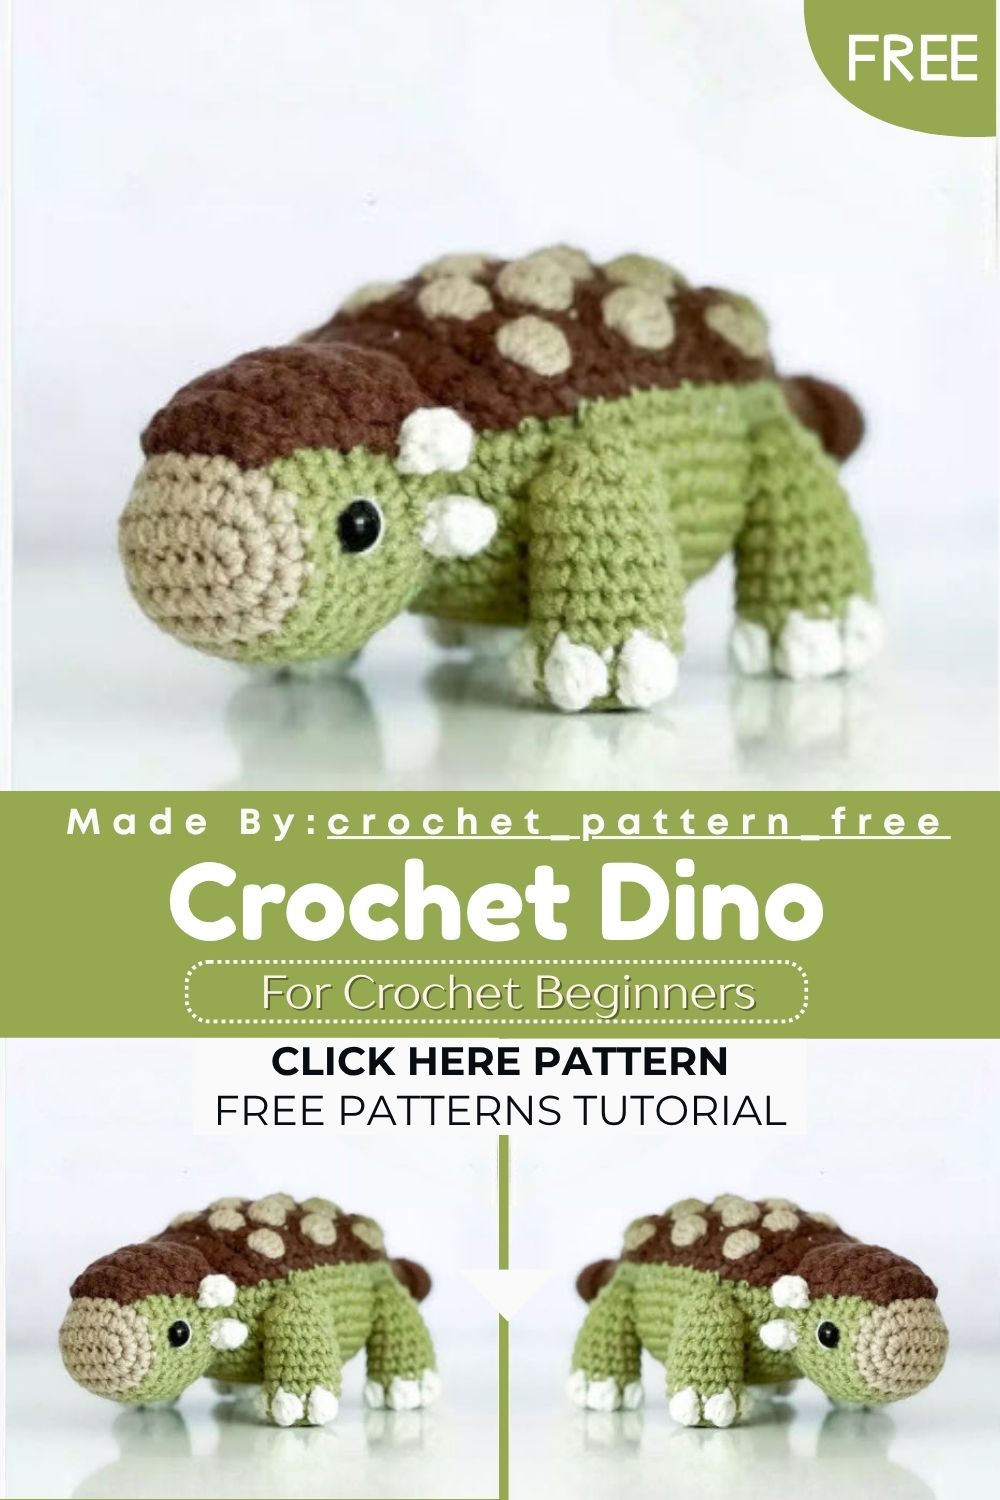
Gorgeous Crochet Dino Amigurumi Pattern for Stuffed Toy
Dinosaurs never really go out of style, honestly. This Gorgeous Crochet Dino Amigurumi Pattern brings that timeless charm home in soft yarn, perfect for gifting or keeping on your shelf.
Building your own dinosaur from yarn sounds intimidating until you actually try it, trust me. This pattern breaks the process into small, manageable pieces, from the rounded head to the spiky body shield. Every stitch works toward a sturdy, huggable toy that stands out on any craft table or nursery shelf.
Skill Level
This Crochet Dino Amigurumi pattern suits confident beginners and intermediate crocheters alike. You should feel comfortable with increases, decreases, bobble stitches, and basic color changes before starting this amigurumi project.
Materials and Abbreviations
Abbreviations
- ch = chain/s
- sc = single crochet
- inc = increase; crochet 2 sc in the same stitch
- dec = decrease; crochet 2 sc together
- bo = bobble stitch
- rnd = round(s)
- […] x X = repeat instructions in brackets X times
- (…) = total number of stitches in the round or row
Materials Required
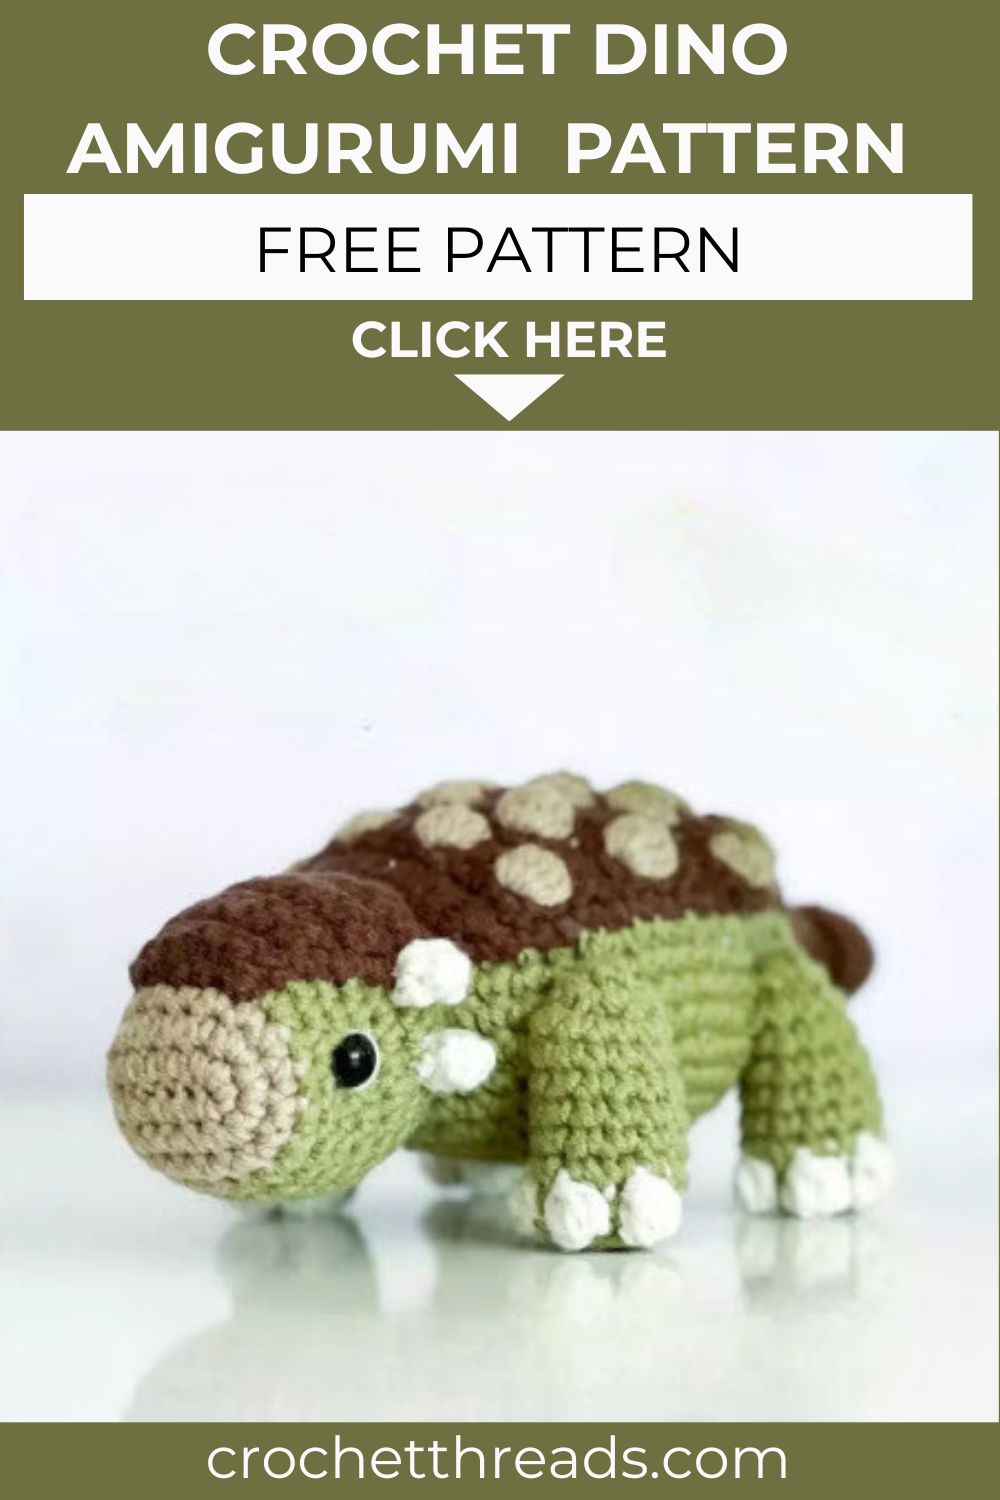
- Cotton and acrylic blend DK weight yarn (Scheepjes Soft Fun recommended). Roughly 25 g is enough for the main color. Colors used: Moss (green 2606), Wheat (beige 2533), Pecan (brown 2491), Lace (white 2426)
- Mini version: fingering weight yarn, such as Yarn & Colors Favorite or Hobbii Rainbow 8/4
- Crochet hook, 2.5 mm (mini version: 1.75 mm)
- Fiberfill or toy stuffing
- Stitch marker, scissors, and embroidery needle
- Security eyes, 8 mm (mini version: 6 mm)
Finished Size
- Standard: 16 cm / 6 in. in length
- Mini version: 12 cm / 5 in. in length
Pattern Instructions
Crochet Dino Amigurumi
Head Shield
Work with brown color. Turn the piece after each row. After the first chain, start crocheting on the second chain from the hook.
Make 7 chains.
- Row 1: Start on the second chain from the hook; 6 sc (6)
- Row 2: 1 ch, 6 sc (6)
- Row 3: 1 ch, inc, 4 sc, inc (8)
- Row 4: 1 ch, 8 sc (8)
- Row 5: 1 ch, inc, 6 sc, inc (10)
- Rows 6–8: 1 ch, 10 sc — 3 rows (10)
Fasten off and leave a long tail to sew to the head.
Head
Start with beige color.
Make 7 chains.
- Rnd 1: Start on the second chain from the hook; 5 sc, 3 sc in last chain, turn and work on the opposite side of the chain, 4 sc, inc (14)
- Rnd 2: inc, 4 sc, [inc] x 3, 4 sc, [inc] x 2 (20)
- Rnd 3: 20 sc (20)
- Rnd 4: 1 sc, inc, 3 sc, change to green color: 2 sc, inc, 3 sc, inc, 5 sc, inc, 2 sc (24)
- Rnds 5–6: 24 sc — 2 rounds (24)
- Rnd 7: [3 sc, inc] x 6 (30)
- Rnd 8: 30 sc (30)
- Rnd 9: [3 sc, dec] x 6 (24)
Place 8 mm security eyes between round 6 and 7, keeping 10 stitches between the eyes. Pin the head shield in place beforehand to double-check the placement looks right.
- Rnd 10: 24 sc (24)
- Rnd 11: [2 sc, dec] x 6 (18)
Stuff the head with filling. Keep the remaining rounds flat, working in back loops only.
- Rnd 12: In back loops only: [1 sc, dec] x 6 (12)
- Rnd 13: [dec] x 6 (6)
Fasten off and leave a long tail to sew to the body.
Body
Work with green color.
Make 8 chains.
- Rnd 1: Start on the second chain from the hook; 6 sc, 3 sc in last chain, turn and work on the opposite side of the chain, 5 sc, inc (16)
- Rnd 2: inc, 5 sc, [inc] x 3, 5 sc, [inc] x 2 (22)
- Rnd 3: 1 sc, inc, 5 sc, [1 sc, inc] x 3, 5 sc, [1 sc, inc] x 2 (28)
- Rnd 4: 2 sc, inc, 5 sc, [2 sc, inc] x 3, 5 sc, [2 sc, inc] x 2 (34)
- Rnd 5: 2 sc, inc, 1 sc, inc, 6 sc, inc, 1 sc, inc, 4 sc, inc, 1 sc, inc, 6 sc, inc, 1 sc, inc, 4 sc (42)
- Rnd 6: [6 sc, inc] x 6 (48)
- Rnds 7–10: 48 sc — 4 rounds (48)
- Rnd 11: [6 sc, dec] x 6 (42)
- Rnd 12: 42 sc (42)
- Rnd 13: [5 sc, dec] x 6 (36)
- Rnd 14: 2 sc, dec, [4 sc, dec] x 5, 2 sc (30)
Stuff the body as you continue working the remaining rounds.
- Rnd 15: [3 sc, dec] x 6 (24)
- Rnd 16: [2 sc, dec] x 6 (18)
- Rnd 17: [1 sc, dec] x 6 (12)
- Rnd 18: [dec] x 6 (6)
Fasten off, leaving a yarn tail. Weave it through the front loops of each stitch, pull tight to close, then weave in the ends.
Legs – Make 4
Start with green color.
- Rnd 1: 6 sc in a magic ring (6)
- Rnd 2: [inc] x 6 (12)
Switch to white color before each bobble stitch, then back to green for the single crochets.
- Rnd 3: In back loops only: 2 sc, [1 bo, 1 sc] x 3, 4 sc (12)
- Rnds 4–9: 12 sc 6 rounds (12)
Stuff the legs lightly, only up to round 6.
- Rnd 10: [dec] x 6 (6)
Fasten off, leaving a long tail. Weave it through the front loops, pull tight to close, then use the remaining tail to sew the legs onto the body.
Tail
Start with brown color.
- Rnd 1: 6 sc in a magic ring (6)
- Rnd 2: [2 sc, inc] x 2 (8)
- Rnd 3: [3 sc, inc] x 2 (10)
- Rnd 4: [4 sc, inc] x 2 (12)
- Rnd 5: 12 sc (12)
Add stuffing if needed.
- Rnd 6: [dec] x 6 (6)
Change to green color.
- Rnds 7–9: 6 sc — 3 rounds (6)
- Rnd 10: [inc] x 6 (12)
- Rnd 11: [1 sc, inc] x 6 (18)
- Rnd 12: 18 sc (18)
- Rnd 13: [2 sc, inc] x 6 (24)
Fasten off and leave a long tail to sew to the body.
Horns – Make 4
Work with white color.
- Rnd 1: 4 sc in a magic ring (4)
- Rnd 2: 4 sc (4)
Fasten off and leave a long tail to sew to the head. Do not stuff.
Body Shield
Start with brown color. Turn the piece after each row.
Make 11 chains.
- Row 1: Start on the second chain from the hook; 10 sc (10)
- Row 2: 1 ch, inc, 8 sc, inc (12)
- Row 3: 1 ch, 12 sc (12)
Crochet the bobble stitches in beige color from here on.
- Row 4: 1 ch, 1 sc, 1 bo, [2 sc, 1 bo] x 3, 1 sc (12)
- Row 5: 1 ch, 12 sc (12)
- Row 6: 1 ch, 1 sc, [2 sc, 1 bo] x 3, 2 sc (12)
- Row 7: 1 ch, 12 sc (12)
- Row 8: 1 ch, 1 sc, 1 bo, [2 sc, 1 bo] x 3, 1 sc (12)
- Row 9: 1 ch, 12 sc (12)
- Row 10: 1 ch, 1 sc, [2 sc, 1 bo] x 3, 2 sc (12)
- Row 11: 1 ch, 12 sc (12)
- Row 12: 1 ch, 1 sc, 1 bo, [2 sc, 1 bo] x 3, 1 sc (12)
- Row 13: Skip first st, 9 sc, dec (10)
- Row 14: Skip first st, 1 sc, 1 bo, [2 sc, 1 bo] x 2, 1 sc (9)
Assembly
Press the head against the body and sew it in place, starting from the round with the back loops. Position the head on rounds 6–11 of the body.
Attach the tail to the body from round 6, centered at the back, adding stuffing before closing it up completely.
Sew two legs to each side of the body between rounds 9 and 10, leaving about 5–6 stitches between them. Make sure the toes point forward.
Attach the head shield starting where the beige color meets the green, running down to the neck. Place the body shield right where the head shield ends, continuing to the tail. Finally, sew the horns to the sides of the head, two per side, with the top horn at the edge of the head shield and the second one a stitch below.
Customization and Variation
- Swap Moss and Wheat for pastel shades to create a softer, nursery-friendly dino
- Use fingering weight yarn and a 1.75 mm hook to crochet the mini version as a keychain or ornament
- Add a contrasting belly patch in a lighter shade for extra visual depth
- Try safety eyes in different sizes to change the dino’s expression
- Skip the horns and lengthen the body shield spikes for a stegosaurus-inspired look
Common Mistakes
- Forgetting to switch colors before the bobble stitch, which throws off the leg pattern
- Understuffing the head, leaving it soft instead of firm and rounded
- Placing the security eyes too close together, which changes the dino’s expression
- Skipping the back-loop-only instruction, resulting in a lumpy closure at the head or leg tops
- Attaching the legs unevenly, causing the finished toy to tip over
Finishing Tips
- Steam-block the body shield lightly before attaching it for a flatter, neater fit
- Use a longer yarn tail when closing rounds so there’s enough length for seaming later
- Weave in ends securely with a few backstitches to prevent unraveling over time
- Brush the fibers gently on acrylic yarn sections for a slightly fluffier finish
- Double-check eye placement with pins before sewing anything permanently
Gifting Ideas
- Pair the mini version with a keychain clasp for a thoughtful stocking stuffer
- Wrap the finished dino in tissue paper with a handwritten care tag for baby showers
- Bundle several color variations together as a dinosaur family gift set
- Attach a small ribbon and tag for birthday party favors
- Include a care card with washing instructions for a polished, gift-ready presentation
Important Remarks
- Selling or gifting finished items made from this pattern is allowed for private use, provided the designer is always credited
- Reach out to the designer directly through Instagram before translating this pattern into another language
Conclusion
This Crochet Dino Amigurumi proves that a slightly intimidating-looking project can come together one round at a time. Between the bobble stitch shields and the color-changing legs, there’s enough variety here to keep any crocheter engaged from start to finish. Take it step by step, follow the stuffing and placement notes closely, and you’ll end up with a sturdy, charming toy worth every stitch, no joke. Whether it sits on a shelf, joins a growing dino family, or heads off as a gift, this little guy is built to be loved for years. Grab your hook, pick your colors, and get stitching.