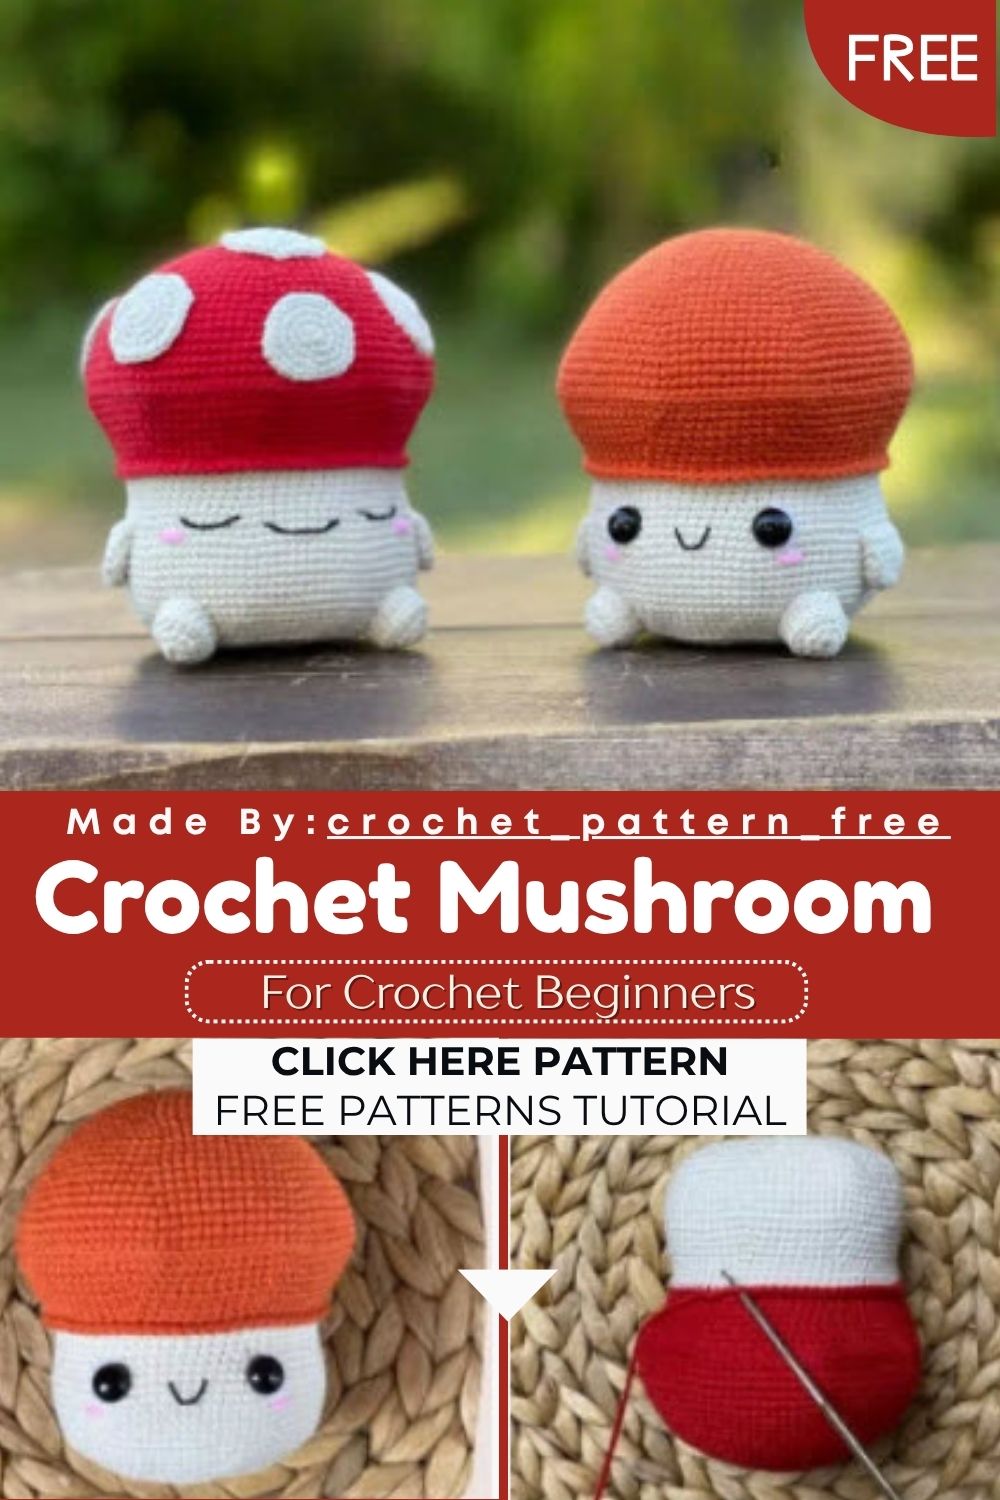
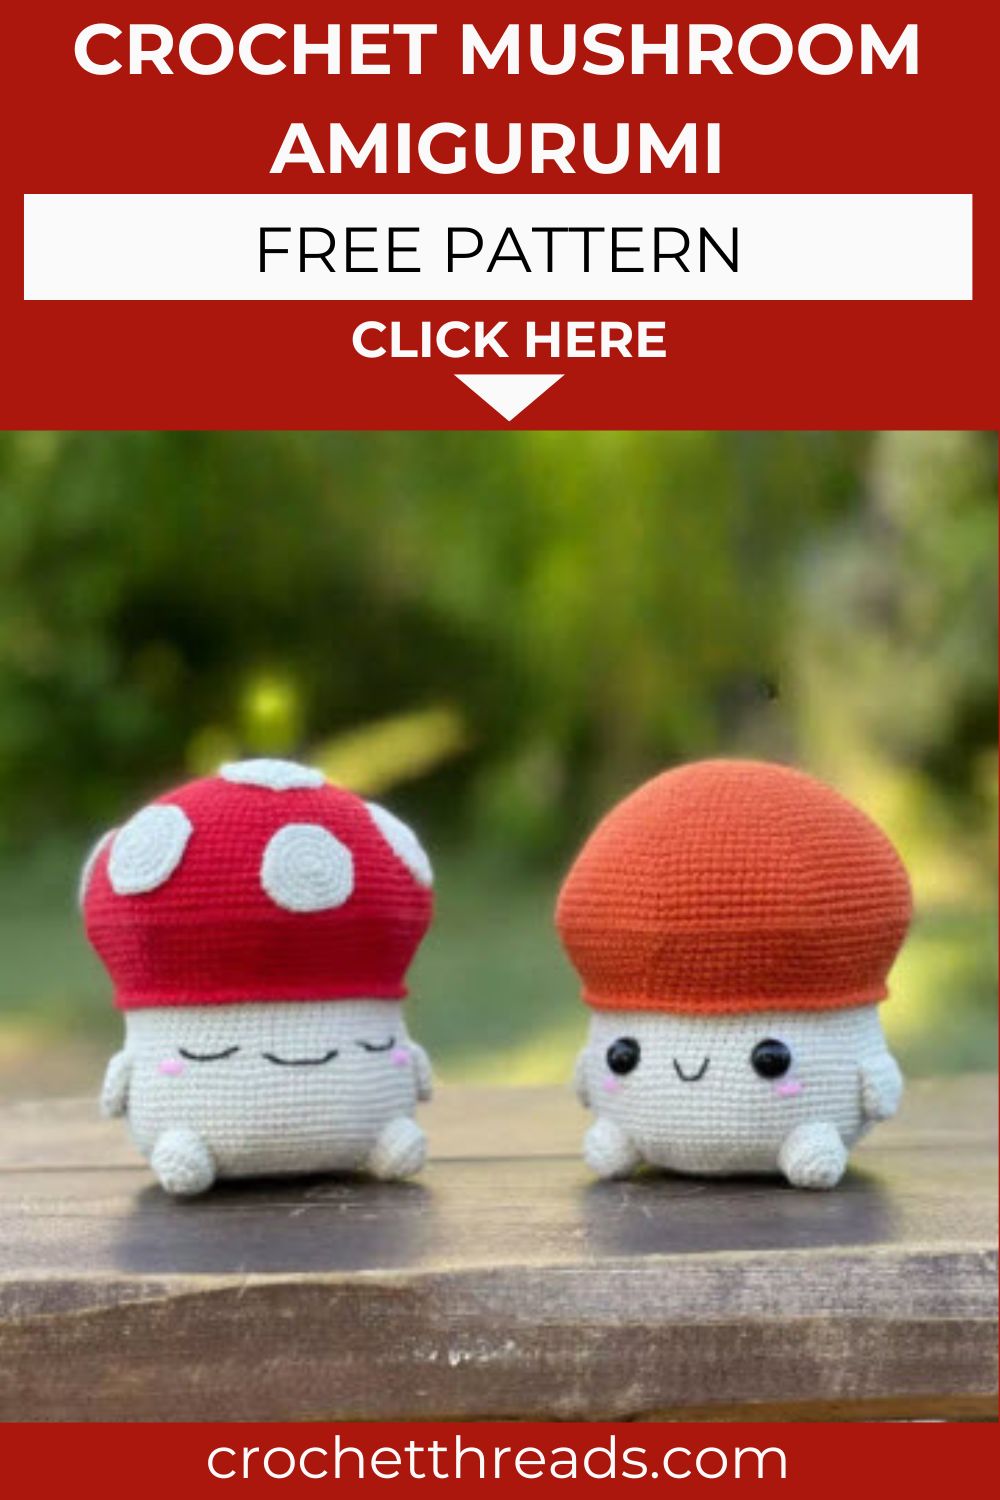
Create a Crochet Mushroom Amigurumi Pattern for Fall Decor
Cozy season just got cuter. This rosy-cheeked Crochet Mushroom Amigurumi Pattern packs a red cap, white spots, and the sweetest little smile into one 11 cm friend. It stitches up fast, looks adorable on any shelf, and makes the perfect handmade fall accent.
This Crochet Mushroom Amigurumi Pattern shapes an adorable mushroom character with a domed red cap and a soft white body all worked as one continuous piece. A stitched smile, pink cheeks, little arms, legs, and optional white spots finish the look.
It’s a fun crochet tutorial that uses only basic stitches from start to end. That makes it one of those handmade crochet ideas you can gift, sell, or keep as part of your seasonal decor. The shaping is repetitive and relaxing, so the whole make feels meditative.
It’s a fun crochet pattern that uses only basic stitches from start to end. That makes it one of those handmade crochet ideas you can gift, sell, or keep as part of your seasonal decor. The shaping is repetitive and relaxing, so the whole make feels meditative.
Skill Level
This pattern sits at the advanced beginner to intermediate level. The stitches stay simple, but the piece runs about 60 rounds, so it takes patience and steady counting. If you can work a magic ring, single crochet, and increase or decrease, you’re fully ready.
New to amigurumi but comfortable with the basics? This is a great project to grow your confidence on.
Required Materials and Supplies
Gather everything before you cast on. Having your tools close keeps the stitching smooth and stress-free.
Yarn Type
- YarnArt Jeans (or any similar sport/DK weight cotton-blend yarn) in red and white
- A small amount of brown or black thread for the smile
- A small amount of pink thread for the cheeks
YarnArt Jeans gives crisp, even stitches and a lovely matte finish. Its cotton-acrylic blend feels soft yet holds its shape, which is ideal for amigurumi.
Hook Size
- A 2.0 mm crochet hook
The small hook keeps your stitches tight and dense. Tight stitches stop the stuffing from peeking through any gaps.
Extra Tools
- Fiberfill stuffing
- Safety eyes, 8 mm
- A needle for sewing pieces together
- Sewing pins to hold parts in place
- Sharp scissors
Finished size: about 11 cm tall.
Crochet Stitches and Abbreviations Used
This mushroom relies on a small set of friendly basics. Here’s your quick reference:
- MR – magic ring
- Rnd – round
- sc – single crochet
- inc – increase (2 sc in one stitch)
- dec – decrease (2 stitches worked together)
- FLO – crochet through front loops only
- BLO – crochet through back loops only
The number at the end of each round, like (24), is your total stitch count. Check it often so your shape stays on track.
Step-by-Step Crochet Instructions
Work in continuous spirals unless noted. Place a stitch marker in the first stitch of every round so you never lose your spot.
Crocheting the Red Cap (Rnds 1–32)
Start with your red yarn for the cap.
- Rnd 1: 8 sc in MR (8)
- Rnd 2: 8 inc (16)
- Rnd 3: (1 sc, inc) x8 (24)
- Rnd 4: (2 sc, inc) x8 (32)
- Rnd 5: (3 sc, inc) x8 (40)
- Rnd 6: (4 sc, inc) x8 (48)
- Rnd 7: 48 sc (48)
- Rnd 8: (5 sc, inc) x8 (56)
- Rnd 9: 56 sc (56)
- Rnd 10: (6 sc, inc) x8 (64)
- Rnd 11: (7 sc, inc) x8 (72)
- Rnd 12: (8 sc, inc) x8 (80)
- Rnd 13: (9 sc, inc) x8 (88)
- Rnd 14 to 16: 88 sc (88)
- Rnd 17: (10 sc, inc) x8 (96)
- Rnd 18: 96 sc (96)
- Rnd 19: (11 sc, inc) x8 (104)
- Rnd 20: 104 sc (104)
- Rnd 21: (12 sc, inc) x8 (112)
- Rnd 22 to 24: 112 sc (112)
- Rnd 25: BLO: 112 sc (112)
- Rnd 26: (12 sc, dec) x8 (104)
- Rnd 27: (11 sc, dec) x8 (96)
- Rnd 28: (10 sc, dec) x8 (88)
- Rnd 29: 88 sc (88)
- Rnd 30: (9 sc, dec) x8 (80)
- Rnd 31: 80 sc (80)
- Rnd 32: (8 sc, dec) x8 (72)
Switching to the White Body (Rnds 33–48)
Now switch colors for the body. Don’t cut the red yarn. Leave it hanging on the outside, because you’ll use it again later for the cap edge. Continue with white yarn.
- Rnd 33: BLO: 72 sc (72)
- Rnd 34 to 36: 72 sc (72)
- Rnd 37: (8 sc, inc) x8 (80)
- Rnd 38: 80 sc (80)
- Rnd 39: (9 sc, inc) x8 (88)
- Rnd 40: 88 sc (88)
- Rnd 41: (10 sc, inc) x8 (96)
- Rnd 42 to 48: 96 sc (96)
Insert the safety eyes between Rnd 39 and Rnd 40, leaving 11 stitches between them. Start stuffing now and keep adding fiberfill as you close the body.
Shaping and Closing the Body (Rnds 49–60)
- Rnd 49: (10 sc, dec) x8 (88)
- Rnd 50: (9 sc, dec) x8 (80)
- Rnd 51: (8 sc, dec) x8 (72)
- Rnd 52: (7 sc, dec) x8 (64)
- Rnd 53: BLO: 64 sc (64)
- Rnd 54: (6 sc, dec) x8 (56)
- Rnd 55: (5 sc, dec) x8 (48)
- Rnd 56: (4 sc, dec) x8 (40)
- Rnd 57: (3 sc, dec) x8 (32)
- Rnd 58: (2 sc, dec) x8 (24)
- Rnd 59: (1 sc, dec) x8 (16)
- Rnd 60: 8 dec (8)
Close the small hole at the bottom. The easiest way is to weave your tail through the remaining front loops, then pull tight. If you prefer, you can sew it flat instead. Either works.
Adding the Cap Edge
Go back to the red yarn you left hanging earlier. Crochet 72 sc around the free front loops from Rnd 32. This creates the cute overhanging lip of the mushroom cap. Fasten off and weave in the end.
Making the Face
Use brown thread to embroider a soft, curved smile under the eyes. Then add two small pink circles for cheeks, one on each side of the smile. Keep your stitches gentle so the face stays sweet and round.
Honestly, this is where your mushroom gets all its personality. Take your time and the expression will look just right.
Crocheting the Legs (Make 2)
Use white yarn.
- Rnd 1: 6 sc in MR (6)
- Rnd 2: 6 inc (12)
- Rnd 3: (1 sc, inc) x6 (18)
- Rnd 4: BLO: 18 sc (18)
- Rnd 5: 18 sc (18)
Stuff the legs slightly. Leave a long tail for sewing.
Crocheting the Arms (Make 2)
Use white yarn.
- Rnd 1: 6 sc in MR (6)
- Rnd 2: 6 inc (12)
- Rnd 3 to 5: 12 sc (12)
Don’t stuff the arms. Fold each one flat and crochet 5 sc through both loops together to close. Leave a long tail for sewing.
Making the Spots (Make 7, Optional)
Use white yarn. These spots are optional but add classic toadstool charm.
- Rnd 1: 8 sc in MR (8)
- Rnd 2: 8 inc (16)
- Rnd 3: (1 sc, inc) x8 (24)
- Rnd 4: (2 sc, inc) x8 (32)
Fasten off and leave a tail for sewing.
Assembly and Finishing
Now bring your mushroom to life.
- Sew the legs between Rnd 46 and Rnd 52, leaving 20 stitches between them.
- Place the arms between Rnd 40 and Rnd 41, about 8 stitches out from each eye, then sew them on.
- Pin the white spots across the red cap and stitch each one down evenly.
- Weave in all loose ends and trim them close.
Your cozy crochet mushroom friend is ready to decorate. The hardest part now is deciding where to display it.
Helpful Beginner Tips
A few small habits make a big difference in your finished mushroom.
- Keep stitches tight. The 2 mm hook builds a dense fabric that hides the stuffing.
- Count every round. A quick stitch count catches mistakes before they grow.
- Stuff in small amounts. Add fiberfill little by little for a smooth, lump-free shape.
- Use a stitch marker. Moving it up each round keeps you from losing your place in the spiral.
Take your time through the long cap rounds. Slow, steady stitching gives the smoothest dome.
Common Mistakes and Solutions
Even simple projects come with little hiccups. Here’s how to fix the usual ones.
- Problem: Stuffing shows through the stitches. Solution: Work tighter and double-check your hook size. Snug stitches close those gaps fast.
- Problem: The body leans or looks lumpy. Solution: Stuff in small, even layers and press the filling into shape as you close.
- Problem: The cap edge looks loose or wavy. Solution: Keep your red FLO round even, and don’t pull the stitches too tight or too loose.
- Problem: The eyes sit crooked. Solution: Place them before you stuff, count the 11-stitch gap carefully, and check from the front before locking the backs.
Mistakes are just part of learning. Frog a round if you need to and try again. No shame in a do-over.
Pattern Customization Ideas
This little mushroom loves a creative twist. Play around and make it yours.
- Swap the red cap for warm fall shades like pumpkin orange, deep burgundy, or mustard gold.
- Add a tiny crochet leaf or vine for a woodland touch.
- Stitch a small bow or felt collar for extra cuteness.
- Use speckled or heathered yarn for a foraged, earthy feel.
- Skip the spots for a clean, modern look.
Mix these ideas to build a whole mushroom family. Each one ends up a little different, and that’s the joy of handmade.
Size and Color Suggestions
As written, this mushroom finishes around 11 cm tall using YarnArt Jeans and a 2 mm hook. You can easily scale it:
- Mini version: Use a 1.75 mm hook and fingering weight yarn.
- Standard version: Stick with the 2 mm hook and Jeans yarn, as written.
- Larger version: Use worsted weight yarn and a 3.5 mm hook for a cuddly, huggable size.
For colors, the classic red cap with white spots always wins. But fall opens the door to so much more:
- Warm pumpkin orange with cream spots
- Deep burgundy with gold dots
- Soft sage green for a mossy woodland look
- Speckled tan and brown for a realistic foraged feel
Frequently Asked Questions
Is this a good Crochet Mushroom Amigurumi Patternfor beginners?
It’s best for advanced beginners. The stitches stay simple, but the piece is long, so steady counting helps. If you’ve made a few amigurumi before, you’ll feel right at home.
What is the best yarn for Crochet Mushroom Amigurumi Pattern?
A cotton-blend yarn like YarnArt Jeans works beautifully. It gives crisp, even stitches and holds its shape well. Pure cotton or acrylic also work, so pick whichever feels best for you.
How long does this project take?
Most crocheters finish this mushroom in two to four hours, depending on speed and breaks. The cap and body take the most time, while the small pieces stitch up fast.
Can I sell items made from this pattern?
Many crocheters happily sell their finished handmade pieces at markets and online. Just use your own photos and listings, and credit the pattern designer where it’s appropriate.
Conclusion
There’s something deeply calming about stitching a Crochet Mushroom Amigurumi Pattern on a crisp autumn day. This crochet pattern gives you a cozy, characterful make that fits right into your fall decor. The stitches are simple, the yarn is soft, and the rosy-cheeked result is full of charm.
So grab your 2 mm hook, pick your favorite shades, and cast on your first mushroom friend. Then make a whole cluster for shelves, gift baskets, and seasonal displays. When yours is done, snap a photo and share your work so other makers can cheer you on.