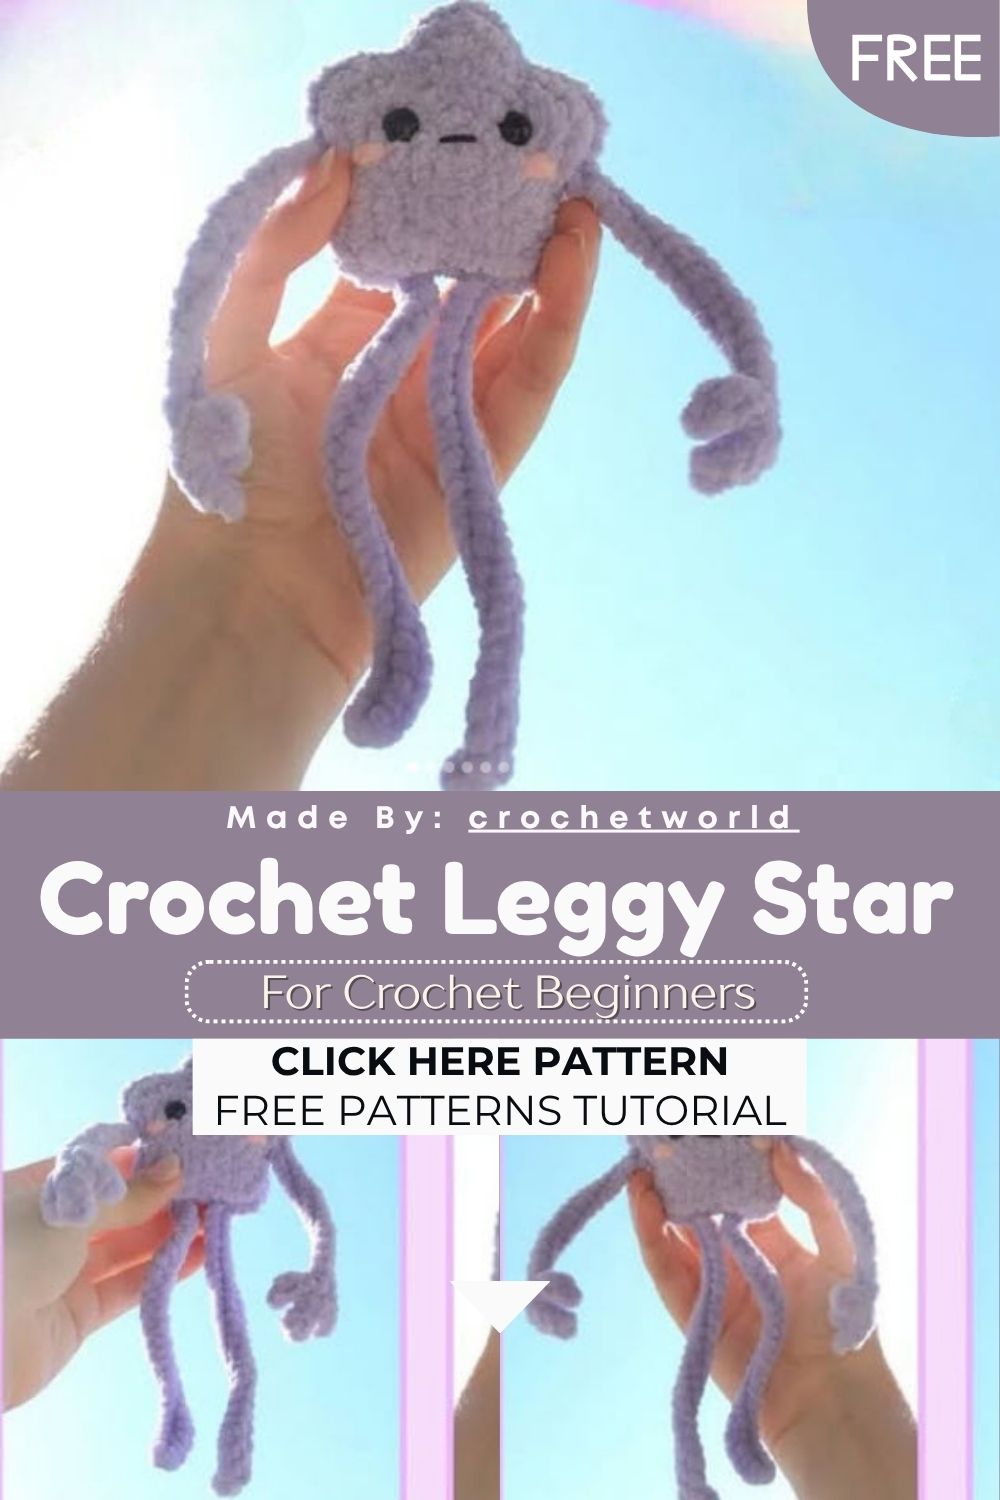
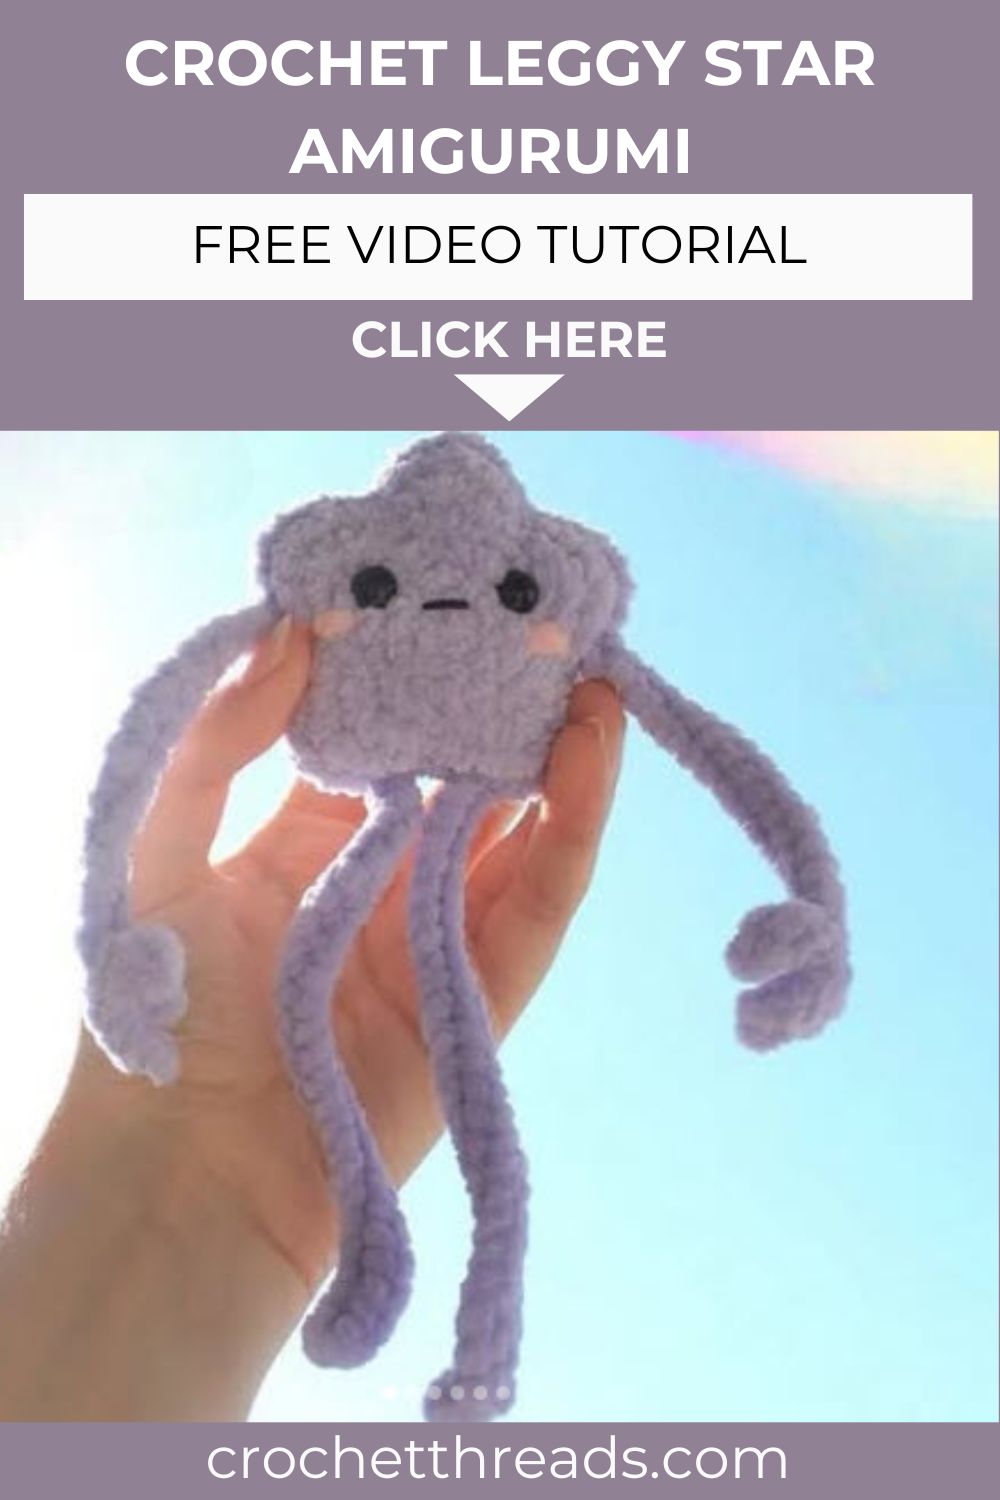
Adorable Crochet Kawaii Leggy Star Amigurumi Pattern
Get ready to fall for this little Crochet Kawaii Leggy Star. It has dangly arms, wobbly legs, and a squishy chenille body. The whole thing is quick and beginner-friendly. Best of all, you won’t want to stop at just one.
Some crochet projects just make you smile. This Crochet Kawaii Leggy Star is one of them. It works up fast, from the first round to the final blush. You only need a few simple stitches to finish it. That makes it great for beginners. It’s also a cozy little make for a slow afternoon. Grab your hook and let’s dive in.
Pattern Overview
- This is a quick, flat amigurumi. You make two star shapes and sew them together. There’s no working in the round.
- Each star is one spiral that flares into five points. Slip stitches, single crochets, and clusters do the shaping.
- The arms and legs are simple chains worked back on themselves. That gives the star its dangly limbs.
- You stuff the star lightly while sewing the halves shut. So there’s no fiddly closing at the end.
- The face really makes it. Two safety eyes, a small smile, and a blush bring it to life.
- It’s small and flat, so it works up fast. It also uses very little yarn. Perfect for scraps.
- This is a forgiving first amigurumi too. Small wobbles just look like a handmade charm.
- The shape is the same on both sides. So there’s no right or wrong way to hold it.
- One star uses about a handful of yarn. You can make a few in an evening.
Why You’ll Love This Pattern
- It’s fast. Most people finish in under an hour.
- It’s cheap. A few yarn scraps are all you need.
- It’s beginner-safe. There are no tricky stitches anywhere.
- It’s giftable. Kids and adults both adore it.
- It’s flexible. Every new color gives a fresh look.
Skill Level
This is a true beginner project. You’ll need a magic ring, single crochet, chain, and slip stitch. Know those four? Then you’re fully ready to make this little star.
Materials
- Chenille yarn (any color you like)
- Scissors
- A black cotton strand (for the smile)
- Stuffing/polyfill
- 4.5mm crochet hook
- Sewing needle
- 8mm safety eyes
- Stitch marker
Abbreviations
- MR — magic ring
- 3sc-inc — 3 single crochet in one stitch
- sc — single crochet
- ch — chain/chains
- slst — slip stitch
- inc — increase
Special Techniques
- Magic ring (MR): Each star starts here. It pulls the center tight, so no hole is left behind.
- 3sc-inc cluster: You work three single crochets into one stitch. This shapes the curves on each point.
- 5sc in one stitch: This bigger cluster forms the sharp tip. It fans the fabric out into a point.
- Slip-stitch shaping: The slip stitches sit between the clusters. They pull the valleys in and keep the star crisp.
- Chain limbs: The arms and legs are just chains. You slip-stitch back along them to make dangly bits.
- Tail tying: You don’t sew each limb on. Instead, you push the tails inside and knot them together.
The Pattern
The Star (make 2)
- R1: 5sc in a MR (5)
- R2: 5 in (10)
- R3: (1sc, inc) × 5 (15)
- R4: (slst, 3sc-inc, slst) × 5 (25)
- R5: (slst, 1sc, 3sc-inc, 1sc, slst) × 5 (35)
- R6: (slst, 2sc, 5sc in the same st, 2sc, slst) × 5 (55)
Fasten off the first star. No need to leave a long tail. Make a second one. This time, leave a long tail for sewing the two parts together.
Hands × 2
Chain 20. Starting from the 2nd chain from the hook:
- 3 slst, (ch 4, 3 slst down the chain) × 2, 16 slst down the chain.
Fasten off. Leave a little tail for inserting into the body.
Legs × 2
Chain 24. Starting from the 2nd chain from the hook:
- 2sc, inc, 20 slst down the chain.
Fasten off. Leave a little tail for inserting into the body.
Assembly
- Hold both star halves together. Start sewing around the edge with a whip stitch.
- After a few stitches, add the safety eyes. Place them between rows 3–4, about 4 stitches apart.
- When you reach the halfway point, start stuffing the star.
- Keep adding small bits of stuffing as you sew the rest of the way.
- Before you close it up, push the arm and leg tails inside. Then tie the two tails together to hold them.
- Quick placement guide: Arm 1 and Arm 2 go on the top points. Leg 1 and Leg 2 hang from the bottom.
- Finish with a little smile between the eyes. Add a soft blush to each cheek, like in the photo.
Color & Style Ideas
- Classic yellow gives that timeless twinkly-star look. Everyone loves it.
- Soft pastels like pink, mint, or lilac feel dreamy and nursery-friendly.
- Rainbow set: make a few in different shades. Hang them as a garland or mobile.
- Sparkle yarn: a little shimmer makes the star feel extra magical.
- Mismatched limbs: try arms and legs in a contrast color for a playful twist.
Beginner Tips
- Use a lighter yarn color for your first try. Mistakes are easier to spot.
- Keep your tension loose and even. Tight stitches make the shaping hard.
- Count out loud as you go. It really helps with the cluster rounds.
- Take breaks if your hands get tired. Chenille can be slippery to hold.
- Lay your pieces flat as you finish them. This keeps the points neat.
Common Mistakes to Avoid
- Losing your stitch marker. The star is worked in a spiral. Drift off your start point, and the points go uneven.
- Pulling slip stitches too tight. Tight slip stitches make the star curl. You want it flat and full.
- Adding the eyes too late. Once both halves are sewn, you can’t reach the backs. So set them early.
- Over-stuffing. A little filling goes a long way. Too much flattens those crisp points.
- Forgetting the long tail. Only the second star needs one. Don’t snip it short by habit.
- A crooked smile. Hold the smile and blush in place first. Check the balance before you commit.
Important Remarks
- Watch the stitch counts in brackets. They help you catch a mistake early.
- Chenille yarn splits easily. Work slowly so you don’t snag the pile.
- A 4.5mm hook keeps the fabric tight. No stuffing peeks through the seams.
- Count your chains before slip-stitching back. It saves a lot of re-dos on the limbs.
- This is a free pattern for personal use. You can sell the stars you make. Just don’t repost or resell the pattern itself.
- Are your points a bit soft? A light steam block sharpens them right up.
- Take your time with the whip stitch. Small, even stitches give a neat edge.
Display & Gift Ideas
- Clip one to a backpack or a keychain.
- Sit a few on your desk or windowsill.
- String several together into a cute nursery garland.
- Pop one inside a card for a quick gift.
- Stack a handful in a jar for a cozy shelf.
Conclusion
And just like that, your little Crochet Kawaii Leggy Star is done! This one is hard to stop at. The colors, the wobbly legs, that smiling face you’ll want a whole set. Don’t worry if your first look a bit off. That’s part of the fun. Crochet Kawaii Leggy Star always looks right once the eyes and blush go on. Small projects like this are fun to play with too. Switch the yarn. Change the limb length. Give each star its own face. Then line them up and watch them smile back. Hang one on a bag. Line a few on a shelf. Tuck one into a gift box for someone who needs a smile. Either way, you just turned yarn into pure handmade joy.