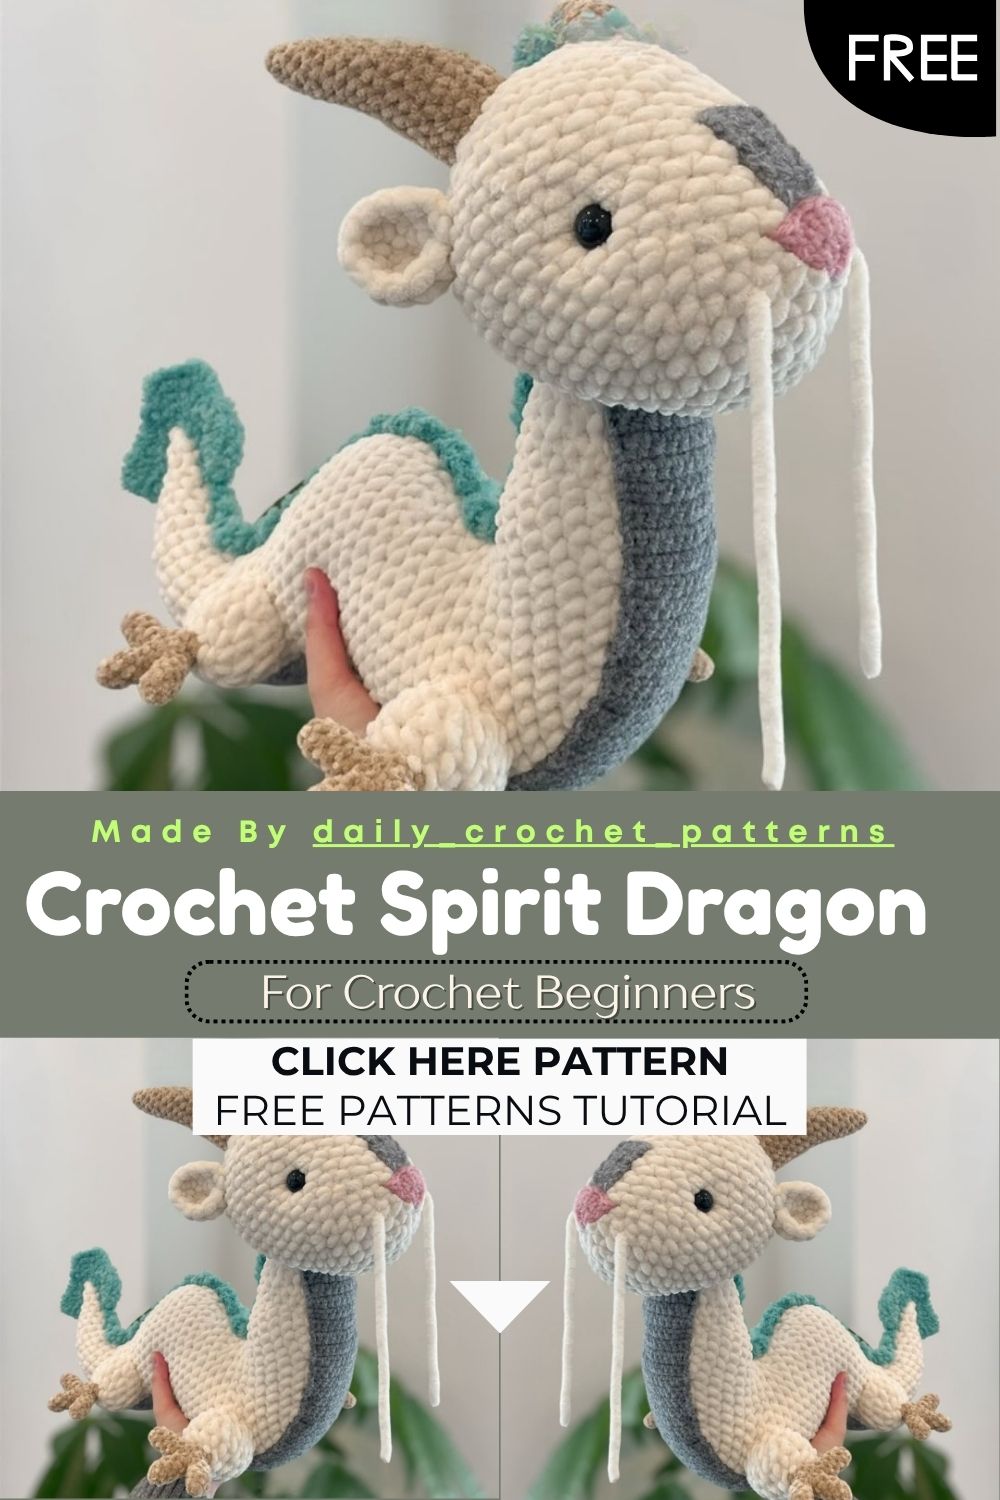
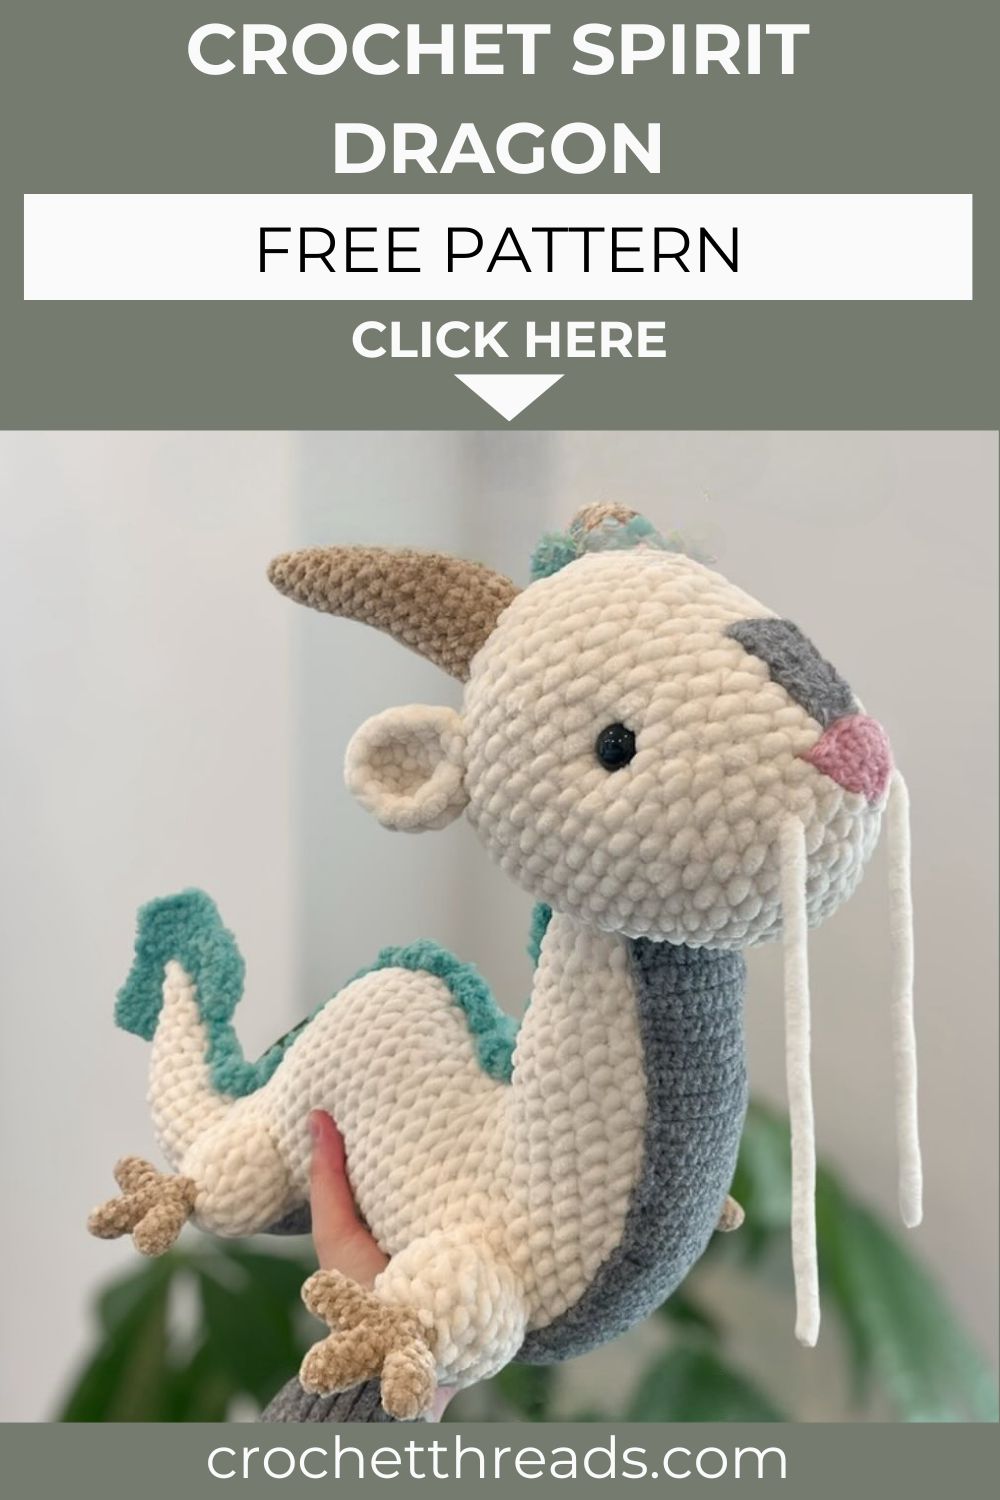
Handmade Crochet Spirit Dragon – Free Amigurumi Pattern
White, whimsical, and wonderfully detailed, this spirit dragon amigurumi is the most magical handmade creature you will ever bring to life!
Dragons have always lived at the intersection of imagination and craft. This spirit dragon pattern brings that magic into your hands with a white chenille body, soft turquoise fuzzy hair, beige horns with two styling options, a gentle grey muzzle and belly, a pink nose, three-fingered beige hands, and long flowing whiskers. Every element of this dragon is worked separately and assembled with care. The result is a large, detailed amigurumi that feels genuinely sculptural rather than simply stuffed. The hair flows from head to tail, the horns can stand upright or sweep sideways, and the belly panel drapes naturally against the front of the body for a finished piece that looks like it floated straight out of a fantasy illustration.
Skill Level
Intermediate to advanced. This pattern involves multiple yarn weights, multiple hook sizes, and a large number of separate pieces assembled. Additionally, the three-fingered hand construction and adjustable belly panel introduce techniques that reward patience and careful reading.
Materials You Will Need
Yarn:
- Himalaya Koala chenille fuzzy size 5 in turquoise — for hair and tail tip
- Lion Brand Pound of Love wool size 4 in grey — for belly and muzzle
- Acrylic size 5 in pink — for nose
- Loops and Threads chenille size 6 in white — for body, ears, head, and legs
- Loops and Threads skinny chenille size 4 in beige — for hands and horns
Hook Sizes:
- 5mm for size 6 white chenille yarn
- 3mm for acrylic, wool, and skinny chenille yarn
- 4mm for fuzzy turquoise yarn
Other Supplies:
- Safety eyes — 15mm
- Stitch markers
- Scissors
- Tapestry needle
- Stuffing
Note: Make the body, head, ears, and feet in white from the original Sky Dragon pattern before starting this variation. Consider adding a small weight inside the tail to balance the finished dragon, as the large head can make the piece slightly top-heavy.
Abbreviations
- MR — Magic Ring
- ST / STS — Stitch / Stitches
- SC — Single Crochet
- INC — Increase (2 sc in same stitch)
- CH — Chain
- SLST — Slip Stitch
- DEC — Invisible Decrease
- FO — Fasten Off, cut yarn, and weave in ends unless otherwise stated
Pattern: Nose
Using pink acrylic yarn and 3mm hook
Row 1: Ch 2, inc into 1st ch (2) Row 2: Ch 1 and turn, inc into each stitch (4) Row 3: Ch 1 and turn, inc, sc 2, inc (6) Row 4: Ch 1 and turn, inc, sc 4, inc (8)
Fasten off, leaving a long tail for sewing. Sew the nose onto rounds 1–3 of the head at the center front.
Pattern: Muzzle
Using grey yarn and 3mm hook
Row 1: Ch 4, sa tarting from the second ch from hook: sc 1, inc, sc 1 (4) Row 2: Ch 1 and turn, sc 2, inc, sc 1 (5) Row 3: Ch 1 and turn, sc 2, inc, sc 2 (6) Row 4: Ch 1 and turn, sc 2, inc, sc 3 (7) Row 5: Ch 1 and turn, sc 3, inc, sc 3 (8)
Fasten off, leaving a long tail for sewing. Sew the muzzle onto rounds 4–8 of the head, centered below the nose.
Pattern: Horns Make 2
Using beige skinny chenille and a 3mm hook
R1: 4 sc into MR (4) R2: (sc, inc) x2 (6) R3: (sc 2, inc) x2 (8) R4: sc around (8) R5: (sc 3, inc) x2 (10) R6–7: sc around for 2 rounds (10) R8: (sc 4, inc) x2 (12) R9: sc around (12)
Stuff as you go from this point.
R10: (sc 5, inc) x2 (14) R11: sc around (14) R12: (sc 6, inc) x2 (16) R13–15: inc 2, sc 5, dec 2, sc 5 for 3 rounds (16) R16: (sc 7, inc) x2 (18)
Horn Style Options
Option A Standing Upright: R17–19: sc around for 3 rounds (18)
Option B Swept to the Side: R17–19: inc 2, sc 6, dec 2, sc 6 for 3 rounds (18)
Fasten off, leaving a long tail for sewing. Refer to the original Sky Dragon pattern for exact horn placement on the head.
Pattern: Hands Make 4
Using beige skinny chenille and a 3mm hook
Each hand requires 3 fingers worked first.
Fingers Make 3 per Hand
R1: 6 sc into MR (6) R2–5: sc around for 4 rounds (6)
Fasten off the first 2 fingers. Do not fasten off the 3rd finger — continue directly to R6 to build the hand.
Hand Construction
R6: 3 sc in finger 3, join yarn into finger 2 and work 3 sc, join into finger 1 and work 6 sc, join back into finger 2 and work 3 sc, join into finger 3 and work 3 sc (18)
R7: 1 dec, 5 sc, 2 dec, 5 sc, 1 dec (14) R8: 1 dec, 3 sc, 2 dec, 3 sc, 1 dec (10) R9: (3 sc, 1 dec) x2 (8) R10: sc around (8)
Fasten off, leaving a long tail for sewing onto the feet. Sew onto the first and second rows of the feet in any orientation you prefer. Sew the gaps between the fingers closed after assembly. These hands do not need stuffing; the excess yarn from each fastened-off finger can be tucked inside instead.
Pattern: Hair
Using fuzzy turquoise size 5 yarn and 4mm hook
Join yarn into the head at round 11 or 12, approximately 1 row behind the eyes and 4 rows behind the muzzle.
Join with a slip stitch, then: sc into next head stitch, ch 2, sc into next head stitch. Continue working (ch 2, sc into next head stitch) along the top of the head and down the back of the body until reaching approximately round 5 of the body near the tail edge.
Fasten off and weave in ends.
The tail tip is worked in the same fuzzy turquoise yarn using the same construction as the original Sky Dragon tail tip.
Pattern: Whiskers
Cut approximately 36 inches (90cm) of white size 6 yarn. Pull it through the head directly underneath the nose so equal lengths extend on both sides.
Trim each end to your preferred whisker length. Burn the ends very lightly to prevent shedding and fraying over time.
Pattern: Belly
Using grey size 4 wool and 3mm hook
Leave a long tail at both the beginning and end for sewing. The belly dimensions will vary slightly based on individual tension, yarn, and hook size.
The belly should start where the head meets the neck and end at approximately round 10 of the 10th rib, the 10th rib, flat against the front.
Row 1: Ch 10, starting from the 2nd ch: sc 9 (9) Rows 2–3: Ch 1 and turn, sc 9 for 2 rows (9) Row 4: Ch 1 and turn, sc 4, inc, sc 4 (10) Rows 5–7: Ch 1 and turn, sc 10 for 3 rows (10) Row 8: Ch 1 and turn, sc 5, inc, sc 4 (11)
Continue adding rows with increases or decreases in the middle of each row as needed to match the width of the body at each point. The original creator worked approximately 100 rows total. Add or remove rows as necessary to fit your specific finished dragon.
Sew the completed belly panel onto the front of the assembled dragon, pinning it carefully before committing to any stitches.
Assembly
Assemble all finished pieces in the following order for the most manageable construction process. First, attach the nose and muzzle to the head. Then add the safety eyes between rounds 11 and 12. Next, attach the horns and ears to the top of the head following the original Sky Dragon placement guide. Sew the head securely onto the body. Attach all four feet and then sew the hands onto the feet. Work the hair from head to tail tip. Finally, you sew the belly panel flat against the front and add the whiskers last.
Customization and Variation Ideas
- First, change the hair color from turquoise to soft pink or gold for a completely different spirit dragon personality, ty uusingthe samee construction throughout.
- Additionally, use Option B horns swept sideways for a more relaxed, resting dragon expression that photographs beautifully from a side angle.
- Moreover, add small crocheted clouds worked in white fuzzy yarn and attach them loosely to the tail for a celestial, sky-floating effect that matches the spirit dragon theme perfectly.
- Furthermore, embroider closed sleepy eyes instead of using safety eyes for a softer, more peaceful expression that suits the gentle spirit dragon aesthetic beautifully.
- Also, try the belly panel in cream instead of grey for a warmer, more vintage-inspired color combination that photographs especially well in natural light.
- Finally, make a miniature version of just the head using fingering-weight yarn and a 2mm hook for a dragon head keychain or ornament using the same face construction at a much smaller scale.
Common Mistakes to Avoid
- First, starting the belly panel without pinning first: The belly dimensions vary with every maker. Always pin the panel in place and check the fit from front, side, and above before sewing a single stitch permanently.
- Additionally, forgetting to add a tail weight: This dragon is top-heavy by design. A small metal washer or smooth pebble placed inside the tail during construction makes a significant difference to how the finished dragon sits and displays.
- Also, fastening off all three fingers before building the hand: The third finger must not be fastened off. Continue directly from finger 3 into R6 of the hand. Fastening off early breaks the continuous construction and requires rejoining, which creates an untidy seam.
- Furthermore, using the wrong hook for each yarn section: This pattern requires three different hook sizes. Using the same hook throughout creates inconsistent stitch tension that makes the pieces look mismatched when assembled.
- Moreover, sewing the horns before the hair: The turquoise hair runs along the top of the head and back. Sewing horns first and then working hair around them is far more difficult than placing hair first and then positioning horns on top.
- Finally, burning the whisker ends too aggressively: A very light, quick pass over the yarn ends is all that is needed. Holding the flame too close melts the yarn into a hard, shiny bead rather than sealing the fibers cleanly.
Finishing Tips
- First, after full assembly, place the finished dragon on a flat surface and check that it can sit or lie in a balanced position. Adjust the tail weight if needed before the final seam is closed.
- Additionally, use a slicker brush very gently across the turquoise hair after assembly to fluff and separate the fuzzy fibers. This creates maximum volume and gives the hair a more flowing, ethereal appearance.
- Moreover, when sewing the belly panel, work from the neck downward rather than from the bottom up. Starting at the neck ensures the most critical visible seam sits cleanly where the head meets the body.
- Furthermore, photograph the finished dragon from a low angle,e looking slightly upward. This viewpoint emphasizes the dragon’s height, the flowing hair, and the delicate face details in a single dramatic image.
- Also, press the grey muzzle very gently with a slightly damp cloth after sewing to help it lie flat against the white head without puckering or curling at the edges.
- Finally, store the finished dragon lying on its side rather than standing upright. Prolonged upright display without internal support can cause the neck to bow forward gradually over time.
Gifting Ideas
- First, display the finished dragon coiled around a piece of driftwood or a decorative branch for a gift presentation that looks like a scene from a fantasy novel.
- Additionally, pair the dragon with a small illustrated card describing its name, magical powers, and the yarn colors used. This personal storytelling touch makes the gift feel like a complete handmade world.
- Moreover, these dragons make extraordinary gifts for fantasy fiction lovers, gaming enthusiasts, and anyone who appreciates genuinely skilled handmade work that goes far beyond standard amigurumi.
- Furthermore, make a matching smaller dragon using worsted-weight yarn for a worsted-weight-hatchling pair that displays together as a complete fantasy family scene.
- Also, commission a custom color version for a specific recipe, not a black and gold dragon, a blue and silver dragon, or a red and cream dragon; all use the same pattern with different yarn choices.
- Finally, these spirit dragons are premium sellers at fantasy conventions, pop culture craft markets, and handmade boutiques. The flowing hair, detailed hands, and large scale make them genuinely show-stopping display pieces.
Conclusion
This spirit dragon pattern is one of the most ambitious and rewarding amigurumi projects available to intermediate and advanced makers. The multiple yarn weights, the three-fingered hands, the flowing fuzzy hair, and the adjustable belly panel all work together to create a finished piece that looks like it took genuine skill and artistry to produce because it did. Therefore, read the entire pattern carefully before beginning, prepare all pieces before assembly, and take your time with the belly panel fitting. In addition, do not skip the tail weight. A balanced dragon is a dragon that can actually be displayed and appreciated properly. In conclusion, this spirit dragon is waiting to come to life in your hands. Every stitch is worth it.
Happy crocheting! Cannot wait to see your spirit dragon soar.