Brilliant Crochet Stray Kids Angel STAY Amigurumi Plush Fan Project
Today, I am sharing a cute K-pop-inspired plush that is easy to finish. This Crochet Stray Kids Angel Amigurumi is a small chibi angel doll with a round head, a pink bear-ear hood, tiny wings, and a little star wand, perfect as a STAY-themed handmade collectible.
In this post, I will walk you through a beginner-friendly way to create that chibi angel vibe: a round head, tiny body, a soft pink hood with bear-like ear bumps, little wings, and an adorable star wand accessory.
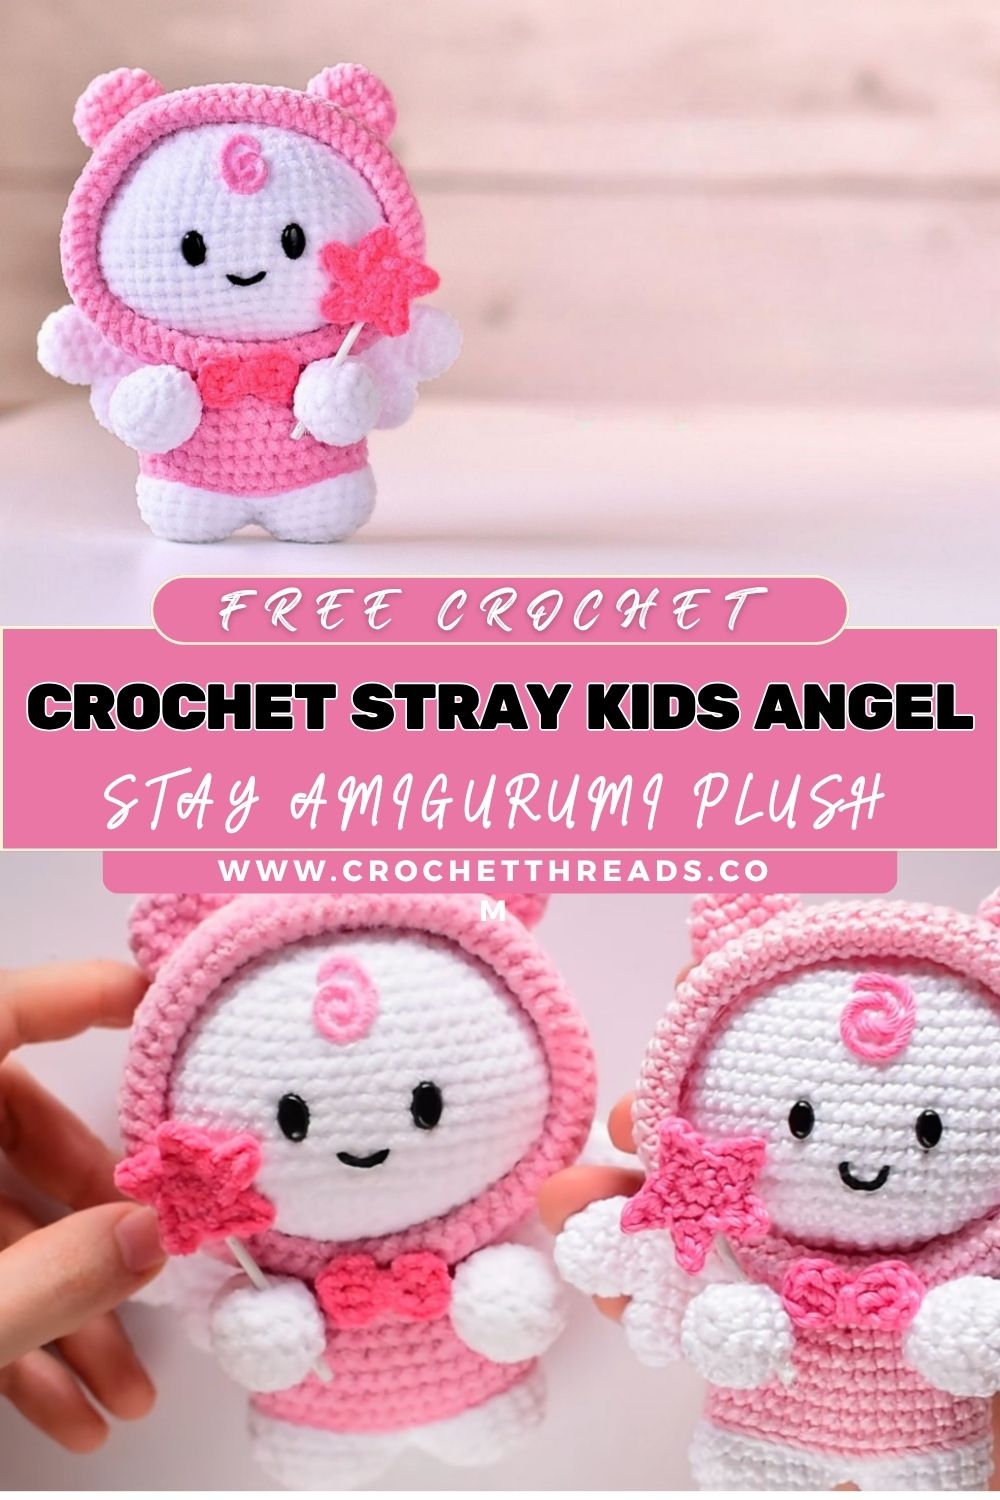
The outfit is one of the most charming parts. The angel wears a soft pink hooded look, and the hood has small, rounded ear bumps that give a bear-hood impression. Because the stitches are tight and smooth, the whole plush looks neat and clean, even if you are still building confidence with amigurumi.
Meanwhile, the back details are what complete the angel theme. Tiny wings sit behind the body, and the doll holds a small star wand, which instantly makes it feel like a magical mini mascot. If you enjoy making handmade gifts, this Crochet Stray Kids Angel Amigurumi works beautifully as a shelf plush, desk buddy, or a thoughtful fan-inspired present.
Materials Needed
Here is a practical yarn plan for one doll around 10 to 12 cm tall, using tight stitches and cotton yarn:
- Cotton yarn
- White: 25 g
- Light pink (hood and outfit): 20 g
- Bright pink (wand star and small accents): 5 g
- Black (face embroidery): 2 g
- Optional blush pink thread (or yarn strand): 1 g
- Hook size: 2.5 mm (for tight cotton look)
Optional for slightly larger plush: 3.0 mm to 3.5 mm - Fiberfill stuffing: 25 g
- Tools: tapestry needle, stitch markers, scissors
- Star wand support: 1 small stick or wire, 8 to 10 cm (toothpick-style stick works if not for small children)
- Optional: 6 mm to 8 mm safety eyes, or embroidered eyes if preferred
Skill Level
Beginner to easy intermediate. If you already know magic ring, single crochet, increases, and decreases, you will be comfortable. The shaping is simple, but placement and assembly take a little patience.
Time Planning at a Glance
- Head: 45 to 60 minutes
- Body: 35 to 50 minutes
- Accessories (hood, ears, wings, wand): 60 to 90 minutes
- Assembly and face details: 35 to 55 minutes
- Total time: 3 to 4.5 hours (depending on speed)
Sizing Tips
- Adjust yarn thickness: Cotton gives a smooth, firm plush. Thicker yarn makes a puffier look.
- Hook size impact: A smaller hook creates tighter stitches and a cleaner finish.
- Stitch tension: Keep your tension steady so the head stays round and the hood sits neatly without gaps.
Step-by-Step Instructions
Notes before you start:
- Work in continuous rounds unless noted.
- Use a stitch marker to track your first stitch.
- Abbreviations: MR (magic ring), sc (single crochet), inc (increase), dec (decrease), sl st (slip stitch), BLO (back loop only).
a. Head (Main Round Shape) | Making time: 45 to 60 minutes
- Start the round head: Make an MR and build a flat circle with increases until it is wide enough for a chibi face.
- Shape the dome: Next, crochet several even rounds with no increase,s so the head becomes rounded rather than flat.
- Begin closing: Then decrease evenly, spacing your decreases evenly around the head so it closes smoothly.
- Stuff gradually: Meanwhile, add small amounts of fiberfill as you go. Push stuffing to the cheeks to keep the face area softly rounded.
- Finish: Finally, close the opening neatly with a yarn needle and weave in the end.
b. Body (Including Outfit Base) | Making time: 35 to 50 minutes
- Make the legs first: Crochet two small, rounded leg pieces in white, then join them together to begin the lower body.
- Build the body tube: Next, continue upward with even rounds to form a tiny chibi torso.
- Add the outfit color: Later, switch to light pink for the outfit section. For a clean color change edge, you can add a round of slip stitches before continuing with single crochet.
- Shape the top: Finally, decrease slightly at the top so the body looks rounded and can be sewn securely under the head.
c. Hood with Ear Bumps | Making time: 35 to 55 minutes
- Crochet a hood shell: First, start with light pink and increase in rounds until the hood circumference fits around the head.
- Add height: Next, work several evenly spaced rounds to create the hood depth.
- Finish the edge: Later, make a final round with gentle shaping so the opening sits nicely around the face.
- Ear bumps: Finally, crochet two small, rounded “bear ears” and sew them near the top sides of the hood, slightly toward the back for a cute silhouette.
d. Arms and Legs | Making time: 20 to 30 minutes
- Arms: First, crochet two small, rounded arm pieces in white. Keep them simple so they look chibi and soft.
- Light stuffing: Next, add a tiny bit of stuffing, or leave them unstuffed for a flatter, cuter look.
- Placement: Later, attach the arms evenly on both sides of the body, ensuring they are at the same height.
e. Wings (Back Detail) | Making time: 25 to 40 minutes
- Make two small wings: First, crochet two small wing shapes with rounded “feather bumps.”
- Slight shaping: Next, use a few decreases so each wing narrows at the base.
- Attach neatly: Finally, sew them to the back so they are visible from the front edges, not hidden behind the body.
f. Star Wand Accessory | Making time: 15 to 25 minutes
- Crochet a tiny star: First, crochet a small five-point star using bright pink yarn.
- Prepare the stick: Next, cut your stick or wire to about 8-10 cm.
- Attach: Later, sew or glue the star to the top of the stick.
- Hold position: Finally, slide the wand into the hands area or stitch it in place to keep it secure for display.
g. Face Detailing | Making time: 20 to 35 minutes
- Eyes: First, place small safety eyes or embroider simple oval or dot eyes for a minimal kawaii style.
- Smile: Next, stitch a small curved smile centered under the eyes.
- Blush: Meanwhile, add soft blush with light pink thread, embroidery, or a tiny bit of cosmetic blush.
- Swirl detail: Finally, stitch a small swirl on the forehead, positioned above the eyes, curving downward to create a cute signature feature.
Assembly Instructions
- Attach head to body: First, stuff the body firmly and sew the head on straight.
- Fit the hood: Next, place the hood over the head and adjust the opening so the face is centered.
- Sew arms and wings: Meanwhile, sew arms evenly on the sides and wings on the back.
- Add wand: Later, position the star wand so it looks like the doll is holding it.
- Final shaping: Pinch and shape the plush gently, balancing the stuffing so it sits upright without leaning.
Basic Tips for Beginners
- Use a smaller hook than your yarn label suggests to prevent holes.
- Count stitches every round, especially after increases and decreases.
- Stuff in small amounts and shape as you go for smooth curves.
- Use stitch markers or pins to test face placement before you commit.
- Weave in ends slowly and securely so the plush stays durable.
Common Mistakes to Avoid
- Uneven stuffing: This can make the head lopsided or bumpy.
- Misplaced facial features: If the eyes are too high or too far apart, the expression changes a lot.
- Loose stitches: Gaps will show stuffing and make the finish look messy, so tighten the tension or size down your hook.
Variations to Personalize
- Change the hood color to match your favorite soft palette, or make a whole set of fan-inspired shades.
- Customize the expression with sleepy eyes, a tiny “u” mouth, or a wink.
- Add a keychain loop or hanging strap to turn it into a bag charm, as long as the attachments are securely fastened.
Finishing Tips FOR ( Crochet Stray Kids Angel )
- Weave in ends in multiple directions so they do not slip out.
- Smooth the shape by gently rolling the head and body in your hands.
- Secure all attachments tightly, especially the wand and wings, to achieve a clean, collectible finish.
Tutor Suggestions for Beginners
- Follow the video slowly for the visual flow, then pause after each section to match your stitch count.
- Replay tricky parts like joining pieces and shaping decreases.
- Practice magic ring, single crochet, and invisible decreases on a small swatch first.
Conclusion
This Crochet Stray Kids Angel Amigurumi is one of those sweet little projects that feels relaxing from start to finish. With the pink bear-ear hood, tiny wings, swirl forehead detail, and star wand, it becomes a cute STAY-inspired collectible, perfect for gifting or keeping close to your craft space.