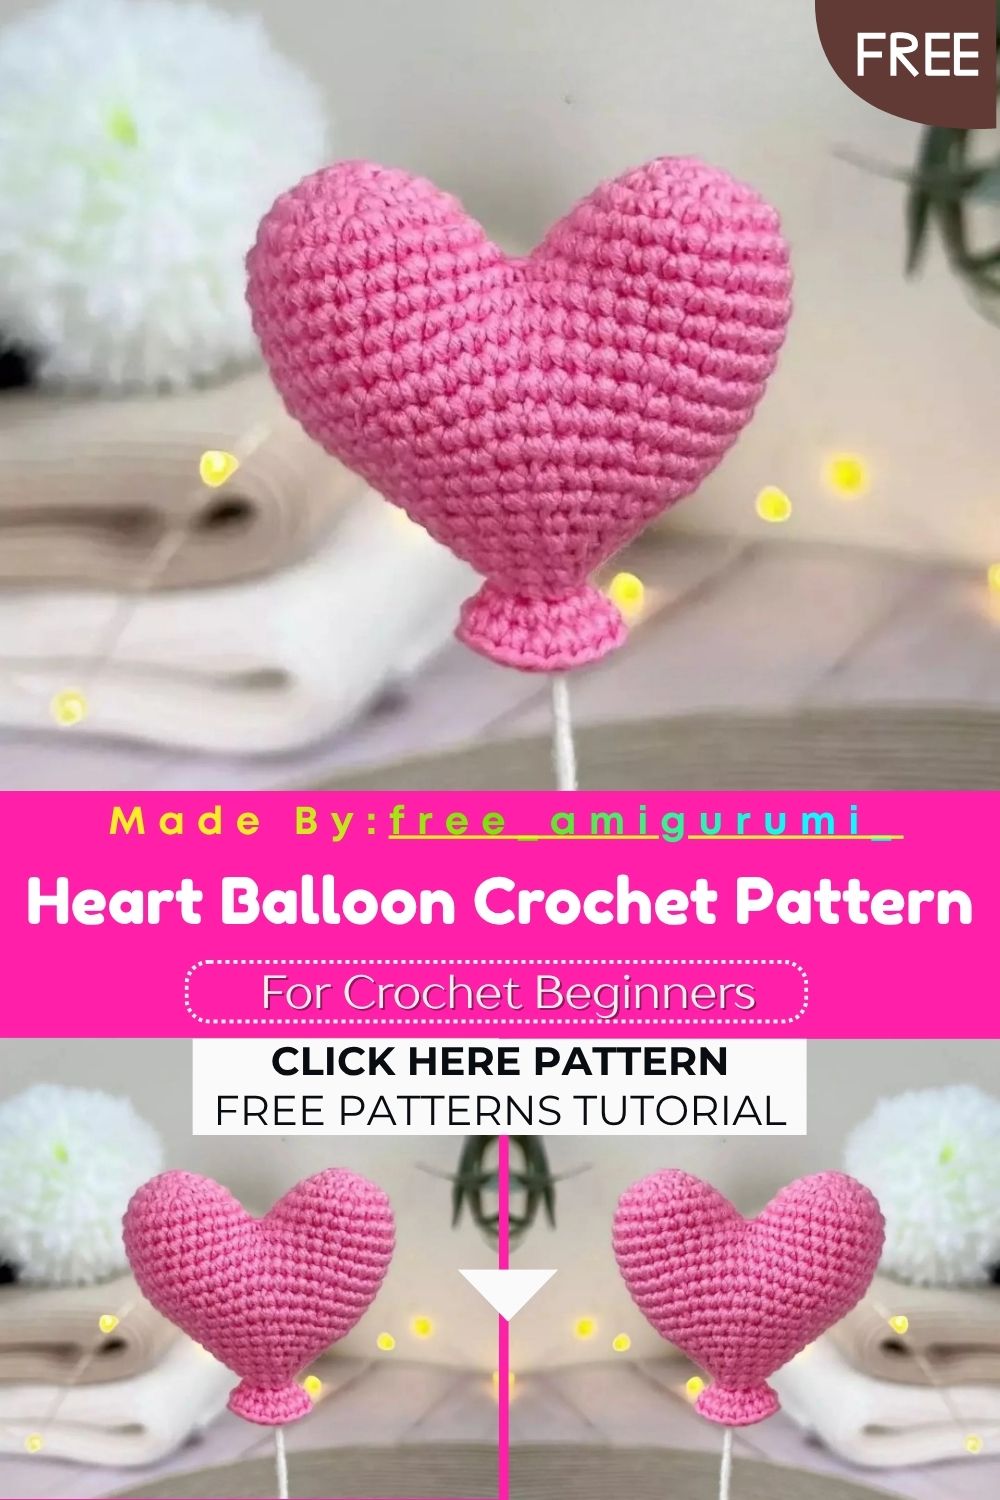
Heart Balloon Crochet Pattern – Free Tutorial
Pink, puffy, and held up by a wire string, you can actually bend this crochet heart balloon is the most playful handmade gift idea you will make all year!
A heart balloon that stays exactly where you put it sounds like something that requires complicated construction. It does not. Two identical circular pieces joined at round 7 form the classic balloon silhouette. A 30cm wire wrapped in yarn and inserted into the body creates the bendable string that holds the finished balloon upright in any display angle you choose. The front loop only flares at round 21, forming the knot detail at the bottom where a real balloon would be tied. Everything about this pattern is clever without being complicated.
Skill Level
Beginner to intermediate. The two-piece joining technique and the wire insertion are the two moments that need the most care. Both are straightforward once read through fully before starting.
Materials You Will Need
Yarn:
- Baby pink Cotton Fair (52% cotton, 48% acrylic) or any yarn suitable for the hook size
Other Supplies:
- Crochet hook — 1.75mm (No. 0)
- Polyester stuffing
- Scissors
- Yarn needle
- Wire — 30cm length
- Electrical tape
Note: If using a different yarn or hook size, adjust the wire length accordingly to match the finished balloon height.
Abbreviations
- CH — Chain
- SC — Single Crochet
- DC — Double Crochet
- INC — Increase (2 sc in same stitch)
- DEC — Decrease (sc next 2 stitches together)
- FLO — Front Loops Only
- (…) x … — Repeat the instruction in brackets the stated number of times
Work in a spiral throughout. Do not join, slip stitch, or turn unless otherwise stated.
The number after = shows the total stitch count for that round. Numbers in brackets show how many rounds are worked without change.
Pattern: Heart Balloon
Using baby pink yarn. Make 2 identical pieces.
R1: MR and 6 sc into it (6) R2: 6 inc (12) R3: (1sc, inc) x6 (18) R4: (1sc, inc, 1sc) x6 (24) R5–6: 24 sc for 2 rounds (24)
Cut the yarn on the first piece. Do not cut the yarn on the second piece.
Joining Both Pieces
R7: 24 sc across the second piece, then 24 sc across the first piece (48)
Sew up the small hole between the two joined pieces before continuing. A few stitches worked through the gap at the connection point close it cleanly and prevent it from opening during the shaping rounds.
R8–10: 48 sc for 3 rounds (48)
Begin stuffing gradually from this point and continue stuffing as the rounds progress.
R11: (5sc, dec, 5sc) x4 (44) R12: (dec, 9sc) x4 (40) R13: (4sc, dec, 4sc) x4 (36) R14: (dec, 7sc) x4 (32)
Wire Insertion
Cut a 30cm length of wire. Make a small loop at one end and wrap it securely with electrical tape to prevent the sharp wire end from poking through the yarn surface.
Wrap the entire length of wire with yarn before insertion. This helps fill the tube that forms in the final rounds and prevents the wire from shifting inside.
Insert the wrapped wire into the heart body through the bottom opening, positioning it so the looped end sits at the base of the balloon.
R15: (3sc, dec, 3sc) x4 (28) R16: (dec, 5sc) x4 (24) R17: (2sc, dec, 2sc) x4 (20) R18: (dec, 3sc) x4 (16) R19: (1sc, dec, 1sc) x4 (12) R20: (dec, 1sc) x4 (8)
The body naturally narrows around the wire at this point, forming the balloon string tube.
R21: FLO — 8 in (16)
This front loop only increases the round, creating a small flared collar that mimics the knotted bottom of a real balloon.
R22: 16 sc (16)
Fasten off and weave in the end. The completed wire string extends from the bottom of the balloon, bendable into any display position.
Customization and Variation Ideas
- First, make the balloon red for a Valentine’s Day version that photographs beautifully alongside small handmade hearts or flowers.
- Additionally, try a pale lavender or sky blue colorway for a birthday-themed balloon that suits any celebration aesthetic.
- Moreover, make a cluster of three balloons in different colors using the same pattern and twist the wire strings together at the base for a full balloon bouquet display.
- Furthermore, add a tiny crocheted ribbon bow at the base of the balloon just above the knotted flare for a more gift-ready presentation.
- Also, use a metallic yarn for a foil balloon effect that catches light beautifully and looks genuinely festive in any room.
- Finally, write a name or short message in embroidery floss across the balloon surface after finishing for a completely personalized celebration gift.
Common Mistakes to Avoid
- First, cutting the yarn on both pieces before joining: Only the first piece gets cut. The second piece continues directly into round 7. Cutting both leaves no working yarn to begin the joining round.
- Additionally, skipping the hole closure between the two pieces at R7: The gap between the joined halves must be sewn shut before continuing. Leaving it open creates a visible divide in the finished balloon silhouette.
- Also, inserting the wire without wrapping it first: An unwrapped wire shifts inside the balloon string tube and can create uneven lumps against the yarn surface. Wrapping it first fills the tube evenly and keeps the wire centered.
- Furthermore, not making a loop and taping the wire end: A bare wire end can pierce through the crocheted stitches over time. The loop and electrical tape combination is a small step that protects the integrity of the finished piece.
- Moreover, working R21 in both loops instead of front loops only: The flared collar at the bottom depends entirely on the FLO construction. Working both loops produces a straight tube rather than the splayed knot effect.
- Finally, stuffing too firmly at the wire insertion stage: Over-stuffing after the wire is in place can make the wire difficult to bend and may cause the yarn surface to pucker at the narrowing rounds.
Finishing Tips
- First, after fastening off at R22, shape the wire string by bending it into a gentle curve that angles away from the balloon body at about 45 degrees. This is the most natural balloon-holding pose.
- Additionally, the FLO flare at rounds 21 and 22 can be gently pressed outward with your fingers immediately after finishing to encourage a more pronounced knotted appearance before the stitches set.
- Moreover, if any of the decrease rounds leave a slight visible seam line on the heart surface, a gentle hand-press or light steam using a damp cloth smooths the surface beautifully without flattening the stuffing.
- Furthermore, when sewing the gap between the two joined pieces at R7, use small, close-set stitches in matching pink yarn so the closure is completely invisible from the outside.
- Also, photograph the finished balloon against a plain white or pastel background to let the pink shape read clearly without any visual competition.
- Finally, if the balloon tip between the two joined pieces looks slightly flat rather than domed, add a small additional pinch of stuffing through the gap before closing it for a more rounded finished profile at the top.
Gifting Ideas
- First, attach the finished balloon to a small wrapped gift box using a ribbon tied around the wire for a presentation that turns a standard gift into a genuine moment.
- Additionally, pair with a small handmade card and a handful of real confetti for a celebration gift bundle that feels joyful and completely put together.
- Moreover, these heart balloons make wonderful Valentine’s Day, Mother’s Day, and birthday gifts the balloon format communicates celebration in a way that most amigurumi designs simply do not.
- Furthermore, make a set of three balloons in graduating sizes using different yarn weights and twist the wires together as a permanent bouquet for a standalone home decor gift.
- Also, attach a small tag with a handwritten message tied to the wire for a personal touch that makes the gift feel genuinely considered rather than generic.
- Finally, these sell reliably at Valentine’s Day and birthday-themed craft markets where the balloon format immediately communicates the occasion, and the handmade quality elevates it above any store-bought alternative.
Conclusion
This heart balloon pattern solves a problem most decorative crochet pieces have it does not just sit there. The bendable wire string means it can be posed, angled, and adjusted for any display or photograph. The two-piece joining technique is worth learning for future projects, and the FLO knot flare is a satisfying finishing detail that makes the whole piece feel genuinely complete. Therefore, wrap the wire before inserting it, sew the joining gap closed immediately, and work R21 in front loops only without exception. In conclusion, your heart balloon is ready to float wherever it is needed most.