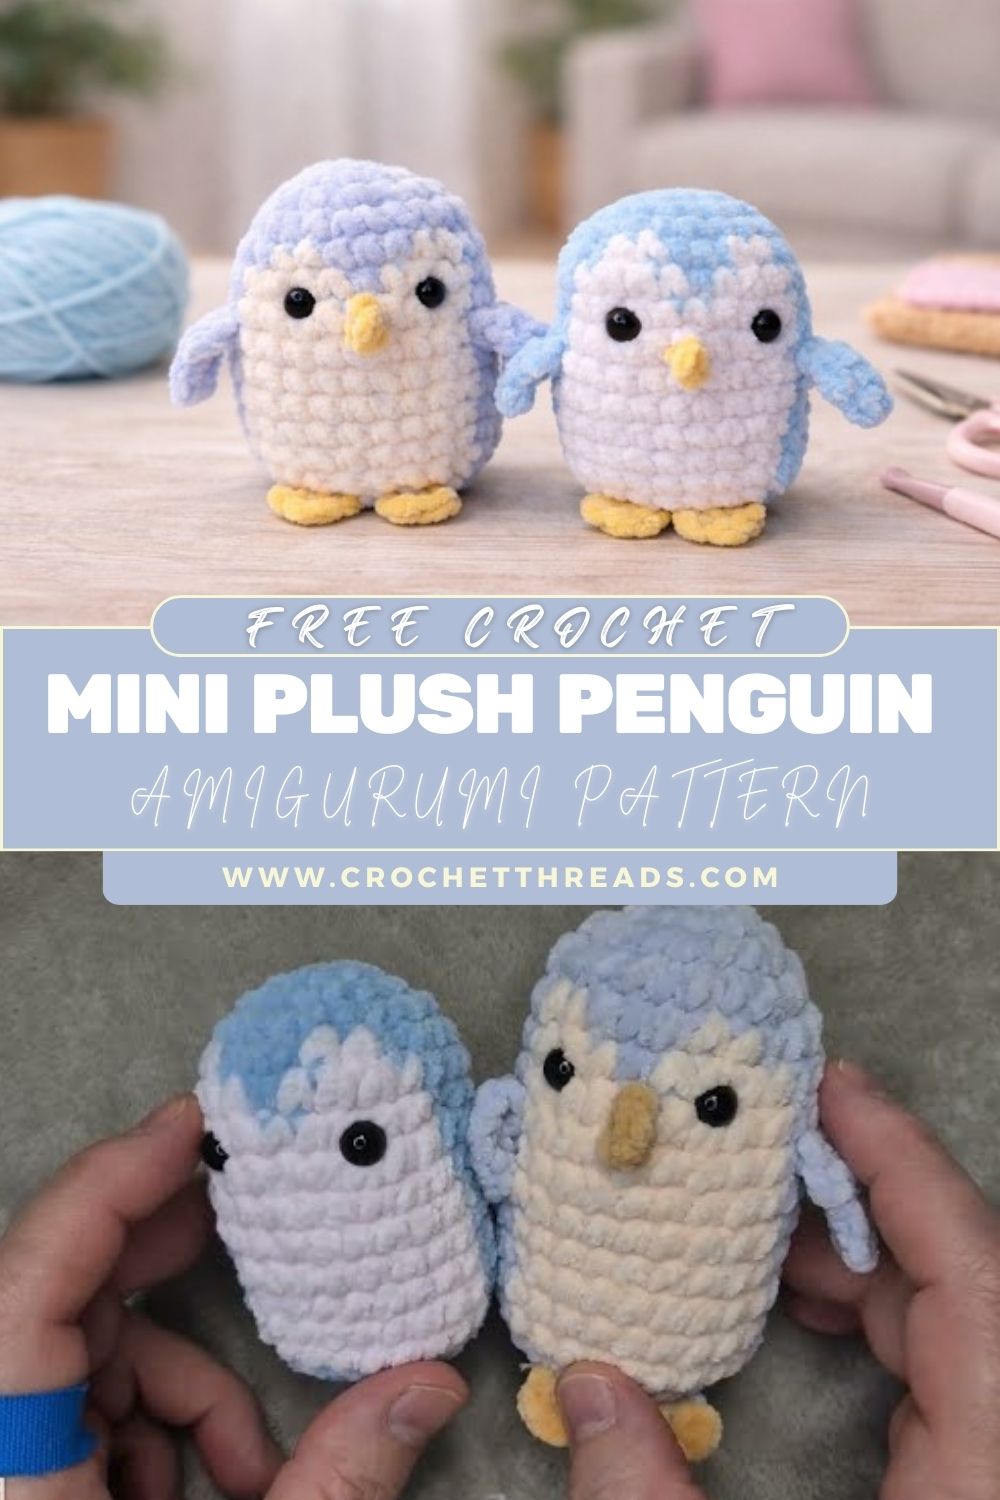
Crochet Mini Plush Penguin Amigurumi Pattern Beginners
A Crochet Penguin Amigurumi is one of the sweetest little plush projects you can make, round, cuddly, and full of personality. Crafters love small amigurumi animals because they work up quickly, use very little yarn, and make adorable gifts. This tutorial will guide you through a mini crochet penguin plush with tiny wings, a cute beak, little feet, and an easy face. If you’re new to amigurumi, this is a fun, confidence-building project.
A crochet penguin amigurumi is a small stuffed toy made by crocheting tight stitches in the round to create a smooth, plush shape. Most penguin designs start with a simple ball-like body, then add small features, wings, feet, and a beak to bring the character to life. Because the shapes are simple and forgiving, penguins are one of the most beginner-friendly animals to crochet.
Small crochet animals are popular for a reason: they’re quick, portable projects that let you practice the key building blocks of amigurumi (single crochet, increases, decreases, stuffing, and sewing). They also make wonderful handmade gifts,,s cute enough for kd, but stylish enouforfors desk décor for adults.
Penguin designs are especially adorable because their round bodies and tiny features naturally look “kawaii.” Even a minimal face, just eyes and a small beak, creates a sweet expression. You can make your penguin classic (blue/white), customise it into pastel winter themes, holiday ornaments, or even a keychain companion.
This mini penguin is perfect as a small toy, stocking stuffer, baby shower gift (use embroidered eyes for baby safety), desk buddy, nursery decoration, or a penguin keychain if you add a loop at the top. Materials Needed
- Soft yarn:
- Blue (main body)
- White (belly/face patch)
- Yellow (beak + feet)
- Crochet hook: 3.0–4.0 mm (choose smaller for tighter stitches)
- Fiberfill stuffing
- Yarn needle (tapestry needle)
- Stitch marker (highly recommended)
- Safety eyes (6–8 mm depending on your yarn thickness)
- Scissors
- Embroidery thread (black for small details; optional pink for cheeks)
- Optional: keychain hardware + jump ring (if making it a keychain)
. Crochet Abbreviations (Beginner-Friendly)
- MR = Magic Ring (adjustable loop to start crocheting in the round)
- sc = single crochet
- inc = increase (2 sc in the same stitch)
- dec = decrease (single crochet 2 stitches together; invisible dec recommended)
- ch = chain
- sl st = slip stitch
- st = stitch
- rnd = round
- FO = fasten off (cut yarn and secure)
. Penguin Design Overview
This crochet penguin is built from simple parts:
- Body/Head: one rounded piece (plush and stable)
- Wings: two small side fins
- Beak: tiny yellow beak on the face
- Feet: flat yellow feet for a “standing” look
- Face details: safety eyes, optional embroidered smile or blush
- Belly patch: white oval patch (optional but adds a cute penguin look)
. Step-by-Step Crochet Pattern
Notes Before You Start
- Work in continuous rounds unless stated.
- Use a stitch marker in the first stitch of each round.
- Keep your stitches tight to prevent stuffing from showing.
- This is a realistic, beginner-friendly sample pattern inspired by a soft mini penguin shape.
Finished size (approx.): 3.5–5 in (9–13 cm) tall, depending on yarn/hook.
A) Body & Head (Blue)
Rnd 1: 6 sc in MR (6)
Rnd 2: inc around (12)
Rnd 3: (1 sc, inc) rep around (18)
Rnd 4: (2 sc, inc) rep around (24)
Rnd 5: (3 sc, inc) rep around (30)
Rnd 6: (4 sc, inc) rep around (36)
Rnd 7–11: sc around (36) for 5 rounds
Eye Placement (before closing)
Insert safety eyes between Rnd 9 and Rnd 10, about 7–8 sts apart (adjust slightly to your preference).
If adding a belly patch, it helps to place it later and confirm the face is centred.
Rnd 12: (4 sc, dec) rep around (30)
Rnd 13: (3 sc, dec) rep around (24)
Start stuffing the body firmly. Shape it into a smooth oval/egg.
Rnd 14: (2 sc, dec) rep around (18)
Add more stuffing, firm at the botto,and slightlyly softer near the top.
Rnd 15: (1 sc, dec) rep around (12)
Rnd 16: dec around (6)
FO, close the opening neatly, weave in ends.
Shaping tip: Penguins look extra cute with a slightly egg-like shape. Before finishing, press the sides gently to form a soft oval rather than a perfect sphere.
B) Belly Patch (White, optional but recommended)
This simple oval makes your penguin instantly recognisable.
Rnd 1: ch 6
Sc in 2nd ch from hook, sc in next 3 ch, 3 sc in last ch.
Working on the other side of the chain: sc in next 3 ch, 2 sc in last ch (12)
Rnd 2: inc, sc 3, inc x3, sc 3, inc x2 (18)
FO, leave a long tail for sewing.
Sew a belly patch centred on the front of the body. (You can sew it on before or after attaching wings, whichever feels easier.)
C) Wings (Make 2, Blue)
Small oval wings that sit on the sides.
Rnd 1: 6 sc in MR (6)
Rnd 2: (sc, inc) rep around (9)
Rnd 3: sc around (9)
Rnd 4: (sc, dec) rep around (6)
FO, leave a tail for sewing.
Flatten slightly (no stuffing needed).
Placement: Sew wings to the sides of the body around mid-height, slightly angled downward.
D) Beak (Yellow)
A tiny beak that’s easy and cute at a ini scale.
Rnd 1: MR, 4 sc (4)
Rnd 2: (sc, inc) rep around (6)
FO, leave a tail.
Flatten into a small oval/triangle and sew between the eyes, slightly below them.
Alternative extra-simple beak:
Embroider a small triangle with yellow yarn instead of crocheting it.
E) Feet (Make 2, Yellow)
Flat little feet so the penguin can sit or “stand” decoratively.
Rnd 1: MR, 6 sc (6)
Rnd 2: inc around (12)
Rnd 3: sc around (12)
FO, leave a tail. Do not stuff. Flatten.
Sew feet near the bottom front of the body, slightly apart, with the front edges peeking out.
F) Face Details (Optional Embroidery)
- Small embroidered smile under the beak (black thread)
- Tiny blush dots under the eyes (pink thread or cosmetic blush)
- Optional: a couple of small white highlights on eyes (tiny embroidery stitch)
G) Assembly (Summary)
Attach belly patch (optional), wings, beak, and feet, then finish with face embroidery and shaping.
. Face Details (Eyes + Cute Expression)
Safety Eye Placement
- Place eyes between Rnd 9–10 for a sweet look.
- Keep them even and level. Use pins or stitch markers to test placement before locking.
BeakPlacement Centred between the
- eyes, about 1–2 rounds below the eye line.
- If your penguin looks “too serious,” place the beak slightly higher.
Optional Embroidered Details
- Smile: one small curved stitch under the beak
- Cheeks: two tiny pink stitches or a soft blush dab under the outer eye edges
- Eyebrows (optional): two tiny short stitches above eyes for extra expression
. Assembly Instructions (Step by Step)
- Attach belly patch (optional):
- Pin the white patch at the centre front.
- Sew around the edge with small whip stitches.
- Attach wings:
- Place wings on the sides around the middle of the body.
- Sew securely, stitching through multiple rounds, so they don’t flop.
- Attach beak:
- Sew between eyes, centred.
- Take a few extra stitches through the centre, so it sits slightly raised.
- Attach feet:
- Position feet at the bottom front.
- Sew the back half of each foot to the body so the front edge sticks out.
- Final shaping + stuffing check:
- Gently squeeze and roll the body to smooth lumps.
- Add a tiny bit more stuffing through any gap before fully closing (if needed, best done earlier).
- Optional keychain loop:
- Attach yarn at the top of the head, ch 12–16, sl st back into the same spot to form a loop.
- Reinforce with a few extra stitches and weave in tightly.
- Add jump ring + clasp.
. Customization Ideas
- Pastel penguins: mint + cream + pale yellow for a soft nursery style
- Winter-themedd penguins: add a tiny scarf, earmuffs, or a pom-pom hat
- Penguin keychains: add a top loop and durable hardware
- Baby penguin set: make a “parent + chick” pair using thicker yarn for the big one and thinner yarn for the mini
- Different yarn textures: velvet yarn for a super plush look (use tight tension and careful counting)
. Beginner Tips
- Use a stitch marker every round. This is the #1 amigurumi helper.
- Keep stitches tight and even (size down your hook if you see gaps).
- Stuff gradually and shape as you go; it’s easier than fixing lumps later.
- If you’re nervous about placements, pin everything first (wings, beak, feet) before sewing.
- Take a quick photo of your pinned piece. Sometimes,s it’s easier to spot uneven placement in a picture.
. Common Mistakes to Avoid
- Uneven stuffing: causes bumps. Use small stuffing pieces and distribute evenly.
- Wrong hook size: too big = visible holes and stuffing; too small = stiff fabric. Adjust for a firm but workable feel.
- Loose stitches: Amigurumi needs snug tension; consider a smaller hook.
- Incorrect eye placement: eyes too high can look surprised; too low can look sleepy. Aim for mid-upper face.
- Wings placed too far back: keep wings slightly forward so they show from the front.
. Why This Pattern Is Special
This crochet penguin is adorable because it’s built from simple shapes that naturally look cute: an egg-like body, tiny wings, and a small beak. It’s beginner-friendly, works up quickly, and makes a perfect handmade gift for penguin lovers, winter birthdays, baby showers, or cosy desk décor. Plus, it’s easy to customise into an entire collection of penguins with different colours and accessories.
Conclusion
If you’re looking for a quick, satisfying amigurumi project, this Crochet Penguin Amigurumi – Easy Step-by-Step Tutorial is a wonderful choice. With a simple round body and a few small parts, you’ll create a soft mini penguin plush that’s cute, giftable, and fun to personalise. Grab your yarn, take it one round at a time, and enjoy watching your penguin come to life stitch by stitch.