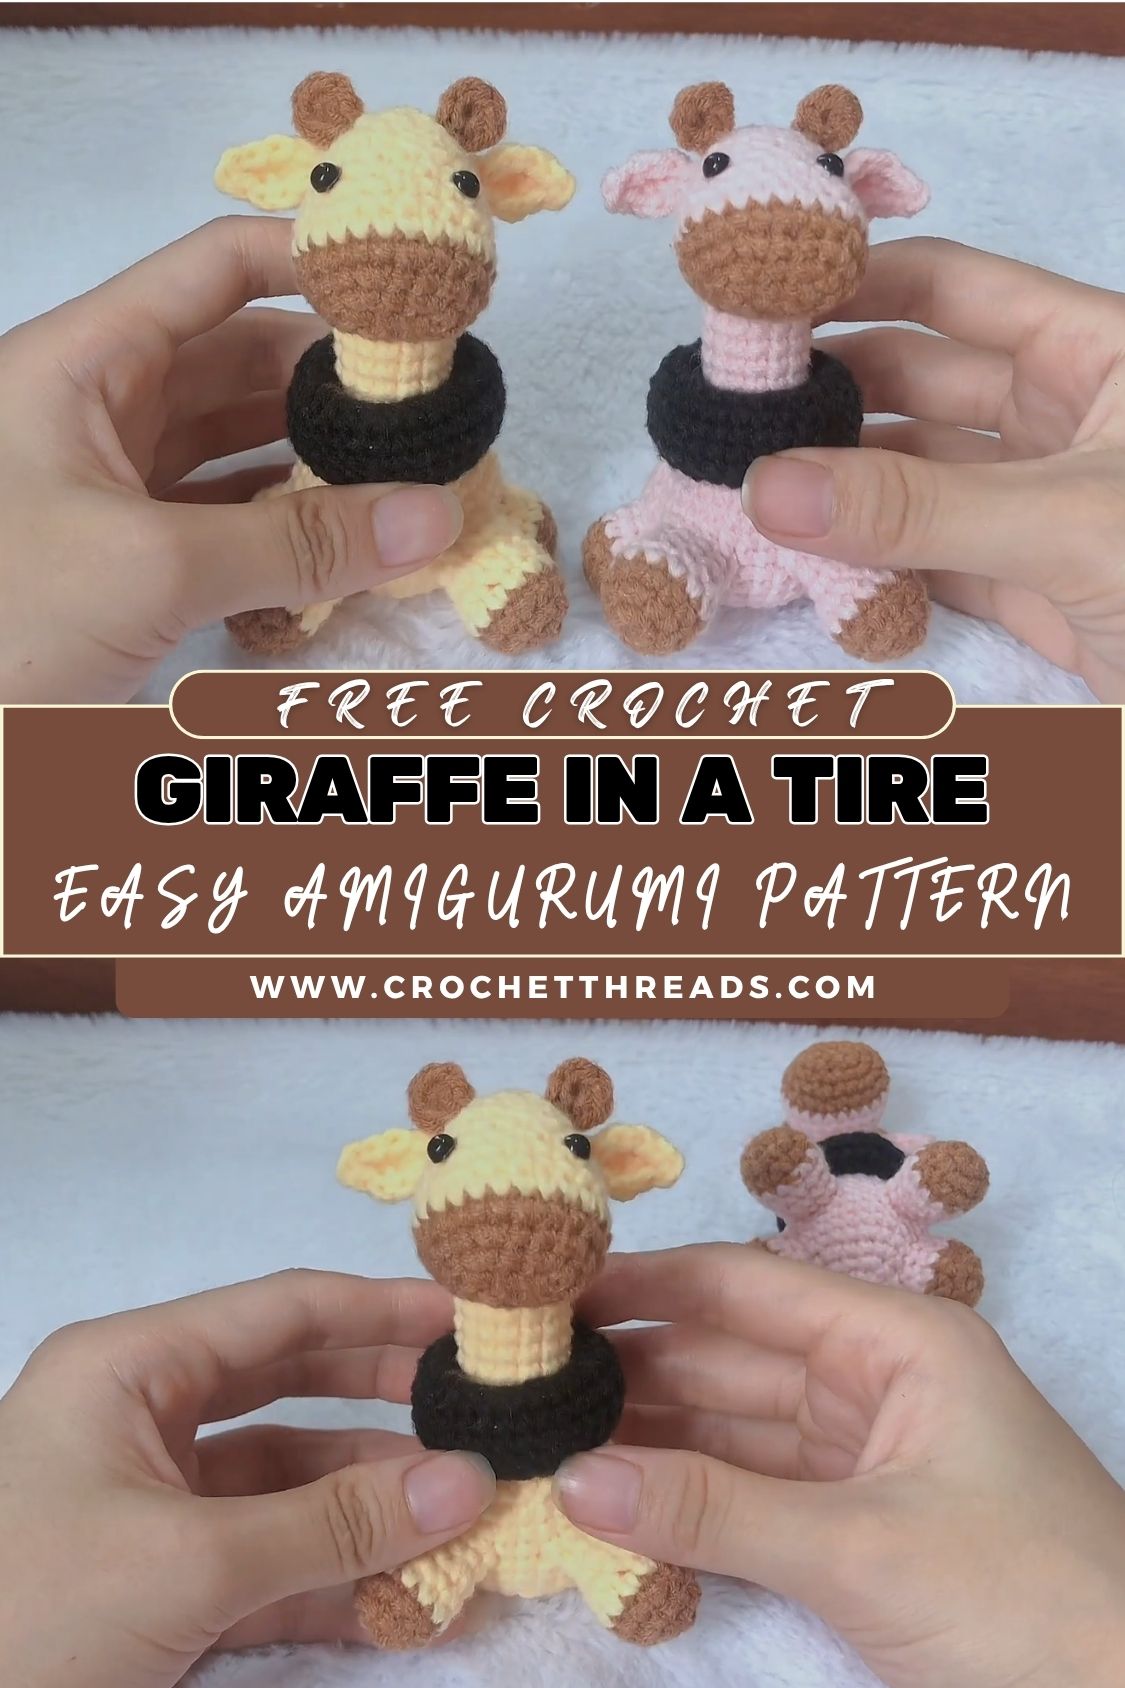
Artistic Crochet Giraffe in a Tire Easy Amigurumi Pattern Step-by-Step
Creating an Artistic Crochet Giraffe in a Tire Easy Amigurumi Pattern is a fun and beginner-friendly project that brings charm and creativity together. This adorable crochet giraffe amigurumi design features a cute mini giraffe sitting inside a soft tire, making it perfect for keychains, gifts, or as a decorative piece. Whether you’re new to crochet or already love making amigurumi animals, this step-by-step pattern is simple to follow and highly enjoyable.
Materials & Tools List
The video notes that materials and abbreviations are in the description; the list below matches what the tutorial clearly uses.
Yarn
- Yellow yarn (main giraffe color)
- Dark/contrasting yarn (tire color commonly black, charcoal, or dark gray)
- Small amounts of brown/tan yarn (spots, horns, small details)
Suggested yarn type/weight:
- Smooth DK-weight yarn works well for beginners (choose what you’re comfortable with).
Hook & Notions
- Crochet hook sized to your yarn (commonly 2.5–4.0 mm for amigurumi; choose a smaller hook than the label suggests for tight stitches)
- Stitch marker (the tutorial marks the first stitch often)
- Yarn needle/tapestry needle (sewing parts + closing)
- Scissors
- Fiberfill stuffing (legs, body, neck/muzzle as instructed)
- Optional: Safety eyes (or black yarn for embroidered eyes)
- Optional: Pins (helpful for positioning muzzle/ears)
Abbreviations (Beginner-Friendly)
- MR = Magic Ring
- ch = chain
- sl st = slip stitch
- sc = single crochet
- inc = increase (2 sc in the same stitch)
- dec = decrease (single crochet decrease)
Step‑by‑Step Crochet Pattern Instructions (By Parts) Tire (Accessory)
Purpose: This is the “tire float” the giraffe wears. The tutorial notes that no stuffing is needed unless your yarn is very soft.
Start: ch 20, join with sl st to form a ring.
Rnd 2: ch 1, sc around (20 sc). Mark first stitch.
>Rnd 3: sc around (20 sc).
>Rnd 4: Pattern: sc 3, inc repeat to end of round.
>Rnd 5: Pattern described as: sc 2, inc, sc 2 — repeat to end of round.
>Rnd 6: sc around (30 sc).
>Rnd 7–8: sc around (30 sc each round).
>Rnd 9: Pattern described: sc 2, dec, sc 2 repeat to end of round.
>Rnd 10: Pattern described: sc 3, dec repeat to end of round.
>Rnd 11: sc around (20 sc).
Finish: sl st, leave a long tail.
Fold/bring the edges together and sew them to form the tire shape. Weave in ends.
Tip from tutorial: If using very soft yarn, loosely stuff the tire to help it hold form.
Hind Legs (Make 2)
Rnd 1: MR, 6 sc.
>Rnd 2: inc in each stitch (12).
>Rnd 3: sc around (12).
Change to yellow yarn.
Rnd 4–5: sc around (12 each).
Finish with sl st. Leave a long tail and cut. Make a second hind leg.
The tutorial later stuffs legs; hind legs are made similarly to front legs, so light stuffing is fine.
Front Legs (Make 2)
Work like the ind leg through round 5, but do not turn after round 5.
Rnd 6: ch 1, sc 2, dec, then repeat: (sc 2, dec) two more times.
Rnd 7: sc around (9).
Finish: sl st, leave a short tail, and cut. Make the second front leg.
Stuff the front legs with fiberfill.
Muzzle (Snout)
Start: ch 4. Work around the chain in an oval.
Rnd 2 (worked into back loops / around chain as described):
- Skip first loop, start in 2nd from hook
- inc (mark this stitch)
- sc 1
- At the end stitch: 2 inc in the same loop
- On the other side: sc 1
- Finish with an inc (to complete the oval shaping)
Rnd 3: sc 1, in alternate to end.
>Rnd 4: Pattern described as: sc 1, inc, sc 1 repeat to end.
>Rnd 5: sc 3, inc — then repeat: (sc 4, inc) to end.
Change to yellow yarn.
>Rnd 6: sc around (24).
>Rnd 7: sc around (24).
>Rnd 8: Repeat: sc 1, dec, sc 1 to end.
Finish: sl st, leave short tail, and cut.
Body + Neck (Main Piece, Legs Attached As You Go)
Rnd 1: MR, 6 sc.
>Rnd 2: inc in each stitch (12).
>Rnd 3: (sc 1, inc) repeat.
>Rnd 4: Pattern described: sc 1, inc, sc 1 repeat.
>Rnd 5: sc 3, inc — repeat to end.
>Rnd 6: sc around (30).
>Rnd 7: sc around (30).
- sc 10 (mark the first stitch)
- Attach first front leg over 4 stitches (insert hook through leg stitch + body stitch, sc to join; repeat for 4 sc)
- sc 2 on the body
- Attach the second front leg the same way over 4 stitches
- sc 10 on the body to end
- sc 10 on body
- sc 5 on leg #1
- sc 2 in the middle stitches
- sc 5 on leg #2
- sc 10 on body
Shaping rounds
Rnd 11: dec, sc 1 alternate (as described), then 14 sc, then sc 1, dec alternate (as described).
>Rnd 12: Multiple dec sections + sc sections as written in the scrape (this is a strong shaping round).
>Rnd 13: Mix of sc and dec as described.
>Rnd 14: sc around (14). Begin stuffing.
Neck length
Rnds 15–24: sc around (14 each round).
Stuff the neck. Then slide on the tire.
Attach Muzzle to the Neck (Built-In Join)
Rnd 25: sc 6, then attach muzzle across 4 stitches (join like attaching legs), then sc remaining neck stitches to finish.
Rnd 26: sc 6, then crochet into muzzle stitches (the tutorial describes skipping an endpoint and continuing around), then sc remaining neck stitches.
Then shape the head:
- Rnd 27: pattern includes sc groups with dec repeated.
- Rnd 28: repeat (sc 5, dec) around.
- Rnd 29: alternate sc and dec to end. Start stuffing.
- Rnd 30: 6 dec total. Finish off by closing the opening by threading through the front loops and pulling tight. Weave in ends.
Tail
- ch 5
- Skip first loop, then sl st in 2nd loop from hook
- sl st in remaining 3 loops
Leave yarn for sewing.
Ears (Make 2)
- ch 5
- sl st in 2nd loop
- hdc in next 2 loops
- sl st in last loop
- ch 2, turn to the other side
- sl st, hide yarn inside
- hdc in next 2 loops
- sl st, leave tail for sewing
Make the second ear.
Spots + Horns
Large spot: MR, 8 sc, pull closed, sl st to first stitch, fasten off.
Small spots + horns (same method):
- MR, 6 sc
- pull closed, sl st, fasten off
Make two (horns) + additional small spots as desired.
Tips & Tricks for Beginners
- Use a stitch marker every round. The tutorial marks the first stitch frequently, which helps prevent you from losing your place.
- Keep tension tight and even. Amigurumi looks best when stitches are compact, so stuffing doesn’t show through.
- Count stitches at the end of each round. Many rounds rely on accurate totals (ex, tire rounds, body shaping).
- Color changes: When switching yarn (legs/muzzle), change color on the last yarn-over of the final stitch of the previous round for a clean transition.
- Decreases: If your decreases look bumpy, try an invisible decrease (insert hook through front loops only).
- Stuff gradually. Especially for the neck and head add small amounts, shape with fingers, then continue.
Finishing & Assembly (Sewing & Details)
Stuffing
- Stuff front legs (the tutorial specifically mentions this).
- Stuff the body and neck starting around Round 14.
- Stuff head during Round 29 before final closing.
- Tires are usually not stuffed. Sew on details
- Ears: Sew symmetrically to the sides/top of the head.
- Horns: Sewn to the top of the head, slightly forward of the ears.
- Tail: Sew to the back of the body.
- Spots: Sew or stitch on with small whip stitches.Eyes & face
- If using safety eyes, install before fully closing the head (typically before final stuffing and closing).
- If embroidering: use black yarn to stitch simple oval eyes and a tiny mouth for a gentle expression.Final touch: tire placement
- Slide the tire onto the neck after the neck is stuffed (the tutorial places it around Round 24).
- Center it so it sits like a little float/wheel the giraffe is wearing.
Conclusion
This giraffe-with-a-tire amigurumi is the kind of project that makes people smile immediately. It’s cute, unusual, and full of character. Once you’ve made one, it’s easy to customize: However you customize it, the basic structure from the tutorial gives you a solid, beginner-friendly amigurumi build with a standout accessory.