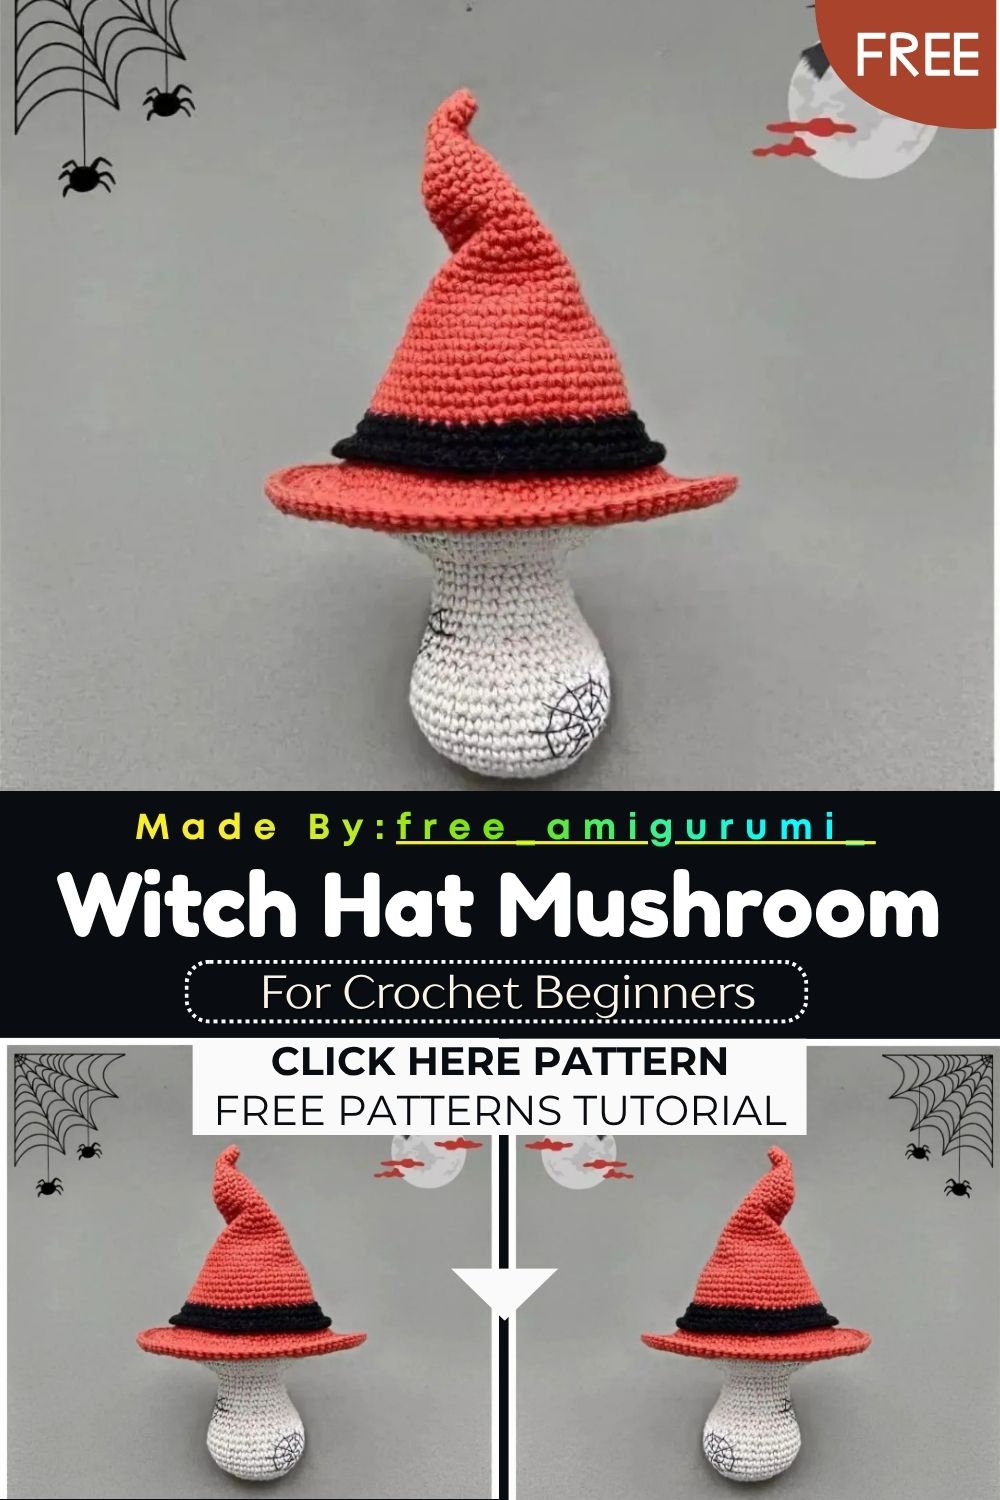
Easy Witch Hat Mushroom – Free Crochet Pattern
Orange hat, black brim, white stem body, this Halloween mushroom is the spookiest little amigurumi in your autumn collection!
Mushrooms are already charming on their own. Give one a pointed witch hat, and the whole piece becomes something festive. This pattern splits into two main pieces. The hat works from the tip downward. The body sews into the hat using a back loop connection at round 35. The orange hat builds gradually through spaced increases. The pointed tip tapers naturally before the brim fans out in black. The white body starts from a magic ring, narrows at the neck, then flares again at the base.
Skill Level
Intermediate. Long increase sequences and two color changes are the main skills needed. Additionally, leaving specific loops free throughout requires careful reading before each relevant round.
Materials You Will Need
Yarn Ricorumi cotton or similar:
- Orange for the hat
- Black for the brim detail and edging
- White or light grey for the body stem
Other Supplies:
- Crochet hook — 2.5mm
- Yarn needle
- Fiberfill stuffing
- Stitch marker
- Scissors
Abbreviations
- RND — Round
- MR — Magic Ring
- CH — Chain
- SLST — Slip Stitch
- SC — Single Crochet
- INC — Increase
- DEC — Decrease
- FLO — Front Loop Only
- BLO — Back Loop Only
- ()* — Repeat until the end of the round
- [ ] — Total stitch count for that round
Pattern: Witch Hat
Using orange yarn
Rnd 1: MR, 5 sc [5] Rnd 2: 5 sc [5] Rnd 3: inc, 4 sc [6] Rnd 4: inc, 5 sc [7] Rnd 5: inc, 6 sc [8] Rnd 6: inc, 7 sc [9] Rnd 7: inc, 8 sc [10] Rnd 8: inc, 9 sc [11] Rnd 9: inc, 10 sc [12] Rnd 10: inc, 11 sc [13] Rnd 11: inc, 12 sc [14] Rnd 12–13: 14 sc for 2 rounds [14] Rnd 14: 2sc, inc, (3sc, inc) x2, 2sc, inc [18] Rnd 15–16: 18 sc for 2 rounds [18] Rnd 17: (2sc, inc)* [24] Rnd 18–19: 24 sc for 2 rounds [24] Rnd 20: (3sc, inc)* [30] Rnd 21–22: 30 sc for 2 rounds [30] Rnd 23: (2sc, inc, 2sc)* [36] Rnd 24–25: 36 sc for 2 rounds [36] Rnd 26: (5sc, inc)* [42] Rnd 27–28: 42 sc for 2 rounds [42] Rnd 29: (3sc, inc, 3sc)* [48] Rnd 30–31: 48 sc for 2 rounds [48]
Switch to black yarn.
Rnd 32: FLO — (7sc, inc)* [54] Rnd 33: (4sc, inc, 4sc)* [60] Rnd 34: 60 sc [60]
Switch to orange yarn. Keep this color for the remaining rounds.
Rnd 35: BLO — 60 sc [60]
Mark these front loops. They attach the body later.
Rnd 36: FLO — (9sc, inc)* [66]
Mark the back loops inside Rnd 35 as well. These are used to sew the body into the hat.
Rnd 37: (5sc, inc, 5sc)* [72] Rnd 38: 72 sc [72] Rnd 39: (5sc, inc)* [84] Rnd 40: (3sc, inc, 3sc)* [96] Rnd 41–42: 96 sc for 2 rounds [96]
Fasten off.
Black Brim Edging
Return to the front loops of Rnd 34. Attach black yarn. Crochet 60 sc around. Fasten off and weave in ends. This edging creates the witch hat band at the underside of the brim.
Pattern: Body
Using white or light grey yarn
Rnd 1: MR, 6 sc [6] Rnd 2: (inc)* [12] Rnd 3: (1sc, inc)* [18] Rnd 4: (2sc, inc)* [24] Rnd 5: (3sc, inc)* [30] Rnd 6: (2sc, inc, 2sc)* [36] Rnd 7: (5sc, inc)* [42] Rnd 8–12: 42 sc for 5 rounds [42] Rnd 13: (5sc, dec)* [36] Rnd 14: (2sc, dec, 2sc)* [30] Rnd 15: 30 sc [30] Rnd 16: (3sc, dec)* [24] Rnd 17–22: 24 sc for 6 rounds [24] Rnd 23: (inc)* [48] Rnd 24: (7sc, inc)* [54] Rnd 25: (4sc, inc, 4sc)* [60] Rnd 26–28: 60 sc for 3 rounds [60]
Stuff firmly at this point. Fasten off, leaving a long tail for sewing.
Assembly
Sew the body into the hat using the back loops of Rnd 35. This keeps the join invisible from outside. The body appears to grow naturally from beneath the hat brim.
Stuff the hat cone firmly. Leave the very top unstuffed. This allows the tip to fold and slouch into the classic witch hat shape.
Customization and Variation Ideas
- First, try deep purple instead of orange for a classic witch hat color. It suits a broader Halloween palette immediately.
- Additionally, add a small gold buckle detail to the black brim band using contrasting yarn. It gives the hat a vintage storybook feel.
- Moreover, make the body in pale cream with tiny embroidered spots. This creates a more botanically realistic mushroom stem.
- Furthermore, try green for the hat and white for the brim. This creates a whimsical forest version that works in both spring and autumn displays.
- Also, add tiny eyes and a smile to the white body. This gives the mushroom a kawaii character expression instantly.
- Finally, make three mushroom witches in different hat colors. Displayed together, they create a complete Halloween shelf scene.
Common Mistakes to Avoid
- First, losing track of saved loops: Mark each FLO and BLO set immediately after completing that round. This prevents confusion during the body attachment stage.
- Additionally, switching to orange at Rnd 35 without marking the back loops: These are the body attachment points. Missing them leaves no anchor for the body joint.
- Also, stuffing the hat tip: Leave the top section unstuffed. Stuffing it makes the hat stiff and straight rather than softly folded.
- Furthermore, sewing the body before the hat is complete: Always finish the full hat first. Working the body in early makes later rounds awkward.
- Moreover, miscounting Rnd 23 of the body: This round doubles the count from 24 to 48. Count to exactly 24 before starting it.
- Finally, skipping the black front loop edging at Rnd 34: This pass creates the visible hat band. It is easy to overlook, ok bit ut significantly impacts the finished look.
Finishing Tips
- First, run a second anchoring stitch line beside the first when sewing the body in. The joint carries weight from both stuffed pieces and needs extra security.
- Additionally, pinch the hat tip between two fingers after stuffing. Hold for a moment. Cotton responds well to gentle shaping while still warm.
- Moreover, stuff the hat from the inside through the brim opening before attaching the body. Use a blunt tool to pack the narrow tip without distorting the shape.
- Furthermore, a photograph from a three-quarter angle. This shows both the pointed hat and the white body together clearly.
- Also, use matching orange thread when weaving in hat ends. Any remaining tail becomes invisible against the surface.
- Finally, press the black brim edging with a damp cloth if it looks uneven. This flattens the sc stitches and helps the edging sit cleanly.
Gifting Ideas
- First, place the finished piece in a Halloween gift bag with orange and black tissue paper. Quick and cohesive.
- Additionally, make three in orange, purple, and green. Display them together in a small wicker basket as a Halloween centerpiece.
- Moreover, these work well as Halloween party favors. A row along a table looks genuinely festive and handmade.
- Furthermore, pair with Halloween candy for a sweet and handmade treat bag that stands out instantly.
- Also, attach a loop of black yarn to the hat tip for a hanging ornament version. Perfect for a Halloween wreath or tree.
- Finally, these sell strongly at autumn craft markets. The pointed hat and seasonal colors create immediate recognition from across any display table.
Conclusion
This mushroom witch combines two completely different crochet objects into something original. The loop-saving technique across rounds 34, 35, and 36 is the heart of the whole construction. Therefore, mark every saved loop set as you go. Leave the hat tip unstuffed. Take your time sewing the body into the back loops of round 35. In conclusion, this little witch mushroom is ready to haunt whatever shelf it lands on.
Happy crocheting! Cannot wait to see your Halloween mushroom come to life.