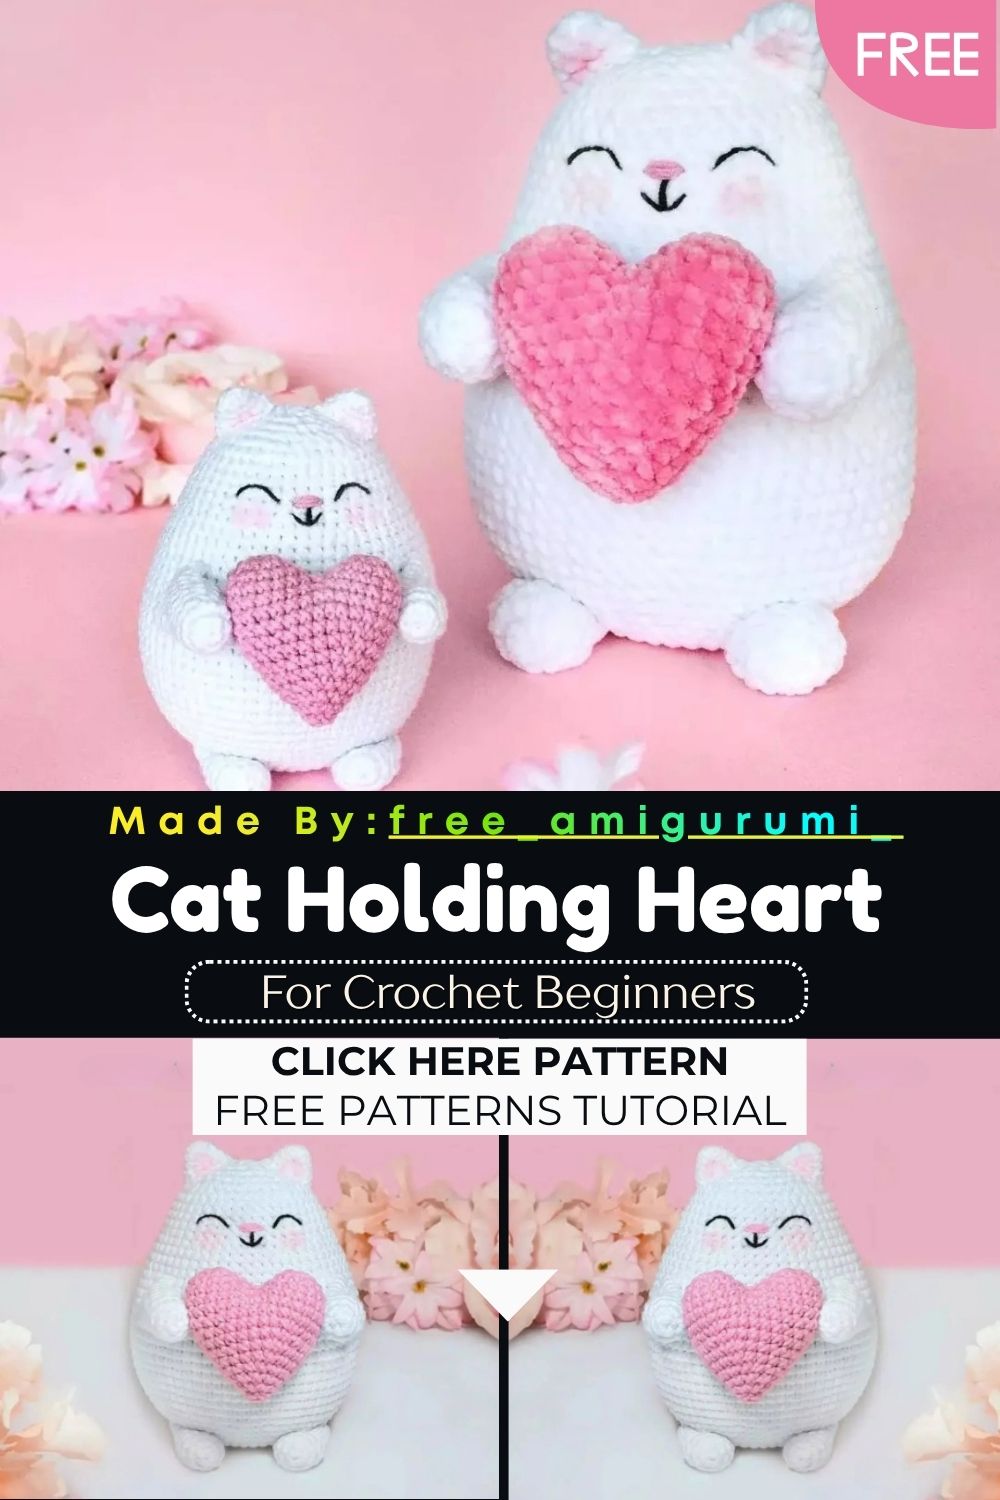
Cat Holding Heart Crochet Pattern – Step by Step
White, round, and clutching a pink heart with both paws, this Valentine kitten is the most heartwarming amigurumi you will stitch this season!
This cat is built from a foundation chain rather than a magic ring, which immediately gives the body an oval, slightly elongated base that reads as a natural cat silhouette without any extra shaping effort. The head and body are worked as one continuous piece from the bottom up, tapering toward the head at the closing rounds. Four separate limbs, a long chunky tail, two simple ears, and a two-part pink heart all assemble around the finished body to create a complete, characterful kitten holding a heart right at chest level.
The face is entirely embroidered with black thread for the eyes and nose, rose thread for the mouth, and pink eyeshadow for the cheeks and inner ears. It is one of those patterns where the finishing details do most of the expressive work.
Skill Level
Beginner to intermediate. The foundation chain body construction is the only departure from standard magic ring starts. Additionally, the two-part heart joining technique is easy to follow and the same method appears in many other amigurumi patterns.
Materials You Will Need
Yarn Alize Cotton Gold (sport/5 ply):
- White (No. 55) for the body, head, ears, tail, legs, and arms
- Pink (No. 98) for the heart
Other Supplies:
- Black and rose embroidery thread or yarn separated in half for face details
- Crochet hook — 2.0mm
- Polyester fiberfill stuffing
- Scissors
- Yarn needle
- Pink eyeshadow or pastel for cheek and ear coloring
Finished size: Approximately 10 to 12cm (4 to 5.5 inches) tall.
Abbreviations
- ST — Stitch
- CH — Chain
- SC — Single Crochet
- INC — Increase (2 sc in one loop)
- DEC — Decrease (2 sc together)
- (sc, inc) x N — Repeat N times
Pattern: Body and Head
Using white yarn. Stuff as you go.
Chain 9. Starting from the second chain from the hook:
R1: 7 sc, 3 sc in the last stitch, continue along the other side of the chain: 6 sc, inc (18) R2: inc, 6 sc, 3 inc, 6 sc, 2 inc (24) R3: 1sc, inc, 6sc, (1sc, inc) x3, 6sc, (1sc, inc) x2 (30) R4: 2sc, inc, 6sc, (2sc, inc) x3, 6sc, (2sc, inc) x2 (36) R5: 3sc, inc, 6sc, (3sc, inc) x3, 6sc, (3sc, inc) x2 (42) R6: (6sc, inc) x6 (48) R7: (7sc, inc) x6 (54) R8: (8sc, inc) x6 (60) R9: (9sc, inc) x6 (66) R10–21: 66 sc for 12 rounds (66) R22: (9sc, dec) x6 (60) R23–24: 60 sc for 2 rounds (60) R25: (8sc, dec) x6 (54) R26–27: 54 sc for 2 rounds (54) R28: (7sc, dec) x6 (48) R29: 48 sc (48) R30: (6sc, dec) x6 (42) R31–34: 42 sc for 4 rounds (42) R35: (5sc, dec) x6 (36) R36: (4sc, dec) x6 (30) R37: (3sc, dec) x6 (24) R38: (1sc, dec) x8 (16) R39: 6 dec (8)
Close the opening and hide the yarn end inside the body.
Face Details
Embroider both eyes using black thread at round 31, with 4 stitches between them.
Embroider the nose between rounds 30 and 31 using black thread. Work the mouth at round 29 using rose thread in a simple curved stitch.
Apply pink eyeshadow or chalk pastel to the cheeks with a dry brush. Apply the same color to the inside of both ears after they are sewn on.
Pattern: Ears Make 2
Using white yarn
R1: 6 sc in MR (6) R2: 6 sc (6) R3: (1sc, inc) x3 (9) R4: (2sc, inc) x3 (12)
Fasten off, leaving a long tail for sewing. Sew both ears onto the top of the head with 3 to 4 stitches between them.
Pattern: Tail
Using white yarn. Stuff as you go.
R1: 6 sc in MR (6) R2: 6 inc (12) R3–13: 12 sc for 11 rounds (12)
Fasten off, leaving a long tail for sewing. Sew the tail onto the back of the body between rows 5 and 6.
Pattern: Legs Make 2
Using white yarn. Stuff as you go.
R1: 6 sc in MR (6) R2: 6 inc (12) R3–8: 12 sc for 6 rounds (12)
Fasten off, leaving a long tail for sewing. Sew the legs between rows 3 and 6 with 6 stitches between them.
Pattern: Arms Make 2
Using white yarn. Stuff as you go.
R1: 6 sc in MR (6) R2: 6 inc (12) R3–11: 12 sc for 9 rounds (12)
Fasten off, leaving a long tail for sewing. Sew the arms between rows 21 and 25 with 28 stitches between them.
Pattern: Heart
Using pink yarn. Make 2 identical pieces.
R1: 6 sc in MR (6) R2: 6 inc (12) R3: (3sc, inc) x3 (15) R4: 15 sc (15)
Fasten off the first piece, leaving a tail for joining.
Do not cut the yarn on the second piece. Continue directly:
R5: 15 sc across the first piece, then join the second piece and crochet 15 sc across it (30) R6: 30 sc (30) R7: (8sc, dec) x3 (27) R8: (7sc, dec) x3 (24) R9: (6sc, dec) x3 (21) R10: (5sc, dec) x3 (18) R11: (4sc, dec) x3 (15) R12: (3sc, dec) x3 (12) R13: (2sc, dec) x3 (9) R14: 4 dec (5)
Close the opening and hide the yarn end inside.
Sew the finished heart to the arms of the cat so it sits at chest level, held between both paws.
Customization and Variation Ideas
- First, make the cat in soft grey instead of white for a tabby-inspired variation. Add light stripes using surface slip stitches in a darker shade after assembly.
- Additionally, swap the pink heart for red for a bolder Valentine’s Day color statement that photographs dramatically.
- Moreover, add tiny embroidered whiskers to the face using long straight stitches in white thread for an extra feline detail.
- Furthermore, make the heart in red and gold alternating rounds for a more festive, celebration-themed variation beyond Valentine’s Day.
- Also, try the arms slightly shorter by reducing the straight rounds to 6 instead of 9 for a stubbier, more compact cat body proportion.
- Finally, make a matching pair of one white cat and one grey cat, each holding one half of a split heart for a couples display set.
Common Mistakes to Avoid
- First, starting the body with a magic ring instead of a foundation chain: The chain 9 start is specifically what gives this cat its characteristic oval base. A magic ring produces a round base that changes the entire body shape.
- Additionally, cutting the yarn on the second heart piece before round 5: The second piece continues directly into the joining round without cutting. Cutting it means rejoining, which creates an extra end and a potential visible seam at the joining point.
- Also, sewing the arms too high: Arms sewn above row 21 sit too close to the head and cannot hold the heart at a natural chest level. Count rows carefully before pinning.
- Furthermore, placing eyes before the face embroidery is mapped: Mark all three face elements eyes, nose, and mouth with pins simultaneously before embroidering any of them. This ensures the whole face is balanced before committing.
- Moreover, sewing the heart to only one arm: The heart should be anchored to both arms simultaneously so it sits flat and centered at chest level rather than tilting to one side.
- Finally, applying cheek color before the face is fully assembled: Always add eyeshadow or pastel as the very last step. Applying it before the ears are on can result in color landing in the wrong position relative to the finished face.
Finishing Tips
- First, when closing the body at R39, thread the yarn tail through all 8 remaining stitches before pulling tight for the flattest, most invisible head closure.
- Additionally, stuff the tail firmly through all 11 straight rounds before fastening off. A loosely stuffed tail flattens with handling and loses its characteristic round shape.
- Moreover, sew each arm through both the front and back of the body rather than just through the surface stitches for a secure attachment that prevents either arm from rotating.
- Furthermore, when sewing the heart in place, run a few anchoring stitches through both the heart and both arm tips simultaneously rather than sewing each connection separately. This keeps the heart perfectly level.
- Also, use a dry brush when applying the cheek color and build it up in light circular passes rather than a single heavy application. This creates a soft, natural blush effect.
- Finally, photograph the finished cat from directly in front at eye level to show the full face expression, the held heart, and the seated body pose all in one clean, balanced frame.
Gifting Ideas
- First, wrap the finished cat in a small square of tissue paper tied with a pink ribbon for a Valentine’s Day gift that needs no elaborate packaging to look completely charming.
- Additionally, pair the kitten with a small handwritten love note tucked behind the heart for a personal touch that elevates the gift beyond just a handmade toy.
- Moreover, these cats make genuinely moving gifts for anyone who loves cats, handmade things, or both the combination of soft white yarn and the pink heart creates an immediate emotional response.
- Furthermore, make a matching set of two cats in white and grey holding a shared heart between them for a couples gift that feels genuinely thoughtful and original.
- Also, display the finished cat on a small shelf or desk alongside a few dried flowers or a small candle for a cohesive Valentine’s display that stays up well beyond February.
- Finally, these cats sell consistently at Valentine’s Day craft markets where the heart-holding pose creates immediate stopping power at any display table.
Conclusion
This kitten pattern is one of those projects where the construction logic and the finished result feel perfectly matched. The oval foundation chain body, the continuous head shaping, and the two-part joined heart are all genuinely satisfying to work through. Therefore, count the arm and leg placement rows carefully, map the face before embroidering any of it, and sew the heart to both arms at the same time for a balanced finished pose. In conclusion, this little white cat is ready to hold its heart out for whoever needs it most.