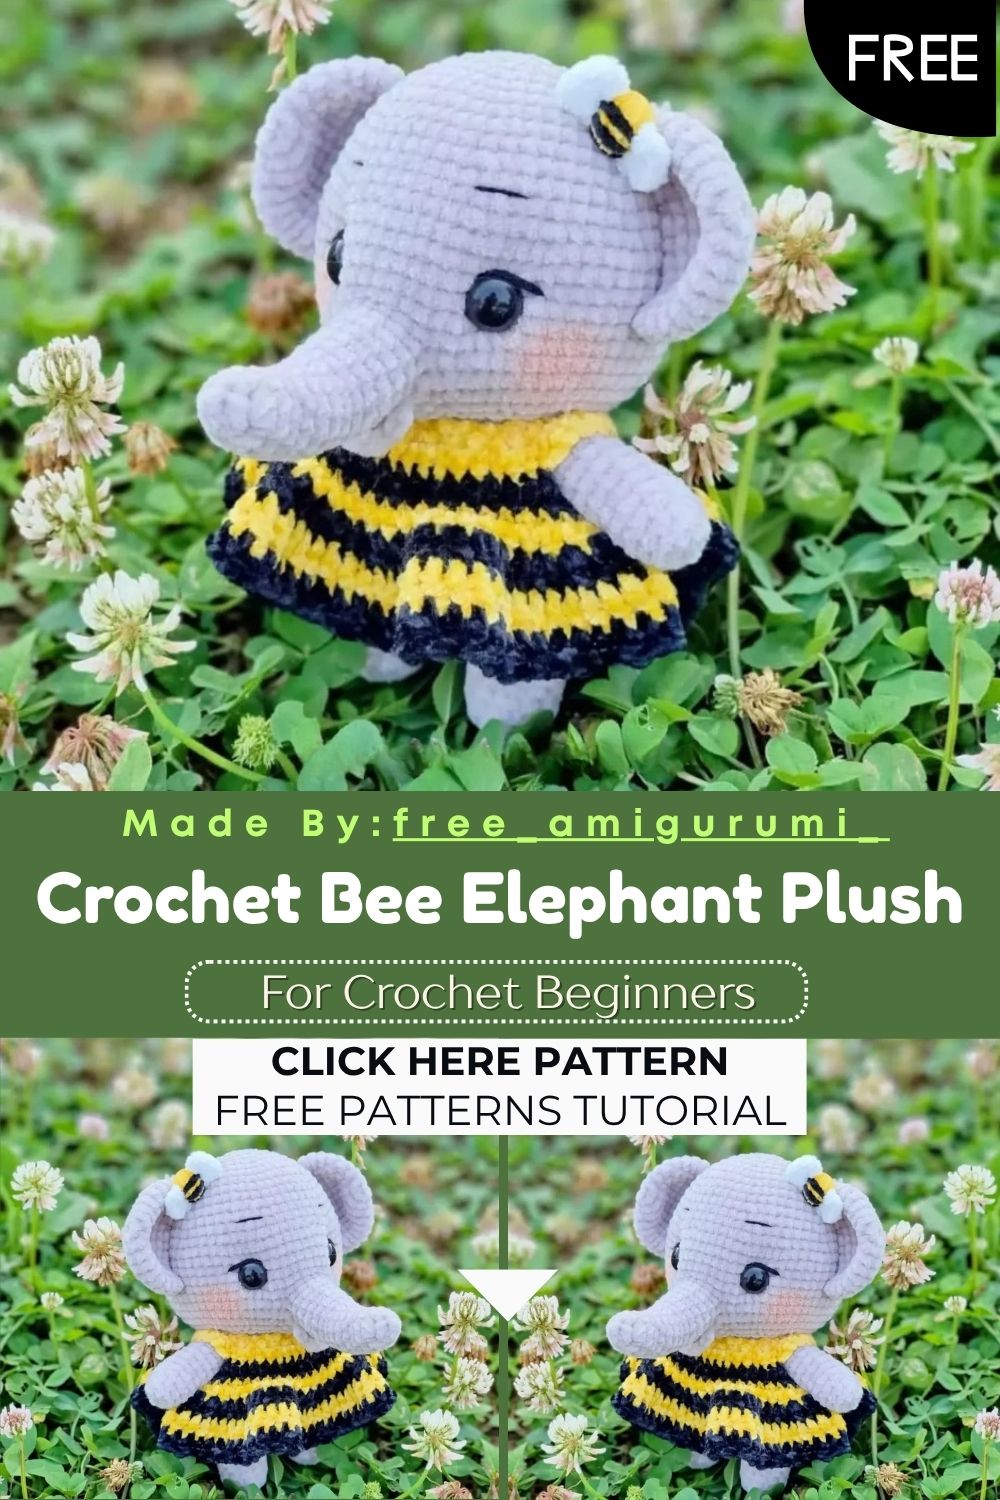
Charming Crochet Bee Elephant Plush – Free Amigurumi Pattern
A soft grey elephant dressed in a yellow and black striped bee costume, this charming amigurumi mashup is the most delightful character you will ever crochet!
This unique pattern combines two beloved amigurumi traditions into one irresistible character. A classic grey elephant with floppy ears, a long curved trunk, and four sturdy legs forms the foundation, while a fully removable bee-striped dress with a chained gap detail and tiny yellow bow transforms the whole piece into something genuinely original. The trunk construction works directly from the head’s leftover stitches, creating a seamless connection with no visible seam. Meanwhile, the dress uses simple chain gaps to create natural armholes and a button-fastened back flap for easy on-and-off styling. Whether displayed as a nursery decoration, gifted to a young child, or added to a collection of character mashup amigurumi, this bee elephant brings playful charm wherever it goes.
Skill Level
Intermediate. Single crochet in continuous rounds forms the foundation throughout. Additionally, the back loop only leg construction, integrated trunk technique, and removable dress with chain gaps introduce satisfying new skills.

Materials You Will Need
Yarn:
- Grey yarn for the head, body, ears, arms, legs, and trunk
- White yarn for the bee-bow base
- Yellow yarn for the bow wrapping and dress stripes
- Black yarn for the bow stripe details and dress stripes
Other Supplies:
- Crochet hook to suit your chosen yarn weight
- Safety eyes — 10mm
- Polyfill stuffing
- Buttons — 6mm
- Yarn needle
- Scissors
Abbreviations
- MR — Magic Ring
- X — Single Crochet
- A — Decrease
- V — Increase
- CH — Chain
- T — Half Double Crochet
- FO — Fasten Off
- SLST — Slip Stitch
Pattern: Head
Using grey yarn
R1: MR, 7X (7) R2: 7V (14) R3: 7 x (X, V) (21) R4: 7 x (2X, V) (28) R5: 7 x (3X, V) (35) R6: 7 x (4X, V) (42) R7: 7 x (5X, V) (49) R8–9: 49X for 2 rounds (49) R10: 7 x (6X, V) (56) R11–12: 56X for 2 rounds (56) R13: 14 x (3X, V) (70) R14–19: 70X for 6 rounds (70)
R20: 32X, chain 6 and skip 6 stitches, 32X (70)
This chain skip creates the foundation opening for the trunk, which will be built directly from this gap in the next section.
R21–22: 70X for 2 rounds (70) R23: 14 x (3X, A) (56) R24: 14 x (2X, A) (42) R25: 14 x (X, A) (28)
Fasten off. Stuff the head firmly before continuing to the nose section below.
Pattern: Nose (Trunk)
Return to R20 of the head. Crochet around the hole left by the chain skip.
R1: 14X (14) R2–4: 14X for 3 rounds (14) R5: 2 x (5X, A) (12) R6–8: 12X for 3 rounds (12) R9: 2 x (4X, A) (10) R10–12: 10X for 3 rounds (10) R13: 5A (5)
Fasten off, leaving a tail. Use a needle to sew the small remaining hole closed at the tip of the trunk.
Pattern: Arms Make 2
Using grey yarn
R1: MR, 5X (5) R2: 5V (10) R3–10: 10X for 8 rounds (10)
Fasten off, leaving a long tail for sewing.
Pattern: Ears Make 2
Using grey yarn
R1: MR, 7X (7) R2: 7V (14) R3: 7 x (X, V) (21) R4: 7 x (2X, V) (28) R5–8: 28X for 4 rounds (28) R9: 2 x (12X, A) (26)
Fasten off, leaving a long tail for sewing.
Pattern: Legs and Body
Using grey yarn
R1: MR, 6X (6) R2: 6V (12)
R3: BLO 12X (12)
This back loop only round creates a small ridge detail at the top of each leg.
R4–7: 12X for 4 rounds (12)
Cut yarn for the first leg. Make a second leg following the same R1–7 construction, but do not cut the yarn — instead, chain 4 and link to the first leg to begin joining into the body.
R8: 12X across leg 1, 4X along the chain, 12X across leg 2, 4X along the remaining chain (32)
R9: 16 x (X, V) (48) R10–13: 48X for 4 rounds (48) R14: 6 x (5X, A) (42) R15–16: 42X for 2 rounds (42) R17: 7 x (4X, A) (35) R18–21: 35X for 4 rounds (35) R22: 7 x (3X, A) (28) R23–25: 28X for 3 rounds (28)
Fasten off, leaving a long tail for sewing. Stuff the body firmly before closing completely, then sew the head onto the top of the body.
Pattern: Bee-Bow
Using white yarn
MR, 2ch, 2T, 2ch, slst, 2ch, 2T, 2ch, slst back into the MR. Tighten the magic ring firmly to form the classic bow shape.
Use yellow yarn to wrap around the center of the bow several times for the cinched middle detail.
Use black yarn to sew small stripe details across both bow loops, then sew the finished bow onto the top of the head.
Pattern: Under-Mouth Detail
MR, 2ch, 5T, 2ch, slst. Tighten the magic ring. Sew this small piece directly under the trunk for a sweet mouth-like detail.
Pattern: Dress
Starting with yellow yarn
R1: Chain 33, then work 32X along the chain (32)
R2: 16 x (X, V) (48)
Change to black yarn.
R3: 8X, chain 7 and skip 7 stitches, 18X, chain 7 and skip 7 stitches, 8X (48 total including chain gaps)
These two chain gaps create the armhole openings for the dress.
R4: 48X (48)
Change to yellow yarn.
R6: 2ch, T in the same stitch, then 2T in each stitch around for a fully ruffled skirt base.
Change to black yarn.
R7: 96T (96)
Change to yellow yarn.
R8: 96T (96)
Change to black yarn.
R9: 96T (96)
Fasten off.
Dress Back Flap
Insert hook into R5 and crochet from bottom to top: X, chain 4, 4X, chain 4, X.
Fasten off. Sew buttons sized 6mm onto the right flap to create a functional closure for easy dressing and undressing.
Customization and Variation Ideas
- First, swap the bee costume for a ladybug theme using red and black yarn instead of yellow and black for a completely different character personality.
- Additionally, make the dress in soft pastel stripes instead of bold yellow and black for a gentler, nursery-friendly color palette.
- Moreover, add tiny crocheted antennae to the top of the head alongside the bow for an even more bee-accurate finished look.
- Furthermore, create a matching mini elephant without the dress for a simpler, quicker version that still captures the same charming character.
- Also, embroider small flower details onto the dress skirt using contrasting thread for extra springtime charm.
- Finally, make the dress in a different insect theme entirely, butterfly stripes in purple and pink offer a beautiful alternative using the same construction technique.
Common Mistakes to Avoid
- First, skipping the chain gap at R20 of the head: This chain and skip sequence creates the essential opening for attaching the trunk. Missing this step leaves no foundation for the nose section to attach to.
- Additionally, working R3 of the legs in both loops instead of the back loop only: This round specifically requires BLO construction to create the correct ridge detail at the top of each leg.
- Also, cutting yarn on both legs before joining: Only the first leg should be cut. The second leg must remain connected to the chain and join directly to the body round.
- Furthermore, skipping the chain gaps in the dress at R3: These two chain sections create the armholes. Working straight through without skipping stitches results in a dress with no opening for the arms.
- Moreover, attaching the trunk before the head is fully stuffed: Stuff the head completely first, then work the trunk section, ensuring the connection point is secure and well-supported.
- Finally, mismatching the dress stripe color sequence: The pattern alternates yellow, black, yellow, black in a specific order through R6–9. Working colors out of sequence disrupts the classic bee stripe pattern.
Finishing Tips
- First, when sewing the trunk closed at the tip, work small, even stitches to create the smoothest possible curve at the very end of the trunk.
- Additionally, position the ears symmetrically on either side of the head, pinning both in place before sewing either one down permanently.
- Moreover, when wrapping yellow yarn around the bow center, keep consistent tension for a neat, evenly cinched bow shape.
- Furthermore, when assembling the dress, check that both armhole gaps align symmetrically before sewing the dress onto the elephant’s body.
- Also, sew the buttons securely onto the back flap with reinforced stitching, since this closure will be used repeatedly for dressing and undressing the toy.
- Finally, photograph the finished bee elephant both dressed and undressed to showcase the charming removable costume feature.
Gifting Ideas
- First, place the finished elephant inside a small gift box alongside a handwritten note describing the removable dress feature for an extra delightful surprise.
- Additionally, pair the bee elephant with a small board book about bees or elephants for a themed gift set for a young child.
- Moreover, this charming character makes a wonderful baby shower gift, especially given the soft yarn and playful, huggable design.
- Furthermore, make a small collection of differently dressed elephants using various insect or animal costume themes for a versatile, interchangeable toy set.
- Also, attach a small fabric care tag noting the yarn details for gift recipients who appreciate knowing the materials behind a handmade piece.
- Finally, this elephant sells exceptionally well at craft markets, where the removable costume feature creates genuine standout interactive appeal beyond typical static amigurumi designs.
Conclusion
This bee elephant amigurumi is a wonderfully creative project that combines clever construction techniques with genuine character charm. The integrated trunk technique, the back loop leg detail, and the fully removable bee dress together create a finished piece that feels both technically impressive and irresistibly playful. Therefore, work the chain gaps carefully at both the head and dress sections, keep your stripe colors in sequence, and take your time with the trunk attachment for the smoothest possible finish. In conclusion, this charming bee elephant is ready to buzz its way into someone’s heart.
Happy crocheting! Cannot wait to see your little bee elephant come to life.