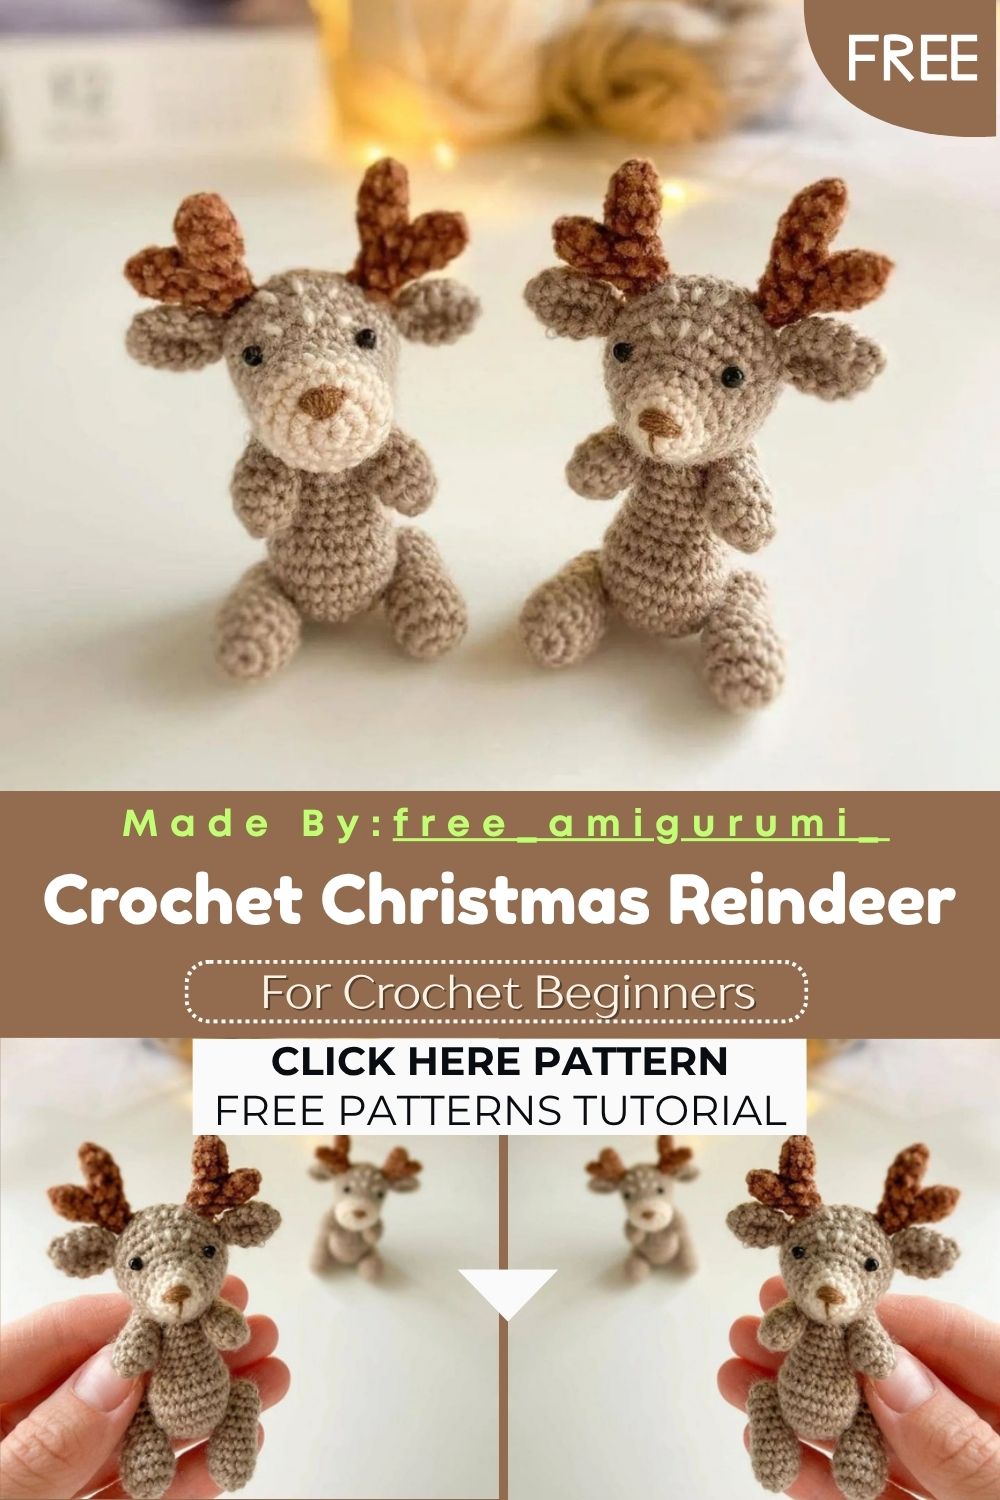
DIY Crochet Christmas Reindeer – Free Amigurumi Pattern
Standing just 6 to 7 centimeters tall with tiny brown horns and a sweet milky face, this little reindeer is the most charming mini holiday companion you will ever crochet!
Worked in fine thread weight yarn with a delicate 1.5mm hook, this miniature reindeer rewards patience with an incredibly detailed finished piece. Two head style options let you choose between a wide or narrow muzzle, giving you creative freedom right from the very first round. The two-part horn construction, fully articulated limbs, and tiny embroidered nose come together to create a finished reindeer that looks remarkably lifelike at such a small scale. Whether displayed in a miniature holiday scene, gifted as an ornament, or added to a growing collection of tiny seasonal creatures, this reindeer brings genuine handmade magic to any festive setting.
Skill Level
Intermediate to advanced. This pattern uses fine thread weight yarn at a small scale, which requires careful stitch counting and precise tension. Additionally, the two-part horn assembly and detailed limb construction reward patience and attention throughout.
Materials You Will Need
Yarn:
- Milky color — Vita Brilliant (380m/100g) or similar fine yarn for the upper head
- Beige color — Vita Brilliant for the body, head, ears, limbs, and tail
- Brown — thin chenille yarn or regular yarn for the horns
Other Supplies:
- Crochet hook — 1.5mm (Clover recommended)
- Plastic eyes — 3mm
- Craft glue
- Brown thin thread for nose embroidery
- White thread for forehead detail stitches
- Polyester fiberfill stuffing
- Needle, pins, scissors
Finished size: Approximately 6 to 7cm tall.
Abbreviations
- MR — Magic Ring
- CH — Chain
- SC — Single Crochet
- INC — Increase
- DEC — Decrease
- SLST — Slip Stitch
Pattern: Head Option 1 (Wide Muzzle)
Starting with milky yarn
R1: 6 sc in MR (6) R2: 6 inc (12) R3: (1sc, inc) x6 (18) R4: 18 sc (18)
Switch to beige yarn.
R5–6: 18 sc for 2 rounds (18) R7: 7sc, 4 inc, 7sc (22) R8: 7sc, inc, 6sc, inc, 7sc (24) R9: (3sc, inc) x6 (30) R10–12: 30 sc for 3 rounds (30) R13: (3sc, dec) x6 (24) R14: (2sc, dec) x6 (18) R15: (1sc, dec) x6 (12)
Stuff the head firmly.
R16: 6 dec (6)
Secure and cut off the thread, weaving in all ends.
Pattern: Head Option 2 (Narrow Muzzle)
Starting with milky yarn
R1: 6 sc in MR (6) R2: (1sc, inc) x3 (9) R3: (2sc, inc) x3 (12)
Switch to beige yarn.
R4: (3sc, inc) x3 (15) R5: (4sc, inc) x3 (18) R6: 7sc, 4 inc, 7sc (22) R7: 7sc, inc, 6sc, inc, 7sc (24) R8: (3sc, inc) x6 (30) R9–11: 30 sc for 3 rounds (30) R12: (3sc, dec) x6 (24) R13: (2sc, dec) x6 (18) R14: (1sc, dec) x6 (12) R15: 6 dec (6)
Secure and cut off the thread, weaving in all ends.
Pattern: Ears Make 2
Using beige yarn
R1: 6 sc in MR (6) R2: (1sc, inc) x3 (9) R3: (2sc, inc) x3 (12) R4: 12 sc (12) R5: (2sc, dec) x3 (9)
Cut off the thread, leaving a tail for sewing. Fold the edges together and sew them with a needle, then fold the ear in half once more and sew again to create the natural curved ear shape.
Pattern: Horns Make 2
Using brown yarn
R1: 5 sc in MR (5) R2–3: 5 sc for 2 rounds (5)
Crochet two equal parts following this same construction. Cut off the thread on the first part. Do not cut off the thread on the second part. Continue crocheting the horn from there.
Connect both parts: 4–5 sc on the first part, 5 sc on the second part (10)
R5: 5 dec (5) R6: 5 sc (5)
Cut off the thread, leaving a tail for sewing. Do not stuff the horn. Make the second horn following the same construction.
Pattern: Body
Using beige yarn
R1: 6 sc in MR (6) R2: 6 inc (12) R3: (1sc, inc) x6 (18) R4: (2sc, inc) x6 (24) R5–7: 24 sc for 3 rounds (24) R8: 6 dec, (1sc, dec) x4 (14) R9–11: 14 sc for 3 rounds (14) R12: (5sc, dec) x2 (12) R13: 12 sc (12)
Cut off the thread, leaving a tail for sewing. Stuff the body firmly.
Pattern: Tail
Using beige yarn
R1: 6 sc in MR (6) R2: (1sc, inc) x3 (9) R3: 9 sc (9)
Cut off the thread, leaving a tail for sewing. Fold the edges together and sew them with a needle.
Pattern: Legs — Make 2
Using beige yarn
R1: 6 sc in MR (6) R2: 6 inc (12) R3–5: 12 sc for 3 rounds (12) R6: (2sc, dec) x3 (9) R7–10: 9 sc for 4 rounds (9)
Stuff firmly. Tighten the hole, secure the thread, and weave in the ends.
Pattern: Arms — Make 2
Using beige yarn
R1: 6 sc in MR (6) R2: (1sc, inc) x3 (9) R3–4: 9 sc for 2 rounds (9) R5: (1sc, dec) x3 (6) R6–7: 6 sc for 2 rounds (6)
Stuff firmly. Tighten the hole, secure the thread, and weave in the ends.
Assembly
Eyes and Nose: Glue the eyes between the 7th and 8th rounds, positioned at the edges of the 4 increases of the 7th round for the wide muzzle option. For the narrow muzzle option, place eyes between the 6th and 7th rounds at the edges of the 4 increases of the 6th round. Embroider the nose with brown thread on the second round of the muzzle.
Ears and Horns: Sew the ears onto rounds 10–11 of the head for the narrow muzzle, or rounds 11–12 for the wide muzzle, positioned on the sides at eye level. Sew the horns just above the ears, positioned close to them. Embroider random small white stitches across the forehead for a subtle frosted detail.
Head to Body: Sew the completed head onto the body securely.
Arms: Attach the arms using thread attachment or sewing, positioned one round below the seam where the head meets the body.
Legs: Attach the legs using thread attachment or sewing, positioned between rounds 4 and 5 of the body on each side.
Tail: Sew the tail onto the back of the body at approximately rounds 5 to 6.
Customization and Variation Ideas
- First, try the narrow muzzle option for a more delicate, fawn-like reindeer face, or the wide muzzle option for a sturdier, classic reindeer expression. Both use the same body and limb construction.
- Additionally, use a soft grey or white yarn instead of beige for a winter-toned reindeer variation that pairs beautifully with snowy holiday displays.
- Moreover, add a tiny red yarn pompom nose for a Rudolph-inspired variation that instantly transforms the character and personality of the finished piece.
- Furthermore, embroider small gold or silver stitches across the body instead of plain white for a more glamorous, sparkling holiday finish.
- Also, attach a tiny bell to a small ribbon around the neck for a festive jingling detail that adds both sound and visual charm.
- Finally, make a small herd of reindeer using slightly different color combinations for the body and horns, creating a charming collection display for a holiday mantel.
Common Mistakes to Avoid
- First, mismatching the eye placement between head options: Wide and narrow muzzle versions have different eye placement rounds. Always double-check which head option you are working on before gluing eyes permanently.
- Additionally, losing stitch count at this small scale: Fine thread weight yarn at 1.5mm hook size makes miscounting very easy. Use a stitch marker consistently and count carefully after every round.
- Also, stuffing the horns: The horns must remain unstuffed for the correct slim, naturally tapered silhouette. Stuffed horns look bulky and lose their delicate antler-like appearance.
- Furthermore, connecting the horn parts incorrectly: The second horn part continues directly from its own working yarn rather than being fastened off separately. Cutting this yarn early breaks the continuous connection needed for R4.
- Moreover, sewing ears or horns before checking head orientation: Always identify the front of the head clearly before attaching any features. At this small scale, a mismatched placement is very noticeable and difficult to correct.
- Finally, gluing eyes before the head is fully stuffed and shaped: Wait until the head is completely stuffed and closed before gluing eyes, since stuffing can shift the surface slightly and affect final positioning.
Finishing Tips
- First, use fine-tipped tweezers or a pin to help position the tiny plastic eyes precisely before applying glue, especially given the small scale of this project.
- Additionally, when sewing the horns above the ears, angle them very slightly outward and upward for the most natural, antler-like positioning.
- Moreover, use a single fine strand of brown thread for the nose embroidery to keep the detail proportional against the delicate fine yarn body.
- Furthermore, when attaching limbs, use the thread-jointing method mentioned in the assembly notes if you want the arms and legs to remain slightly poseable rather than fixed in one position.
- Also, work the random white forehead stitches in small, varied lengths rather than a uniform pattern for the most natural, frost-dusted appearance.
- Finally, photograph the finished reindeer beside a small pinecone or sprig of greenery for scale reference and a naturally festive presentation.
Gifting Ideas
- First, attach a small loop of thread to the back of the finished reindeer for use as a miniature tree ornament that adds handmade charm to any holiday tree.
- Additionally, pair the reindeer with a tiny handwritten gift tag for a stocking stuffer that feels personal and thoughtfully made.
- Moreover, these little reindeer make wonderful additions to a miniature holiday village display alongside other small handmade or collected pieces.
- Furthermore, make a small herd of three or four reindeer in slightly varied colors and present them together as a complete holiday collection gift.
- Also, attach a small keyring to the back of a finished reindeer for a tiny, functional holiday-themed accessory.
- Finally, these miniature reindeer sell beautifully at winter craft markets, where their small scale and intricate detail create genuine standout appeal among larger, simpler holiday crafts.
Conclusion
This tiny crochet reindeer is a true labor of love, rewarding careful, patient stitching with an incredibly detailed finished piece. The choice between wide and narrow muzzle options means every maker can personalize the final character right from the start. Therefore, count your stitches carefully at this small scale, keep your horns unstuffed for the correct silhouette, and take your time with eye and ear placement. In conclusion, this little reindeer is ready to bring a delicate, handmade holiday charm to wherever it finds its home.
Happy crocheting! Cannot wait to see your tiny reindeer come to life.