Fantasy Crochet Dragon Soft Plush Amigurumi Pattern
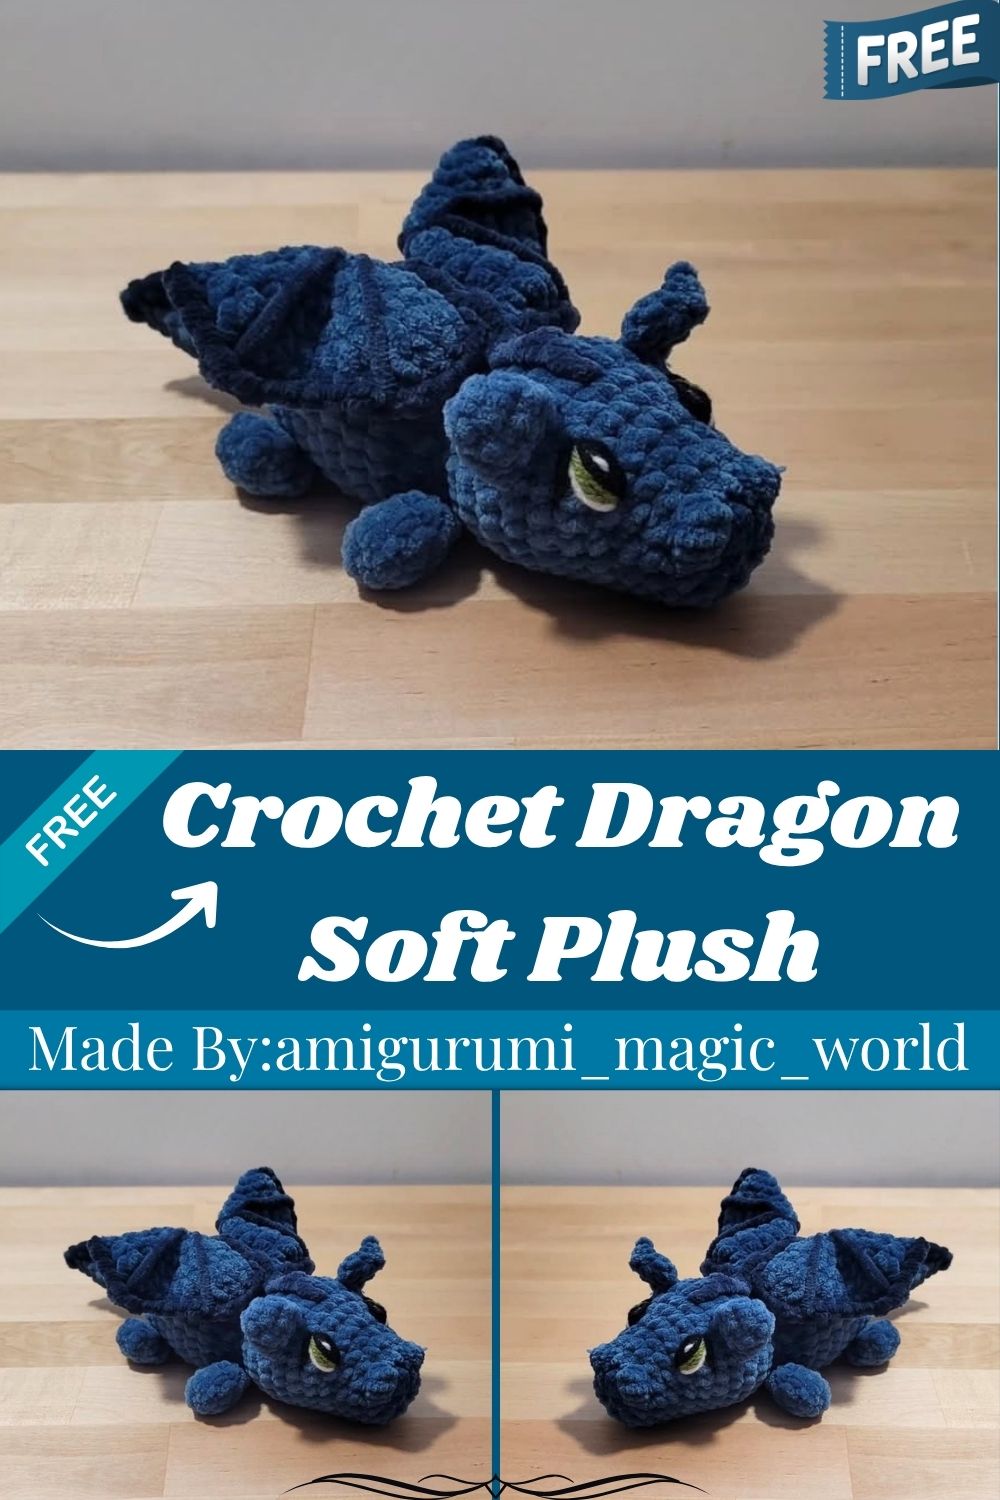
Pattern Overview
- First, a plush body worked from the tail up through the head in one piece
- Next, four matching pieces for the legs and arms, left unstuffed for a soft feel
- Also, two folded ears with a color-changed detail attached directly to the head
- Then, a pair of layered wings shaped with increasing rounds and stitched veins
- After that, safety eyes and bobble-stitch eyebrows for an expressive dragon face
- Finally, a crocheted spine of pointed stitches running from head to tail
- Overall, bulky yarn that keeps the whole project soft, plush, and quick to finish
Special Techniques
- To start, a magic ring beginning for a seamless, hole-free center on every piece
- Additionally, bobble stitches worked as 4 or 5 incomplete loops for raised texture
- Meanwhile, color changes between the two main yarn shades throughout the body
- For the wings, increasing rounds combined with stitched vein lines for shape and detail
- Likewise, single crochet worked directly into the body to attach the ears mid-round
- Finally, a repeated hdc, dc, hdc, slst bracket pattern to crochet the spiky spine
Skill Level
Intermediate crocheters will feel comfortable with this pattern, thanks to bobble stitches, color changes, and mid-round attachments. However, bulky yarn works up quickly, so patient beginners can succeed too.
Common Mistakes
- First, forgetting that the legs and arms stay unstuffed for a soft, floppy feel
- Also, attaching the ears before checking placement against the head shaping rows
- Similarly, placing the safety eyes without leaving the recommended 5 visible stitches apart
- In addition, crocheting the bobble eyebrows too tightly, which flattens the raised texture
- Sometimes, sewing the wings flat instead of angling them upward as instructed
- Finally, rushing the spine stitches, which can pull the back of the body out of shape
Uses & Benefits
A crochet dragon plushie brings imaginative play into any home beyond simple shelf decor. For instance, its soft bulky yarn body suits story time cuddles and encourages kids to invent dragon adventures. Additionally, gifting a handmade dragon shows far more thought than a mass-produced toy, and the spine and wing construction doubles as a satisfying challenge for the maker. Ngl, working through the bobble stitches and color changes builds real technique, resulting in a durable keepsake that lasts for years.
Helpful Beginner Tips
- First, count stitches after every round, especially through the head shaping rows
- Also, keep a stitch marker on the first stitch of each round at all times
- Similarly, practice the bobble stitch separately before working it into the eyebrows
- If needed, pin the ears and wings in place before sewing to check positioning
- Finally, weave in ends as you go instead of leaving them all for later
Assembly
Follow these steps in order, starting with the small pieces before moving to the body.
Materials
- Hook: 4.5mm crochet hook
- Yarn: Hobbii Honey Bunny (category 6, super bulky) in Cool Blue and Open Sea
- Stuffing
- Sewing needle
- Optional: 14mm safety eyes (or embroider the eyes instead)
Abbreviations
- MR = magic ring
- SC = single crochet
- INC = increase
- DEC = decrease
- HDC = half double crochet
- DC = double crochet
- SLST = slip stitch
- BBL = bobble, 4-5 incomplete loops
Legs & Arms
Make 4, and leave these unstuffed for a soft, floppy feel:
- R1: 6 sc in MR (6)
- R2: inc x6 (12)
- R3: 12 sc (12)
- R4: dec x6 (6) Once finished, fold the piece and single crochet 3 stitches across to close it. Fasten off, leaving a long tail for sewing.
Ears
Make 2:
- R1: 3 sc in MR (3)
- R2: inc x3 (6)
- R3: 6 sc (6) Fold the piece and single crochet 3 stitches across to close. Fasten off (no need for a long tail here).
Note: at this point, the original notes mention a color change to dark blue, with a long tail of light blue left sticking out for sewing later, followed by folding the piece in half and crocheting it closed at “R7: 3sc, dc x2, 5sc, dc x2, 3sc (15).” Since rounds 4 through 6 were not specified, this looks like it may belong to a separate spiked detail piece rather than a continuation of the ear itself. If you are working from this pattern, it is worth double-checking gauge and stitch count here before committing to the final shape.
Wings
Make 2:
- R1: 6 sc in MR (6)
- R2: inc x6 (12)
- R3: (1 sc, inc) x6 (18)
- R4: (2 sc, inc) x6 (24)
- R5: (3 sc, inc) x6 (30) Using dark blue, sew from the center point of the wing to the two highest points on the wing, repeating this for both sides.
- R6: (1 sc, slst, hdc, 2 dc, hdc, 1 sc, slst, 1 sc, hdc, 2 dc, hdc, 1 sc, slst) x2 (30)
Body
Begin with the tail:
- R1: 3 sc in MR (3)
- R2: inc x3 (6)
- R3: 6 sc (6)
- R4: (1 sc, inc) x3 (9)
- R5-R12: 9 sc, 8 rounds (9) Then, continue with the body:
- R13: (1 sc, inc x3) x2, 1 sc (15)
- R14: 3 sc, inc x2, 2 sc, inc, 2 sc, inc x2, 3 sc (20)
- R15: 4 sc, (inc, 2 sc) x2, inc x2, (2 sc, inc) x2, 2 sc (26)
- R16: 26 sc (26)
- R17: 10 sc, (inc, 1 sc) x4, 8 sc (30) From this point, add stuffing as you continue.
- R18-R21: 30 sc, 4 rounds (30)
- R22: 5 sc, (dec, 1 sc) x6, dec, 5 sc (23)
- R23: 3 sc, (dec, 1 sc) x6, 2 sc (17) Next, continue with the head:
- R24: 3 sc, (inc, 1 sc) x6, 2 sc (23)
- R25: 3 sc, (inc, 1 sc) x9, 2 sc (32)
- R26-R27: 32 sc, 2 rounds (32)
Before continuing, attach the ears: place each ear on top of the head, lining up your next stitch with the point where it was closed with 3 sc. Hook through the first stitch on the ear, then through the next stitch on the head, and single crochet as normal. Repeat this for the next stitch to secure the ear in place.
- R28: 12 sc, (3 sc through ear and head), 6 sc, (3 sc through ear and head), 8 sc (32) Note: you may need to adjust ear placement here depending on tension.
- R29: 7 sc, dec, 3 sc, dec, 1 sc, dec, 2 sc, dec, 1 sc, (dec, 3 sc) x2 (26)
- R30: 26 sc (26)
- R31: 9 sc, dec, 2 sc, dec x2, 2 sc, dec, 5 sc (22)
- R32: 7 sc, (dec, 1 sc) x4, 3 sc (18)
- R33: 18 sc (18) Insert the safety eyes between rounds 30 and 32, leaving about 5 visible stitches between them.
- R34: 7 sc, dec, bbl (4 loop), 1 sc, dec, 1 sc, bbl (4 loop), dec, 1 sc (15) Note: you may need to adjust the bobble placement here depending on tension.
- R35: dec x2, 1 sc, dec x5 (8) Once finished, fasten off and pull the yarn through the remaining 8 loops. Tie off and hide the ends.
Sew the Legs and Arms
Sew the legs and arms onto the sides of the belly. Attach the legs at the back of the body, angled slightly outward, and space them evenly apart from the tail. Sew the top of the arms in line with the row where the neck begins.
Dragon Spine
Using dark blue yarn, crochet the spine directly into the body, working from the top of the head down to the tail. Complete each stitch into a row along the back of the dragon. Pull up a loop and chain 1, then repeat [hdc, dc, hdc, slst] along the back until you reach the end of the tail. Fasten off and hide the ends.
Sew on the Wings
Make sure the spine of each wing points downward, then sew half of each wing onto either side of the body. This placement allows the wings to angle upward once the dragon is complete.
Where Can You Use This Case?
- For instance, a fantasy-themed nursery or kids’ bedroom shelf display
- Also, a handmade birthday gift for fans of dragons and mythical creatures
- Similarly, a soft imaginative-play toy for kids who love storytelling
- In addition, a craft fair or Etsy shop item that stands out from mass-produced toys
- Finally, a cozy centerpiece for a fantasy or medieval-themed room
Why Beginners Will Enjoy This Pattern
No joke, beginners tend to enjoy this pattern because the bulky yarn works up fast, so progress feels visible almost immediately. Furthermore, clear round-by-round counts make the body and head easy to follow, and as a result, the wings and spine feel like a rewarding finishing touch rather than an overwhelming task.
Tips and Tricks for Success
- First, block finished pieces gently to even out stitch tension before sewing
- Also, match the bulky yarn weight to a 4.5mm hook for snug, even stitches
- Then, pin the wings and ears in place before sewing to check the angles
- Additionally, save leftover yarn for small details like the bobble eyebrows or spine
- Finally, photograph each stage so future amigurumi projects go faster with less guesswork
Why This Crochet Pattern Is Trending
Fantasy amigurumi keeps climbing search trends as fans of dragons, mythical creatures, and fantasy media look for handmade collectibles. Real talk, super bulky yarn projects also appeal to crafters wanting a faster finish without sacrificing detail, and as a result, this pattern fits neatly into both fantasy fan gifting and quick-project search trends.
- Overall, dragon and fantasy-creature searches have grown steadily across Pinterest and Etsy
- Additionally, super bulky yarn projects remain popular for their fast, satisfying finish
- Furthermore, dragon plushies appeal to both kids and adult collectors, widening the gift market
Conclusion
For real, this crochet dragon amigurumi pattern proves that bulky yarn and a little patience can produce a genuinely striking handmade gift. Overall, whether it sits on a fantasy-themed shelf or travels home in a birthday gift bag, this little dragon brings imaginative, handmade warmth that store-bought toys simply cannot match.