
Cute Crochet Duck with Hats Keychain Amigurumi Pattern
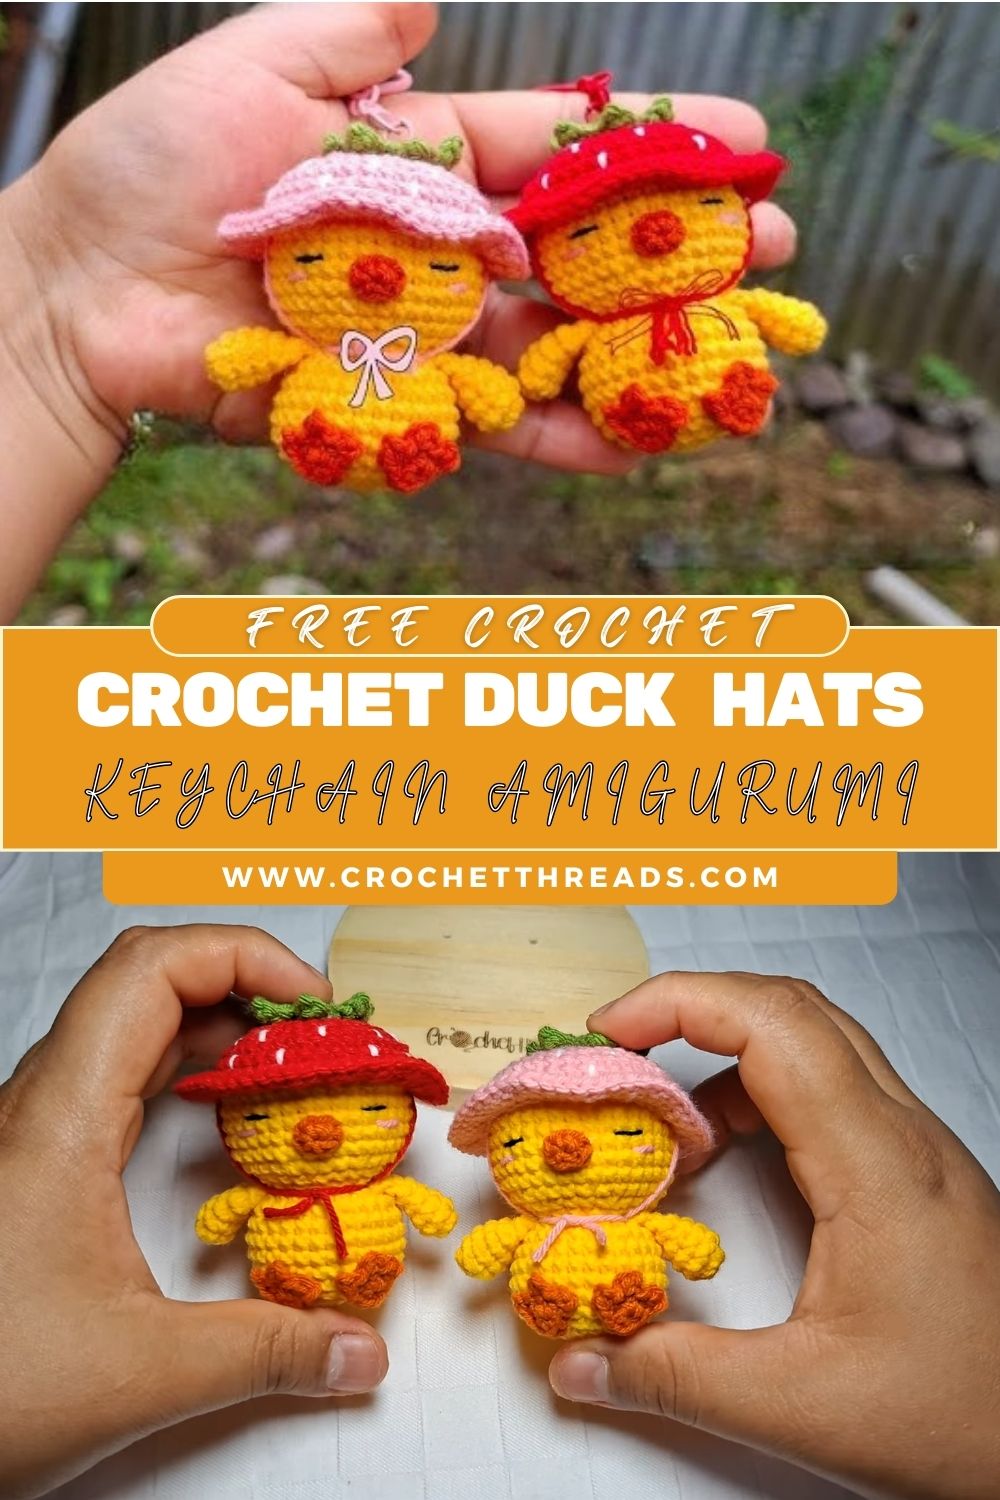
This crochet duck keychain project features two mini amigurumi ducks one wearing a red strawberry hat and the other a pink mushroom hat. They’re adorable, pocket-sized, and perfect as gifts or bag charms.
If you love tiny, collectible crochet makes, these mini amigurumi duck keychains are a must-try. Fruit-themed and mushroom-themed designs are trending because they instantly add a playful, kawaii vibe perfect for keychains, bag charms, and craft-market bestsellers.
This pattern is designed to be beginner-friendly: it uses mostly single crochet with simple increases and decreases, plus easy embroidery for the sleepy eyes. Whether you’re crocheting for fun, creating handmade gifts, or building products for your small business, this duck keychain set is a quick project with a high “cute factor.”
You can use these mini ducks as a keychain, backpack charm, gift topper, nursery decor accent, or a craft fair / online shop product. Make them as a matching pair, a couple set, or a themed collection in different colors.
Each duck has:
- A yellow mini duck body with a round, chubby shape
- A soft, handmade amigurumi texture (tight stitches)
- Sleepy embroidered eyes for a calm, cute expression
- A small orange beak placed right at the center of the face
- Tiny orange feet that help the duck look like it’s sitting
Two themed hats complete the look:
- Pink mushroom hat: a rounded cap with small green top accents and an optional ribbon/bow detail
- Red strawberry hat: a strawberry-shaped hat with white seed details and a green leafy top
Overall aesthetic: kawaii, collectible charm style perfect for a mini plush keychain.
Materials List
You’ll likely need:
- Yellow yarn (duck body)
- Orange yarn (beak + feet)
- Red yarn (strawberry hat)
- Pink yarn (mushroom hat)
- Green yarn (leaf top + accents)
- White yarn (strawberry seeds)
- Crochet hook: usually 2.0 mm–3.0 mm (choose smaller for tighter amigurumi fabric)
- Fiberfill / stuffing
- Yarn needle (sewing + embroidery)
- Stitch marker
- Scissors
- Keychain ring or lobster clasp
- Ribbon or decorative bow (optional)
Note: You can adjust yarn weight and hook size to match your preference just aim for tight stitches so stuffing doesn’t show.
Abbreviations (Clear for Beginners)
- MR (Magic Ring): adjustable starting ring
- ch (chain): foundation chain/loop
- sl st (slip stitch): join rounds or close edges neatly
- sc (single crochet): main amigurumi stitch
- inc (increase): 2 sc in the same stitch
- dec (decrease): turn 2 stitches into 1 (prefer invisible decrease)
- hdc (half double crochet): medium-height stitch
- dc (double crochet): taller stitch
- FO (fasten off): cut yarn and secure the end
Pattern Difficulty + Finished Size
- Skill level: Beginner (basic amigurumi)
- Time: about 1–2 hours per duck (including hat)
- Finished size: approx. 5–7 cm (depends on yarn/hook/tension)
- Keychain-ready: Yes perfect mini size for daily use
Step-by-Step Pattern Breakdown (Tutorial Guide)
This pattern is written for continuous rounds (no joining). Use a stitch marker to track the first stitch of each round.
A. Head and Body (One Piece)
Goal: a smooth round head that transitions into a chubby body.
- Start:
- Round 1: MR, 6 sc
- Round 2: inc around = 12
- Round 3: (1 sc, inc) x6 = 18
- Round 4: (2 sc, inc) x6 = 24
- Round 5: (3 sc, inc) x6 = 30
- Rounds 6–8: 30 sc (build head height)
- Neck + Body shaping:
- Round 9: (3 sc, dec) x6 = 24 (gentle neck)
- Round 10: (2 sc, dec) x6 = 18
- Round 11: (2 sc, inc) x6 = 24 (start body)
- Round 12: (3 sc, inc) x6 = 30
- Rounds 13–15: 30 sc (chubby body)
- Stuffing tip:
Start stuffing around Round 14, adding small amounts and shaping as you go. - Close the bottom:
- Round 16: (3 sc, dec) x6 = 24
- Round 17: (2 sc, dec) x6 = 18
- Round 18: (1 sc, dec) x6 = 12 (final stuffing adjustment)
- Round 19: dec x6 = 6
- FO, leave a tail, and close neatly with a yarn needle.
B. Beak
Option 1: Crochet beak (recommended)
- MR, 6 sc
- Next round: 6 sc (or slightly puffier: (1 sc, inc) x3 = 9)
- FO, leave tail for sewing.
Placement: Center of face, slightly below the eye line. Pin first, then sew.
Option 2: Embroidered beak
For extra-mini ducks, embroider a small oval/triangle with orange yarn.
C. Eyes and Facial Expression
Sleepy eyes (embroidery):
- Use black or dark brown yarn.
- Make two small curved lines (2–3 short stitches each).
- Keep both eyes at the same height for a balanced kawaii look.
Optional blush:
Add tiny pink stitches on both cheeks or use fabric blush very lightly.
D. Wings (Make 2)
- MR, 6 sc
- (1 sc, inc) x3 = 9
- Optional: 1 round of 9 sc for a fuller wing
- FO, leave tail.
Sewing tip: Attach wings to the sides of the body, slightly below the face level.
E. Feet
Option 1: Crocheted feet (cute and sturdy)
For each foot:
- ch 4
- From 2nd chain: sl st, sc, hdc
- FO, leave tail.
Option 2: Embroidered feet
Embroider small “V” shapes or short lines at the bottom front.
Placement: Bottom front area, evenly spaced so the duck looks like it’s sitting.
F. Strawberry Hat
Red hat base:
- MR, 6 sc
- inc around = 12
- (1 sc, inc) x6 = 18
- (2 sc, inc) x6 = 24
- 1 round of 24 sc
- If needed for fit: (3 sc, inc) x6 = 30
White seeds:
Embroider small white dots randomly but evenly (like real strawberry seeds).
Green leafy top:
- Make a small center (MR, 6 sc)
- Create 4–5 leaves: (ch 3, sl st back down) repeated around
- Sew to the top of the hat.
Fit: Try it on the duck head and adjust. You can keep it removable or secure it with a few stitches.
G. Mushroom Hat
Pink cap:
- MR, 6 sc
- inc = 12
- (1 sc, inc) x6 = 18
- (2 sc, inc) x6 = 24
- (3 sc, inc) x6 = 30
- 1 round of 30 sc
- Edge: sl st or sc round for a clean finish
- FO
Green top accents:
Add tiny green knots/leaves near the top using short chains or small embroidered details.
Ribbon/bow:
Sew a small ribbon bow on the side or front edge.
Fit: Place it so the face stays visible. Stitch lightly if you want it permanently attached.
H. Assembly (Putting It All Together)
Recommended order:
- Sew the beak
- Embroider eyes (and blush if desired)
- Sew wings evenly
- Attach feet symmetrically
- Fit and attach the hat (removable or stitched)
Pro finish: Weave in ends inside the body, tighten knots well, and reshape gently with your hands.
I. Keychain Finishing
- Create a hanging loop at the top of the head or hat:
- Yarn loop: ch 8–12, join with sl st, reinforce with extra stitches.
- Attach a jump ring / keyring or lobster clasp.
For selling/daily use: Reinforce the loop from the inside (stitch through the body several times) so it won’t pull out.
Full Pattern Notes
- Tension affects size tighter stitches = cleaner amigurumi.
- Use invisible decrease for a smoother finish.
- A stitch marker prevents losing count in continuous rounds.
- Stuff gradually and shape as you go; don’t overstuff.
- Embroidery placement changes the expression—pin/mark first.
- Hats can be removable or permanently stitched depending on your use.
Customization Ideas
- Change hat colors: blue mushroom, pastel strawberry, polka-dot cap.
- Make different duck colors: white, beige, pastel yellow.
- Create a bigger plush using thicker yarn + a larger hook.
- Turn it into a bag charm with a lobster clasp and strap.
- Baby shower version: cotton yarn + embroidered details only.
- Build a seasonal fruit series (cherry, peach, watermelon).
- Make a pastel mushroom set for collectors.
- Couple/best-friends set: matching hats or initials.
- Add a tiny name tag/initial charm.
Common Mistakes to Avoid
- Uneven stitch count (always count at the end of rounds).
- Overstuffing (creates stretched stitches and messy shape).
- Loose sewing on wings/feet (they may fall off).
- Asymmetrical face (mark placements before embroidery).
- Oversized hat (fit-check as you crochet).
- Weak keychain loop (must be reinforced for durability).
Who Is This Pattern Best For?
- Beginners learning amigurumi shaping
- Crochet hobbyists who love quick, cute projects
- Handmade gift makers
- Craft sellers (fast to make, easy to bundle as sets)
- Keychain and bag charm lovers
- Kawaii accessory fans and collectors
Selling Tips for Handmade Businesses
- Sell as a gift item with simple packaging (clear pouch + thank-you card).
- Offer both keychain and bag charm options (ring vs lobster clasp).
- Bundle as a couple set (strawberry + mushroom) for higher value.
- Take custom orders: colors, ribbon, initials, facial expressions.
- Market as a mini fruit/fantasy plush collection customers love collecting series.
Conclusion
These mini crochet amigurumi duck keychains with a strawberry hat and a pink mushroom hat are small, stylish, and full of personality. They’re the kind of project that looks impressive but is still easy enough for beginners—plus they’re perfect for gifts and handmade business stock. Try the pattern, play with colors, and create your own adorable duck theme set!


