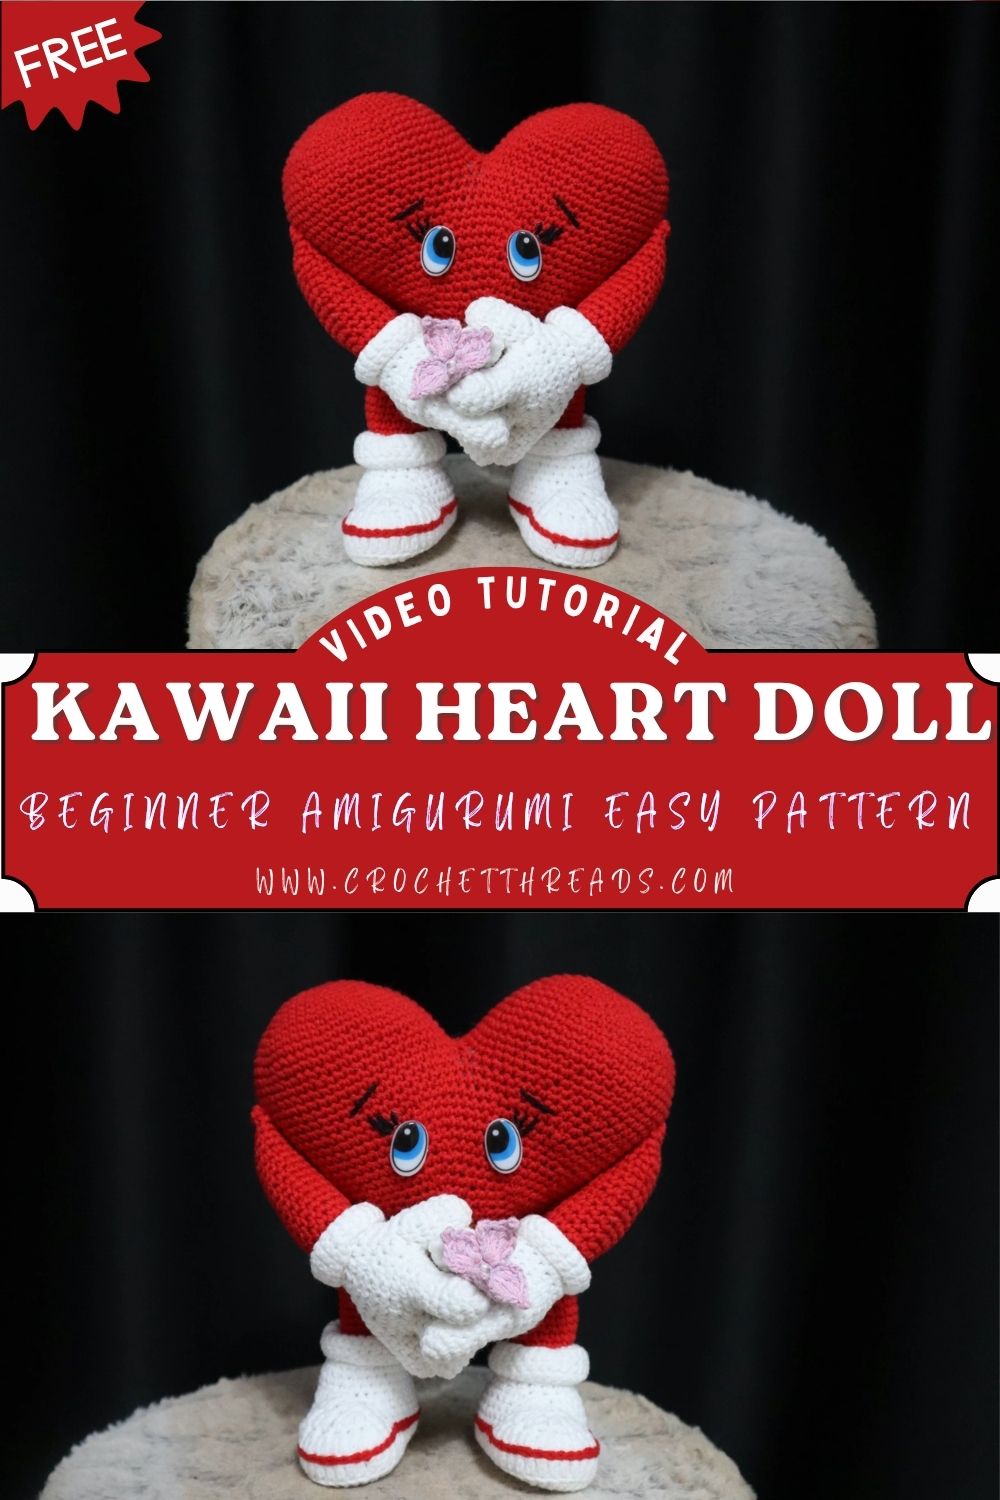
Wonderful Crochet Kawaii Heart Doll Beginner Amigurumi Easy Pattern
Sweet stitches and a little sparkle can turn a simple ball of yarn into a tiny friend. This Kawaii Heart Doll Amigurumi brings cozy charm with an adorable heart-shaped body.
Soft, playful, and beginner-friendly, this design is made for relaxed crafting days. Cute boots, tiny gloves, and a small center detail make the doll feel extra special.
Heart designs stay popular in crochet because they’re instantly cheerful and easy to recognize. A heart shape also looks great in plush form, round, squishy, and comforting, so it naturally fits the amigurumi style. People love heart projects for Valentine’s Day, anniversaries, baby showers, and “just because” gifts, since the shape already carries a sweet message.
This kawaii heart doll is more than a plush heart: it has personality. The heart-shaped body gives it a playful silhouette, while the cute facial expression adds warmth. Little arms reach forward, glove-like hands hold a small decorative detail, and simple boots complete the doll as a character. This project suits beginners who know basic stitches and want a friendly challenge with shaping, plus it’s a lovely handmade decor piece for shelves, desks, or gift baskets.
Materials Needed
- Red yarn (heart body): 50 g / approx. 90–110 m (DK/light worsted)
- White yarn (gloves + boots): 20 g / approx. 35–45 m (same weight as red)
- Pink yarn (center embellishment): 5 g (approx.) 8–12 m
- Crochet hook: 2.75 mm or 3.0 mm (choose the size that gives tight stitches)
- Safety eyes: 8 mm (1 pair)
- Black embroidery thread (or thin black yarn): about 40 cm for brows/lashes and small details
- Stuffing: 25–35 g polyester fiberfill (enough for a firm plush)
- Yarn needle: 1
- Stitch marker: 1 (or a scrap of yarn)
- Scissors: 1
Finished size: about 12–15 cm tall, depending on yarn, hook, and stuffing firmness.
Skill Level
Beginner to Easy (basic stitches, simple shaping, light sewing)
Abbreviations
- MR = Magic Ring
- sc = single crochet
- inc = increase (2 sc in the same stitch)
- dec = decrease (single crochet 2 together)
- sl st = slip stitch
- ch = chain
Notes: Work in continuous rounds unless stated. Use a stitch marker to track the first stitch of each round.
Time Planning at a Glance
Estimated total time: 2.5 to 4 hours
- Heart body: 60–90 min
- Arms: 20–30 min
- Gloves: 15–20 min
- Legs: 20–30 min
- Boots: 20–30 min
- Face detailing: 10–15 min
- Assembly and finishing: 30–45 min
Pattern Instructions
Heart Body
This body is built from two “top bumps” that get joined, then shaped into a point.
Make Top Bump A (red):
- R1: MR, 6 sc (6)
- R2: inc x6 (12)
- R3: (sc, inc) x6 (18)
- R4: (2 sc, inc) x6 (24)
- R5–R6: sc around (24)
Fasten off and set aside.
Make Top Bump B (red):
Repeat Top Bump A, but do not fasten off after R6.
Join to form the heart top:
- With Top Bump B still on the hook, sc into a stitch of Top Bump A and continue crocheting around Top Bump A (24 sc).
- Then continue around Top Bump B (24 sc).
You now have 48 stitches around the joined shape.
Shape the heart downward:
- Round: sc around (48)
- Round: (6 sc, dec) x6 (42)
- Round: sc around (42)
- Round: (5 sc, dec) x6 (36)
- Round: sc around (36)
- Round: (4 sc, dec) x6 (30)
Add stuffing gradually:
Start filling now. Push stuffing into both top curves to keep them rounded. Keep the center joint smooth and firm, but not stretched.
Create the lower point:
- (3 sc, dec) x6 (24)
- sc around (24)
- (2 sc, dec) x6 (18)
Add a little more stuffing, shaping the point with your fingers. - (sc, dec) x6 (12)
- dec x6 (6)
Fasten off, weave the tail through the last stitches, pull tight, and hide the end.
Legs
Make 2 (red). Legs are small, simple tubes that sit under the heart.
- R1: MR, 6 sc (6)
- R2: inc x6 (12)
- R3–R6: sc around (12)
Lightly stuff each leg so it holds shape without becoming stiff. Fasten off with a long tail for sewing.
Tip: Keep both legs the same length by counting rounds carefully.
Boots / Shoes
Make 2 (white). These boots are rounded and slightly wider than the leg.
- R1: MR, 6 sc (6)
- R2: inc x6 (12)
- R3: (sc, inc) x6 (18)
- R4: sc around (18)
- R5: (4 sc, dec) x3 (15)
- R6: sc around (15)
Optional simple red accent: add one thin “ankle stripe” by surface stitching a short red line near the top of the boot, or embroider a tiny red V/line at the front.
Fasten off,f leaving a tail for sewing stuff lightly just enough to keep the toe rounded.
Arms
Make 2 (red). These are slim and slightly curved when stuffed.
- R1: MR, 6 sc (6)
- R2: (sc, inc) x3 (9)
- R3–R7: sc around (9)
Add a small pinch of stuffing, mostly near the lower half, so the arm can naturally bend inward. Fasten off,f leaving a tail for attaching.
Gloves / Hands
Make 2 (white). Simple mitten-style hands keep the look extra cute.
- R1: MR, 6 sc (6)
- R2: (sc, inc) x3 (9)
- R3: sc around (9)
- R4: (sc, dec) x3 (6)
Stuff very lightly. Fasten off with a tail.
These small gloves look sweetest when slightly rounded rather than heavily filled.
Center Detail
Inspired by the tiny accent held in the hands, choose an easy mini bow/flower. Here’s a qui,ck tiny bow (pink):
- Ch 6
- Sl st into the first chain to form a small ring
- Ch 1, work 10 sc into the ring, sl st to join
- Wrap yarn around the center of the circle 3–4 times, pull snug to pinch it like a bow
Fasten off, leaving long tails for tying/sewing between the hands.
Alternative: make a mini flower by stitching 5 small loop petals with chain loops—either option stays cute and simple.
Face Details
A kawaii face looks best placed low enough to feel “baby cute,” but not too close to the point.
- Insert 8 mm safety eyes between the top curves, around the upper-middle area of the heart. A common spacing is 6–8 stitches apart, adjusted to your heart width.
- Use black thread to stitch tiny eyebrows slightly above the eyes. Small curved lines give a gentle, sweet mood.
- Optional: add tiny lashes at the outer edge of each eye with 1–2 short stitches.
Extra cozy touch: blush cheeks with pink yarn or a soft makeup blush (very lightly).
Assembly Instructions for ( Crochet Kawaii Heart Doll )
Take a moment to pin parts in place before sewing. This makes the doll look balanced.
- Attach legs to body:
- Position legs under the heart, centered left and right.
- Sew each leg securely using the long tail, stitching through both the leg and the heart body.
- Check that the doll can sit nicely; adjust the angle just before tightening.
- Attach boots to legs:
- Slide a boot onto each leg end.
- Sew around the top edge of the boot to the leg with small, neat stitches.
- Attach arms to sides:
- Place arms on the sides of the heart, slightly forward so the hands can meet in front.
- Sew firmly, especially at the top of each arm, where it takes the most pull.
- Attach gloves to arms:
- Stitch each glove to the end of an arm.
- Angle the gloves inward so they look like they’re holding something.
- Add center detail between the hands:
- Sew or tie the pink bow/flower between the two gloves.
- A few stitches through the center will keep it from wobbling.
- Finalize facial features:
- Confirm eye placement looks even.
- Stitch brows/lashes last so you can match the expression to the final shape.
Beginner Tips for ( Crochet Kawaii Heart Doll )
- Even stitches: Keep the tension throughout; tight stitches help keep stuffing hidden.
- Heart shaping: Use your fingers to sculpt both top bumps while you add stuffing. A little extra stuffing near the curves gives that classic heart look.
- Symmetrical eyes: Mark the positions with pins or scrap yarn before locking the safety eyes. Step back and check from a distance.
- Stuffing amount: Aim for “plush and smooth,” not rock-hard. Overstuffing can stretch stitches and flatten the heart curves.
- Standing or sitting: This doll often sits best. For a steadier sit, gently flatten the area at the bottom of the seat and keep the legs evenly spaced.
Common Mistakes to Avoid
- Uneven heart shaping: Mismatched top bumps can happen when rounds are skipped. Count carefully and keep both bumps identical.
- Overstuffing the point: Too much stuffing at the bottom makes it look rounded rather than heart-shaped. Add small pieces slowly.
- Loosely attached limbs: Arms and legs get tugged during handling. Use tight stitches and go around attachment points more than once.
- Mismatched glove/boot sizes: Use the same hook and tension for both sides. Finishing one piece, then immediately making the twin, helps.
- Poor facial placement: Eyes too high can look surprised; too low, crowded. Center them between the curves with comfortable spacing.
Fun Ways to Personalize It
- Change the heart color: Try pastel rainbow, classic pink, or even ombré yarn for a unique mood.
- Turn it into a Valentine gift: Add a tiny stitched initial or a small felt heart patch on the body.
- Make it shelf decor: Create a small “base pillow” or mini crochet blanket for the doll to sit on.
- Create a mini keychain version: Use thinner yarn and a smaller hook, then add a keyring loop at the top.
- Add a tiny sign, flower, or bow: Swap the center detail for a mini rose, a little tag, or a tiny banner that says “love.”
Finishing Touches for ( Crochet Kawaii Heart Doll )
- Smooth the shape: Gently squeeze and massage the heart to round out the top curves and sharpen the bottom point.
- Check stuffing balance: Add or remove a tiny bit of stuffing so the body looks full but not stretched or bumpy.
- Tighten loose seams: Give the arms, legs, gloves, and boots a light tug; add a few extra stitches wherever they feel wobbly.
- Neaten the face: Confirm both eyes look even; adjust eyebrow/lash stitches so the expression feels sweet and balanced.
- Hide yarn tails: Weave ends into the body, run them through a few different directions, then trim close so nothing pops out later.
- Clean the finish: Lightly brush off lint/fuzz and trim any stray fibers for a tidy, gift-ready look.
Conclusion
This Kawaii Heart Doll Amigurumi is the kind of project that feels like a warm hug in yarn form, sweet, playful, and wonderfully beginner-friendly. Pick your favorite colors, take your time with the shaping, and enjoy watching the little heart character come to life stitch by stitch.