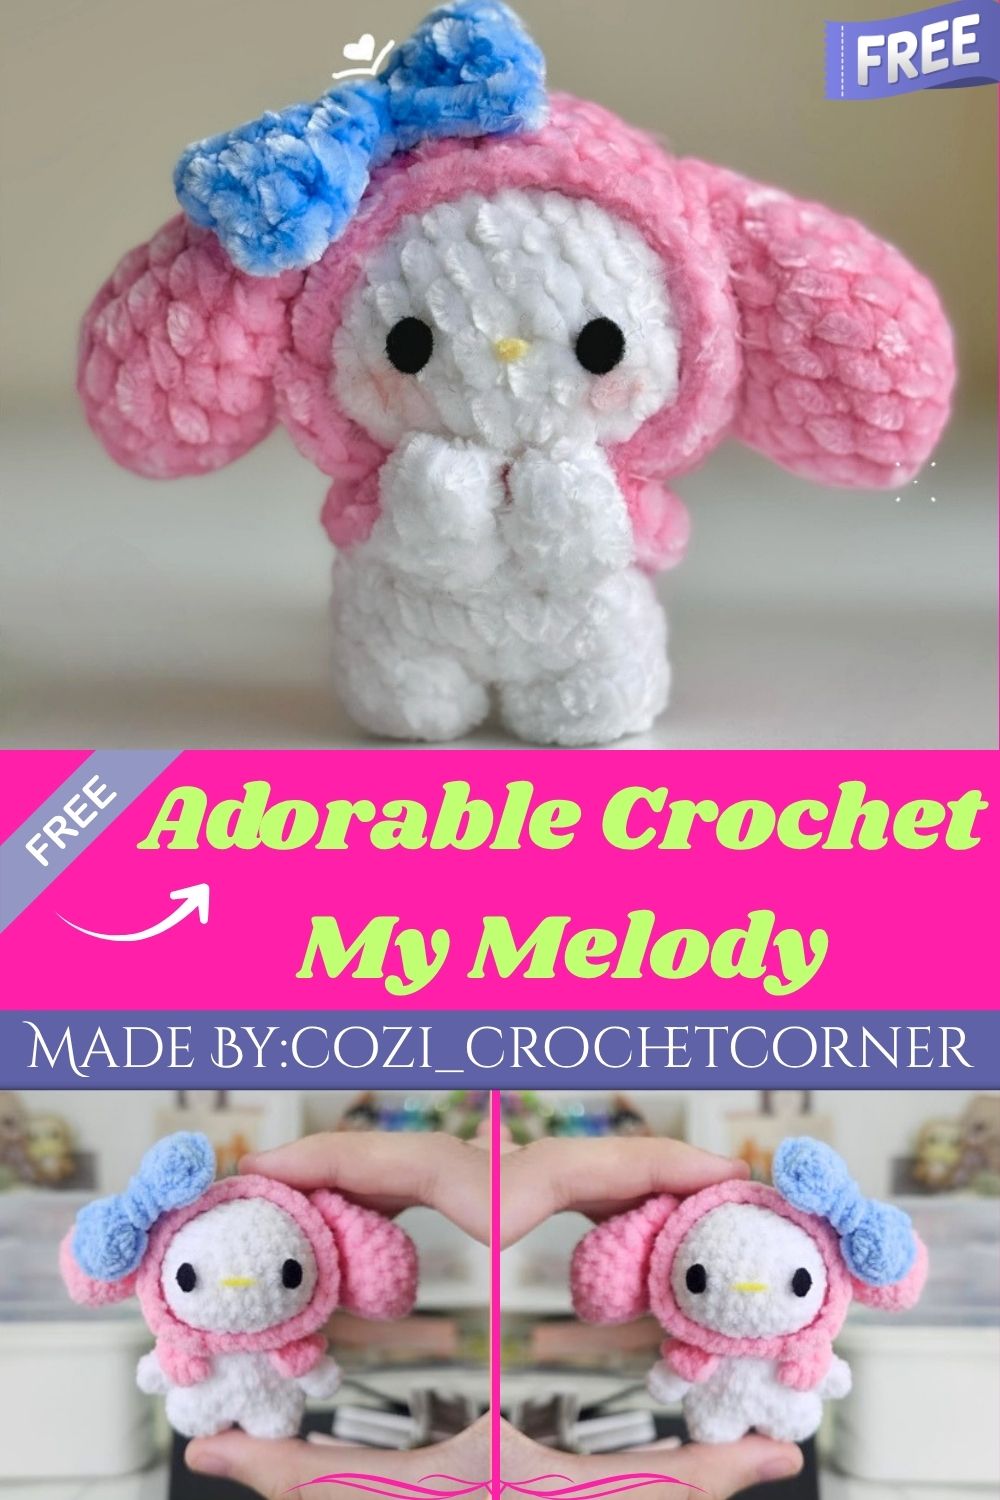
Adorable Crochet My Melody Amigurumi with Blue Bow
Grab your hook and pink yarn because a sweetheart project is waiting for you. Honestly, this amigurumi combines a fluffy hood, tiny ears, and a signature blue bow into one charming keepsake perfect for gifting or displaying proudly at home.
Amigurumi lovers keep asking for patterns that feel nostalgic yet simple to execute, and this design checks both boxes effortlessly for makers of every level. Soft white yarn forms the rounded head while pink shades build the hood and ears into a recognizable silhouette anyone would spot instantly. Felt pieces add expressive facial details without complicated embroidery skills getting in the way. Beginners and experienced crafters alike find the repetitive rounds calming, almost meditative, as the character takes shape row by row across a single sitting. Real talk, few patterns balance nostalgia and simplicity this well, making it a satisfying weekend project for any skill level looking for a rewarding finish.
Materials
- White yarn
- Pink yarn
- Black and yellow felt
- Stuffing
- Yarn needle
- Scissors
- Stitch markers
- Crochet hook (3mm recommended; velvet yarn works best)
Abbreviations
- MR = magic ring
- sc = single crochet
- inc = single crochet increase
- dec = single crochet decrease
- FO = finish off
- ch = chain
- slst = slip stitch
- de inc = double crochet increase
Skill Level
Beginner to intermediate crafters handle this pattern comfortably. Basic stitches like single crochet, increase, and decrease appear throughout. Felt gluing and simple sewing skills round out the finishing touches nicely.
Pattern Overview
- Rounded head worked in white yarn using magic ring and standard increase rounds, building thirteen rounds total before firm stuffing and closure
- Pink hood shaped separately across twelve rounds, then fitted snugly over the finished head piece for a layered look
- Two matching ears crocheted in eleven rounds, stuffed firmly and sewn between specific hood rows for accurate placement
- Compact body built from two feet joined into one continuous piece, keeping the character proportionate and stable when standing
- Decorative ruffle chain worked from twenty-one starting chains, added exactly where the hood meets the body
- Felt eyes and nose glued precisely for an expressive, friendly face that captures the character’s charm
- Blue bow attached last as the signature finishing accessory, tying the entire design together visually
Special Techniques
- Magic ring starts keep the crown of the head gap-free and remarkably neat compared to chained starts
- Increase and decrease rounds shape curves without visible bumps, giving the head and hood a smooth silhouette
- BLO (back loop only) worked on the foot rounds creates a defined edge that adds structure and stability
- Joining two feet through a single connecting chain forms a seamless leg base without extra seams
- Firm stuffing applied gradually before closing rounds keeps the amigurumi’s shape rounded, sturdy, and long-lasting
- Leaving long tails after finishing off each piece makes assembly sewing far smoother and more secure
Common Mistakes
- Skipping stitch markers leads to miscounted rounds and uneven, lopsided shaping over time
- Under-stuffing the head causes a floppy, deflated look instead of a firm rounded finish
- Placing ears too high or too low throws off facial symmetry noticeably once assembled
- Gluing felt features unevenly distorts the character’s expression and reduces overall polish
- Forgetting to leave a long tail makes sewing pieces together far harder during assembly
- Rushing through decrease rounds without counting carefully leaves gaps near the closing point
Uses & Benefits
Finished amigurumi pieces work wonderfully as nursery decor, desk companions, or thoughtful handmade gifts for fans of cute collectibles. Crocheters practicing color changes, felt detailing, and multi-piece assembly gain valuable skills applicable to future projects across many other patterns. Trust me, giving a handmade character to someone feels far more personal than any store-bought toy ever could. Beyond sentimental value, amigurumi making reduces stress, sharpens fine motor skills, and offers a portable hobby for commutes, waiting rooms, or quiet evenings at home. Selling finished pieces at craft fairs also generates steady income for small shop owners.
Helpful Beginner Tips
- Count stitches carefully after every round before moving forward to the next one
- Use stitch markers consistently since amigurumi rounds have no natural starting point to reference
- Choose velvet or smooth yarn for a cleaner, more polished finished texture overall
- Stuff gradually while working rather than cramming everything in at the very end
- Keep tension firm but not overly tight to avoid visible gaps between stitches
- Practice magic ring separately if new to it, since the whole head depends on it
Pattern Instructions
Head (in White)
- R1: 6sc in MR (6)
- R2: inc, sc, 2inc, sc, inc (10)
- R3: sc, inc, 2sc, inc, sc, inc, 2sc, inc (14)
- R4: sc, inc, 4sc, inc, sc, inc, 4sc, inc (18)
- R5: (sc, inc)x2, 4sc, (inc, sc)x2, inc, 4sc, inc (24)
- R6-10: 24sc around [5 rounds] (24)
- R11: (2sc, dec)x6 (18) — stuff firmly
- R12: (sc, dec)x6 (12)
- R13: 6dec (6)
- Slst and FO, sew shut
Hood (in Pink)
- R1: 6sc in MR (6)
- R2: inc, sc, 2inc, sc, inc (10)
- R3: 10inc (20)
- R4: (sc, inc)x2, 5sc, inc, (sc, inc)x2, 5sc, inc (26)
- R5: (sc, inc)x2, 10sc, inc, sc, inc, 9sc (30)
- R6-11: 30sc around [6 rounds] (30)
- R12: sc, dec, (3sc, dec)x3, 12sc (26)
- FO, cut tail off, insert head inside
Ears (Make 2, in Pink)
- R1: 4sc in MR (4)
- R2: 4inc (8)
- R3: (sc, inc)x4 (12)
- R4: (2sc, inc)x4 (16)
- R5: 16sc (16)
- R6: (2sc, dec)x4 (12)
- R7: 12sc (12) — stuff firmly
- R8: (sc, dec)x4 (8)
- R9: 8sc (8)
- R10: 4dec (4)
- R11: 2sc across top
- Slst and FO, leave long tail for sewing
Body & Feet (Make 2 feet, in White)
- R1: 4sc (4)
- R2: 4inc (8)
- R3: 8sc, BLO (8)
- FO foot 1, cut tail off; do not FO foot 2, body continues from it
- Ch 1 from foot 2, then sc around both feet and both sides of the chain (18)
- R5: 4sc, inc, 8sc, inc, 4sc (20)
- R4: 4sc, dec, 8sc, dec, 4sc (18)
- R5: 3sc, dec, 7sc, dec, 4sc (16)
- R6: 3sc, dec, 6sc, dec, 3sc (14)
- FO, leave a tail for sewing, stuff firmly
Hood Ruffle
- R1: Ch 21
- R2: 20sc starting from second chain from hook
- FO, leave tail for sewing (optional: trim tail and glue ruffle in place)
Assembly
- Insert the finished white head snugly into the pink hood piece, checking alignment before securing
- Sew ears onto the head between hood rows nine and eleven for accurate, symmetrical placement
- Attach the body firmly to the bottom edge of the head and hood using the leftover tail
- Sew or hot glue the ruffle exactly where the hood meets the body for a clean finish
- Position arms around row six or seven, then secure their ends onto the face carefully
- Cut two black felt ovals for the eyes and one small yellow oval for the nose
- Glue eyes roughly five stitches apart between rows eight and nine for balanced spacing
- Place the nose centered between both eyes so the expression stays proportional and cute
- Finish by securing the blue bow onto the top of the head as the final touch
Where Can You Use This?
Display finished amigurumi on bookshelves, gift them to fans of cute collectibles, or clip a keyring loop onto the finished body for a portable accessory. Nurseries, craft fairs, themed birthday parties, and classroom gift exchanges all suit this design perfectly. Small enough for backpacks yet detailed enough for shelf display, versatility remains one of its strongest selling points. Crafters selling on Etsy or at local markets often find pieces like this attract repeat buyers quickly, since the finished look photographs well and appeals to a wide age range of collectors.
Why Beginners Will Enjoy This Pattern
Straightforward stitch counts and clearly written rounds make tracking progress simple even for first-time amigurumi makers. No joke, the repetitive structure builds confidence quickly since mistakes stay easy to spot and fix along the way. Felt details replace tricky embroidery, letting newer crafters achieve professional-looking results without advanced needlework experience. Each piece finishes relatively quickly too, so beginners see tangible progress within a single sitting rather than abandoning a project halfway through out of frustration.
Tips and Tricks for Success
- Pin felt pieces temporarily before gluing to test placement and proportion first
- Work in good lighting to catch missed or twisted stitches early on
- Block finished pieces gently if yarn edges curl slightly during assembly
- Keep a small notebook tracking row counts for future pattern repeats and adjustments
- Photograph progress at each stage to troubleshoot shaping issues before they compound
- Test bow placement with pins before committing to final glue or stitching
Why This Crochet Pattern Is Trending
Nostalgic characters keep resurfacing across social media feeds, and amigurumi versions of beloved icons attract huge engagement from crafters and collectors alike. Low-key, this specific design blends a recognizable color palette with achievable stitch counts, making it shareable content for pattern testers and small shop owners. Video platforms showing quick assembly clips have also pushed interest higher, since viewers enjoy watching familiar characters take shape stitch by stitch.
- Pastel color palettes photograph beautifully for Pinterest and Instagram
- Nostalgic characters attract multi-generational crafting audiences
- Compact size suits both beginners and quick gift-making projects
Conclusion
Crafting this amigurumi rewards patience with a genuinely charming result worth every single stitch invested. Ngl, the combination of simple shaping and expressive felt details makes it approachable for newer crocheters while still satisfying seasoned makers looking for a quick project. Keep hooks ready, because once finished, this pattern practically begs to be made again in new color combinations for friends, family, or an ever-growing personal collection sitting proudly on the shelf.