Crochet One Shoulder Turtleneck Top Pattern with Draped Collar
Draped necklines rarely show up in crochet designs, and that’s exactly what makes this Crochet One Shoulder Turtleneck Top Pattern with Draped Collar such a distinctive, charming project. Comfortable ribbing pairs with a beautiful asymmetric silhouette to give it a boutique-style refinement. Crocheters drawn to textured stitches and wearable garments will find this an exciting pick, one that delivers a comfortable fit alongside a striking, standout look.
Ribbed stitches build this top’s entire body, delivering stretch and beautiful texture in equal measure. That same texture gives the turtleneck crochet top collar its softly folded shape, while the one-shoulder crochet design cut flows naturally into the design. This comfortable silhouette suits brunch, evening get-togethers, and light spring days especially well.
Anyone drawn to minimalist crochet fashion will love its clean, refined finish. Simple stitch repetition keeps it easy to make, while the finished top looks every bit as polished and tailored as ready-to-wear, making it a lovely pick for anyone after a Crochet One Shoulder Top Pattern.

Project Details
- Skill Level: Intermediate
- Finished Size: Customizable to fit; adjust chain length and row count for your measurements
- Estimated Time Required: 6–9 hours, depending on size and crochet speed
- Recommended Yarn Weight: Worsted weight (Medium, 4)
- Crochet Hook Size: 5.0mm (H-8) or size needed to achieve gauge
Materials Needed
- Worsted weight yarn in your chosen color (mustard, rust, or warm neutrals work beautifully for this style)
- 5.0mm crochet hook
- Tapestry needle for seaming and weaving in ends
- Stitch markers to track row starts
- Scissors
Crochet Stitches & Techniques
- Chain Stitch (ch)
- Slip Stitch (sl st)
- Single Crochet (sc)
- Half Double Crochet (hdc)
- Ribbing technique (working into back loops only for stretch)
- Fastening Off
- Seaming pieces together with a tapestry needle
Ribbing carries the whole design, so getting comfortable working into the back loop only will make a noticeable difference in how even your rows turn out.
Pattern Instructions
Step 1: Starting the Foundation Chain
Every ribbed panel in this top begins the same simple way. Leave a short tail, form a slipknot, and chain until you reach the length needed for your body panel or collar piece. Loose, even chains matter more here than in most patterns, since this foundation row determines how well the ribbing sits once you’re several rows in. Count your stitches twice before moving forward, because an uneven start becomes much harder to fix once the texture pattern gets going.

Step 2: Building the First Row
Working back into that foundation chain is where the ribbing texture actually begins to show. Insert your hook into the back loop of each chain, pulling through to create your first row of stitches. Keep tension consistent as you go, since tight or loose spots in this row will carry through the entire panel. This step sets the rhythm for the rest of the piece, so take your time getting the loop placement right before speeding up.

Step 3: Crocheting the Ribbed Body Panel
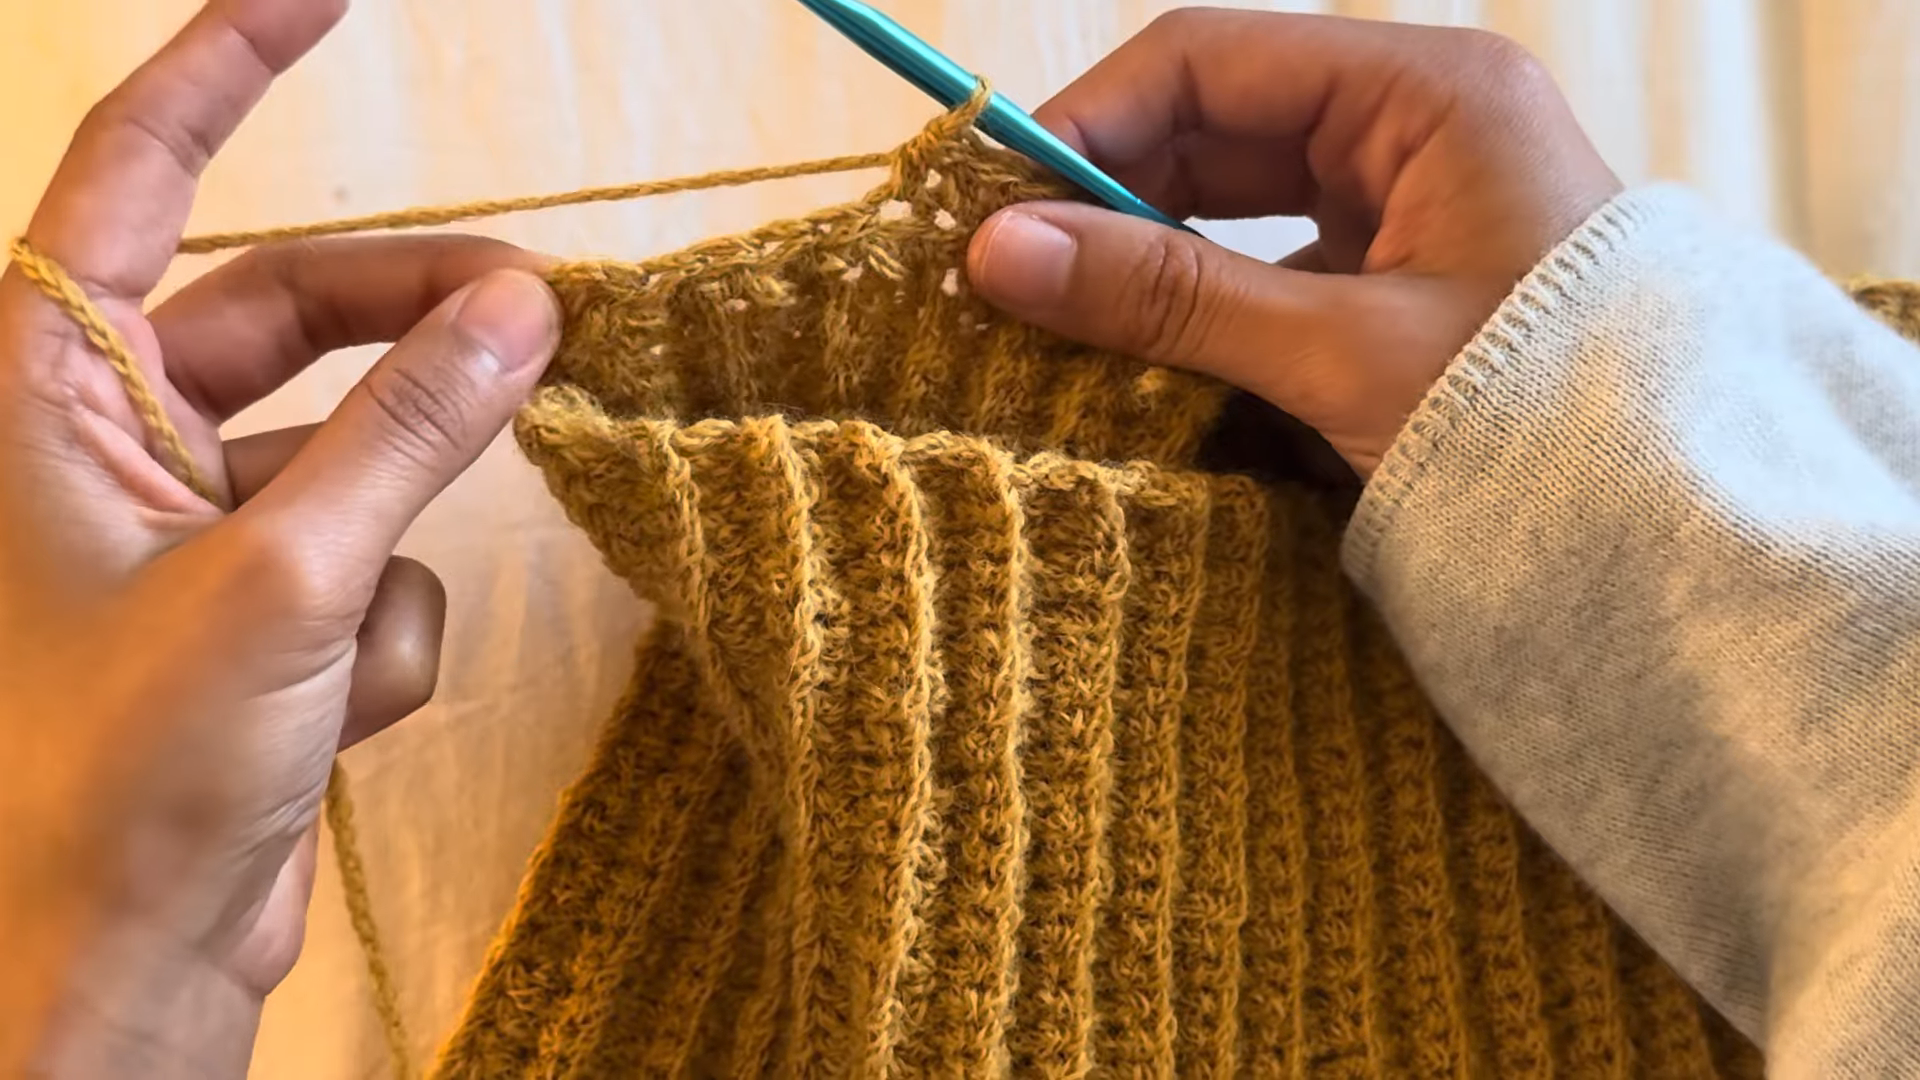
Row after row, the ribbing builds into that signature textured fabric the pattern is known for. Work into the back loop only across each row, turning at the end and repeating until your panel reaches the desired length for the body. Vertical ridges will start forming almost immediately, giving the fabric both stretch and visual interest. Once your panel is long enough, use your tapestry needle to finish and secure the edges cleanly, tucking in any loose tails as you go so the seam line stays neat.

Step 4: Shaping the Turtleneck Collar
The collar comes together at the top edge of your finished ribbed panel, and this is where the piece really starts to look like a garment. Insert your hook along the top edge and continue working stitches upward, following the same ribbed pattern to keep the texture consistent between the body and the neckline. Building the collar this way, directly from the existing piece, avoids a visible seam and lets the fabric fold naturally into that soft turtleneck shape. Continue for several rounds until the collar reaches a height you’re happy with, then fasten off and weave in your ends.
Final Assembly
Once your body panel and collar are complete, lay the piece flat to check that the drape falls the way you want across the one shoulder. Seam any remaining open edges with your tapestry needle, keeping stitches small and even so they blend into the ribbed texture. A quick steam block afterward helps the ribbing relax into place and gives the finished top a more polished, professional drape.
Tips for Success
- Mark the start of each row with a stitch marker, since ribbed rows are easy to miscount
- Keep your tension consistent from the first row onward for even ridges
- Check your gauge swatch before committing to the full-size chain
- Weave in ends as you finish each panel rather than saving them all for the end
- Block the finished piece to help the ribbing lie flat and drape properly
Personalization Ideas
Try a Statement Color
Swap the mustard tone for a bold jewel color like emerald or burgundy to change the entire mood of the top.
Add a Fringe Detail
A light fringe along the collar edge brings a boho touch without changing the core construction.
Make It Cropped
Shorten the body panel for a cropped version that pairs well with high-waisted bottoms.
Layer With a Camisole
Add a thin lining underneath for extra coverage while keeping the ribbed texture visible on top.
Adjust the Collar Height
A shorter collar reads more like a mock-neck, while extra rounds create a deeper, cozier turtleneck.
Common Mistakes to Avoid
Skipping the back-loop-only instruction is one of the most common mistakes with this Crochet One Shoulder Turtleneck Top. It can flatten the ribbing texture that makes the design stand out. Losing track of row counts is another frequent issue. Ribbed stitches can look repetitive and make it easy to lose your place.
Rushing the seaming step can leave visible gaps at the shoulder. Slow, even stitches are more important here than speed. Skipping the gauge swatch can also cause fit problems later. This matters especially because the project is a wearable garment rather than a flat piece.
Frequently Asked Questions
Can I make this pattern in a different yarn weight?
Yes, though switching yarn weight will change your finished measurements, so plan on adjusting your chain length and row count accordingly.
Why does my ribbing look flat instead of textured?
This usually happens when stitches are worked into both loops instead of the back loop only, which is essential for the ribbed effect.
How do I know when my collar is tall enough?
Try the piece on periodically as you work, or measure against a turtleneck you already own for reference.
Can this pattern be adjusted for a fuller bust or different body shape?
Yes, adding extra stitches to your foundation chain and adjusting row count for the body panel allows for a customized fit.
What’s the best way to prevent curling edges?
Blocking after seaming helps significantly, and working an even tension throughout also reduces curling.
Is this Crochet One Shoulder Turtleneck Top pattern good for using scrap yarn?
It can work well for stripes or color-blocking if you have coordinating scrap yarn in the same weight.
How do I keep the one-shoulder drape from slipping?
A few strategically placed stitches at the shoulder seam, or a small elastic thread woven through, can help hold the drape in place.

Conclusion
Few patterns combine texture, drape, and a wearable silhouette quite like this Crochet One Shoulder Turtleneck Top. Give the ribbing technique some patience through those first few rows, and the payoff is a piece that looks just as good finished as it did in your imagination. Once you’ve made your first one, don’t be surprised if you’re already planning a second in a different color. Share your finished top and let others see how your version turned out.