Easy Free Crochet Penguin Plush Toy Amigurumi Pattern for Beginners
Make an adorable penguin plush toy with this crochet penguin pattern! This beginner-friendly free amigurumi pattern includes step-by-step rounds, shaping, stuffing tips, and easy assembly. Create a cute crochet penguin as a gift or nursery decor perfect beginner crochet project, anda fun DIY crochet toy.
Want to make an adorable penguin plush toy that’s soft, squishy, and gift-worthy? This beginner-friendly crochet penguin pattern walks you through every step with a clear amigurumi penguin tutorial, from shaping the head and body to adding tiny wings, feet, and a sweet little beak.
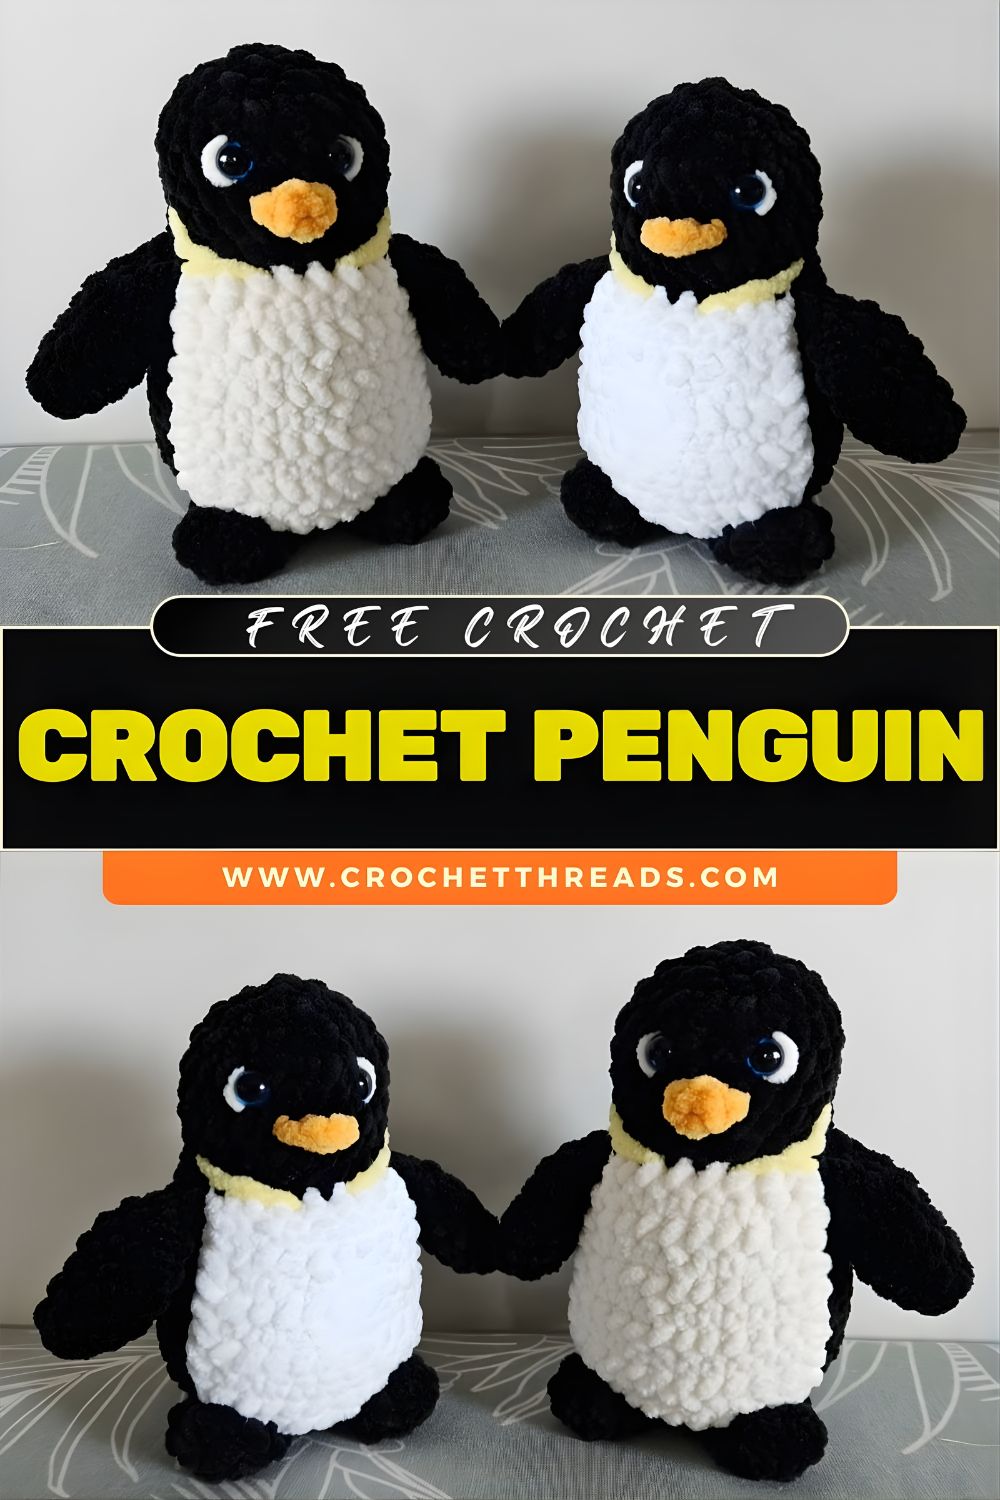
This is a fun beginner crochet project because it uses simple stitches (mostly single crochet), easy shaping, and minimal sewing for a polished result. Whether you’re making holiday gifts, nursery decor, or a charming handmade crochet toy for yourself, this DIY crochet toy is quick, cute, and customizable. You’ll end up with a cute crochet penguin that looks great in any color combo: classic black and white, pastel “baby penguin,” or even a bold rainbow version.
- Skill level: Beginner (confident beginner if you’re new to amigurumi)
- Finished size: About 5–7 in (13–18 cm) tall with worsted yarn (varies by hook/tension)
- Style: Round, cuddly plush penguin pattern with a belly panel
4. Materials Needed
To make this crochet penguin pattern, gather:
- Yarn (worsted weight / Category 4)
- Main color: black, navy, charcoal, or any “penguin” shade
- Belly color: white or cream
- Beak/feet color: orange, mustard, or yellow
- Optional accents: blush pink, light blue (scarf/hat)
- Crochet hook: 3.5 mm–4.0 mm (use the smaller size for tighter stitches)
- Safety eyes: 8–10 mm (or embroider for baby-safe toys)
- Stuffing: polyester fiberfill
- Tools: tapestry needle, scissors, stitch markers (recommended)
- Optional: buttons (decor only), embroidery floss (for smile/cheeks)
5. Stitch Abbreviations
You’ll use these common amigurumi stitches:
- MR = magic ring
- rnd = round
- st(s) = stitch(es)
- sc = single crochet
- inc = increase (2 sc in same st)
- dec = decrease (sc2tog; use invisible decrease for best results)
- sl st = slip stitch
- ch = chain
- BLO = back loop only (optional, for a neat edge)
Notes:
- Work in continuous rounds (no joining) unless stated.
- Mark the first stitch of each round with a stitch marker.
- Keep stitches tight to avoid stuffing showing—key for any handmade crochet toy.
6. Step‑by‑Step Crochet Penguin Pattern (Free Crochet Pattern)
Helpful Pattern Notes (Read First)
- This free crochet pattern is written for worsted-weight yarn.
- If you use plush/chenille yarn, the size will increase, and the stitch definition will be softer—still adorable for a penguin plush toy.
- Stuff firmly in small pieces to keep a smooth shape.
Head (Main Color)
- Rnd 1: MR, 6 sc (6)
- Rnd 2: inc x6 (12)
- Rnd 3: (sc, inc) x6 (18)
- Rnd 4: (2 sc, inc) x6 (24)
- Rnd 5: (3 sc, inc) x6 (30)
- Rnd 6: (4 sc, inc) x6 (36)
- Rnd 7–10: sc around (36)
- Rnd 11: (4 sc, dec) x6 (30)
- Rnd 12: (3 sc, dec) x6 (24)
Place eyes: Insert 8–10 mm safety eyes between Rnds 8–9, about 6–7 sts apart.
10. Rnd 13: (2 sc, dec) x6 (18)
- Rnd 14: (sc, dec) x6 (12)
- Stuff the head firmly.
- Rnd 15: dec x6 (6)
Fasten off. Close the opening and weave in ends.
Tip: If you prefer fewer seams, you can crochet the head and body together. This pattern keeps them separate for easier shaping—great for a first amigurumi penguin tutorial.
Body (Main Color)
- Rnd 1: MR, 6 sc (6)
- Rnd 2: inc x6 (12)
- Rnd 3: (sc, inc) x6 (18)
- Rnd 4: (2 sc, inc) x6 (24)
- Rnd 5: (3 sc, inc) x6 (30)
- Rnd 6: (4 sc, inc) x6 (36)
- Rnd 7–11: sc around (36)
- Rnd 12: (4 sc, dec) x6 (30)
- Rnd 13: (3 sc, dec) x6 (24)
- Rnd 14: (2 sc, dec) x6 (18)
- Rnd 15: (sc, dec) x6 (12)
- Stuff the body firmly, shaping a rounded bottom.
- Rnd 16: dec x6 (6)
Fasten off, close, weave in ends—leave a longer tail if you want extra-secure stitching.
Wings (Make 2, Main Color)
- Rnd 1: MR, 6 sc (6)
- Rnd 2: (sc, inc) x3 (9)
- Rnd 3: sc around (9)
- Rnd 4: (2 sc, inc) x3 (12)
- Rnd 5–6: sc around (12)
- Flatten the opening and sc through both layers to close (6 sc).
Fasten off, leave a tail for sewing.
Tip: Don’t stuff the wings—flat wings sit neatly and look “penguin-like” for this plush penguin pattern.
Feet (Make 2, Orange/Yellow)
- Rnd 1: MR, 6 sc (6)
- Rnd 2: inc x6 (12)
- Rnd 3: sc around (12)
- Rnd 4: (sc, dec) x4 (8)
- Lightly stuff (optional—just a pinch).
Flatten and sc through both layers to close (4 sc).
Fasten off, leave a tail for sewing.
Beak (Orange/Yellow)
- Rnd 1: MR, 4 sc (4)
- Rnd 2: (sc, inc) x2 (6)
- Rnd 3: sc around (6)
Fasten off, leave a tail.
Shape tip: Fold slightly into a small triangle before sewing.
Belly (White Panel)
You can crochet this as a simple oval and sew it on—easy and beginner-friendly.
- Rnd 1: ch 6
- Rnd 2: Starting in 2nd ch from hook: 4 sc, 3 sc in last ch. Work on the other side: 3 sc, 2 sc in last ch (12)
- Rnd 3: inc, 3 sc, inc x3, 3 sc, inc x2 (18)
- Rnd 4: sc, inc, 3 sc, (sc, inc) x3, 3 sc, (sc, inc) x2 (24)
- Rnd 5: sc around (24)
Fasten off, leave a long tail for sewing.
Tip: If your belly panel curls, go up 0.5 mm in hook size just for this piece, or block it lightly before sewing.
7. Assembly Instructions
Take your time here—assembly is what makes a cute crochet penguin look professional.
1) Attach Head to Body
- Center the head on top of the body.
- Pin in place (or use stitch markers).
- Sew around using whip stitch, catching stitches evenly.
- Add a little extra stuffing at the neck before fully closing for stability.
2) Place and Sew the Belly
- Center the white belly panel on the front of the body.
- The top of the belly usually sits just under where the head meets the body.
- Sew around the edge neatly; keep stitches small and even.
- Optional: Add a tiny bit of flat stuffing under the belly before closing to create a “pudgy” plush look.
3) Attach the Beak
- Place the beak centered between the eyes, slightly below eye level.
- Sew firmly around the edges.
- Optional: Add a short embroidered smile line under the beak.
4) Attach Wings
- Position wings on the sides of the body, roughly aligned with the upper belly area.
- Sew the wing edge down so it sits slightly outward like flippers.
5) Attach Feet
- Place the feet at the lower front of the body so the penguin can sit.
- Sew securely across the top edge of each foot (don’t sew the whole foot flat—let the toes stick out).
6) Secure Yarn Ends
- Weave ends through several stitches, then backtrack in a different direction.
- Pull snug, trim, and hide the tail inside the body.
8. Tips & Tricks (Beginner Crochet Project Help)
- Keep stitches tight (no stuffing show-through):
- Use a smaller hook than recommended for your yarn.
- Tighten your tension slightly for amigurumi.
- Stuff evenly without lumps:
- Add stuffing in small pieces and push it into curves with the back of your hook or a chopstick.
- Invisible decreases = smoother penguin:
- Use invisible dec on the head/body to reduce bumps.
- Clean color blocking:
- For crisp contrast, sew the belly on instead of changing colors mid-body (perfect for a first amigurumi penguin tutorial).
- Eye safety:
- For babies/toddlers, skip safety eyes and embroider eyes instead (safer for a handmade crochet toy).
9. Finishing Touches (Personalize Your DIY Crochet Toy)
Make your penguin plush toy extra special:
- Tiny scarf: ch 45–60, turn, sc across; wrap and tie
- Mini hat: Crochet a small beanie in a matching accent color
- Bows: small ribbon bow or crocheted bow near one “ear” area
- Embroidered heart: stitch a tiny heart on the belly
- Buttons: decorative only (avoid for small children)
- Seasonal themes:
- Red/green scarf for the winter holidays
- Pastel belly + blush cheeks for spring
- Add a little backpack for a “school penguin.”
These add-ons turn your project into a one-of-a-kind DIY crochet toy and a truly giftable handmade crochet toy.
10. Conclusion
This crochet penguin pattern is a cozy, beginner-friendly way to learn amigurumi basics while making something genuinely adorable. With simple shapes, minimal sewing, and lots of room for personalization, it’s an ideal beginner crochet project—and a fun free crochet pattern you can come back to again and again.
If you make this cute crochet penguin, share a photo and tag your project name (or note your yarn colors) so others can get inspired. Next, try a matching amigurumi set like a polar bear, seal, or mini whale to grow your collection of plush penguin pattern-style animals and expand your handmade crochet toy skills.