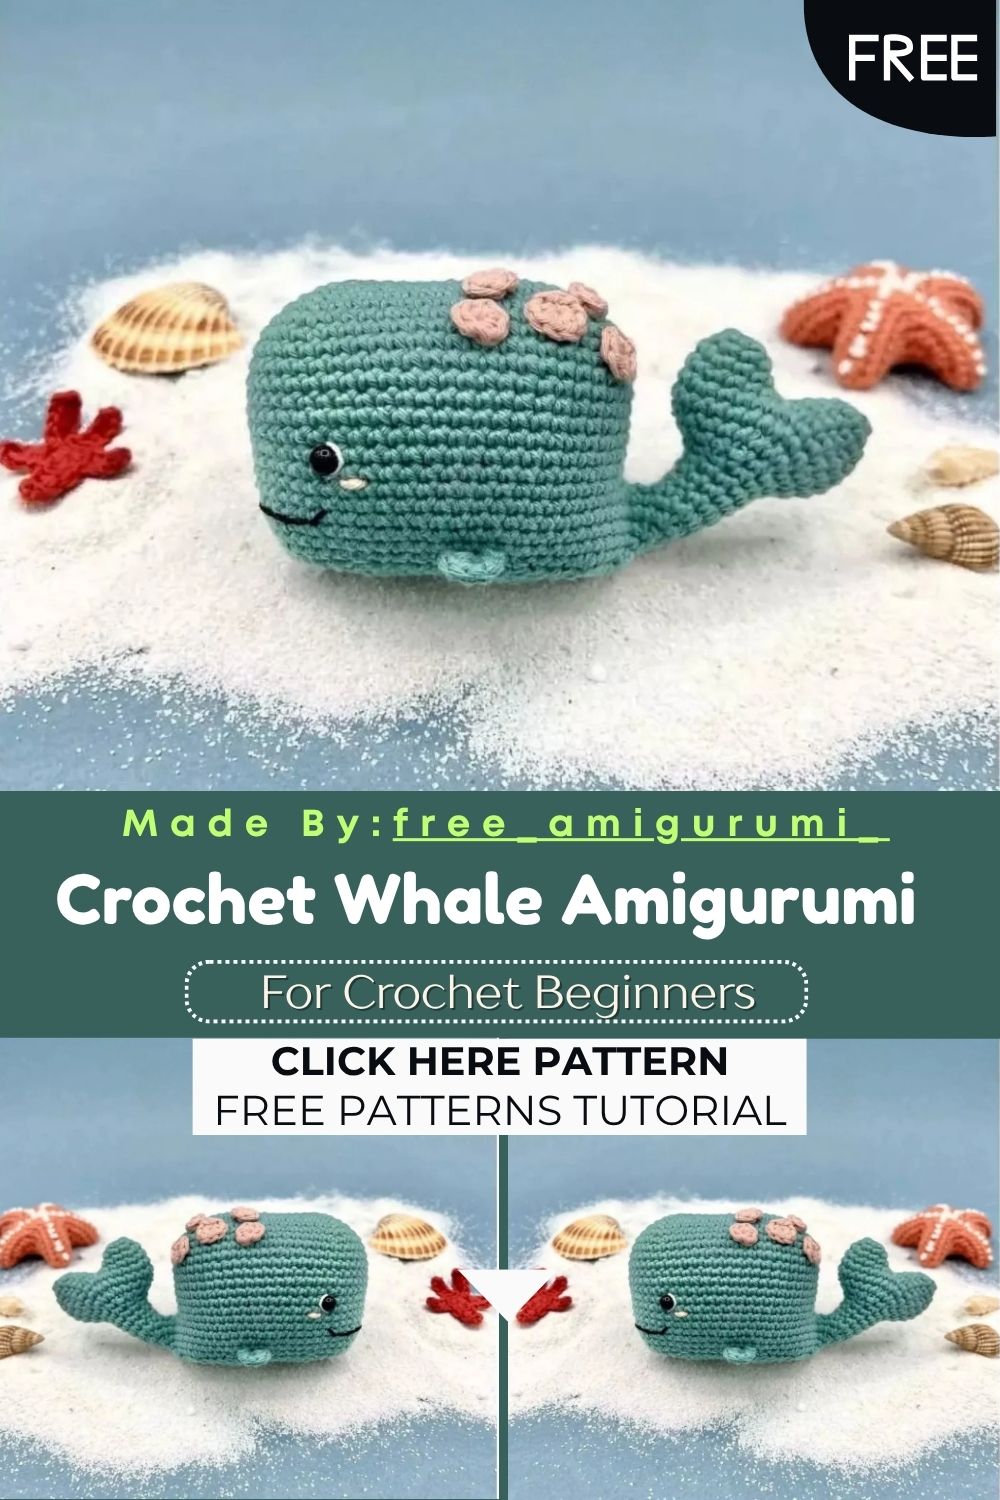
Easy Crochet Whale Amigurumi – Free Pattern
Round, smiling, and dotted with sweet pink polka dots, this little blue whale is the most calming amigurumi project you will ever start!
Worked from a clever foundation chain rather than a simple magic ring, this little whale builds outward into a naturally elongated body that immediately reads as ocean-ready. The integrated tail construction joins seamlessly into the body round, eliminating any complicated sewing for one of the trickiest parts of any whale design. Tiny crocheted fins, a soft pink belly panel, and scattered pink dots across the top complete a finished whale that feels genuinely polished. Whether displayed solo on a shelf or paired with a whole ocean-themed collection, this whale brings calm, cheerful energy to any handmade gathering.
Skill Level
Beginner to intermediate. Basic single crochet, increase, and decrease form the foundation throughout. Additionally, the chain-based body construction and integrated tail joining introduce simple new techniques that are easy to follow with the round-by-round counts provided.
Materials You Will Need
Yarn Ricorumi cotton:
- Blue for the main body, tail, and fins
- Pink for the belly and decorative dots
- White for optional highlights
Other Supplies:
- Black embroidery thread for the face
- Crochet hook — 3mm
- Safety eyes — 6mm
- Yarn needle
- Fiberfill stuffing
- Stitch marker
- Scissors
Abbreviations
- RND — Round
- MR — Magic Ring
- CH — Chain
- SLST — Slip Stitch
- SC — Single Crochet
- FLO — Front Loops Only
- BLO — Back Loops Only
- INC — Increase
- DEC — Decrease
- ( )* — Repeat until the end of the round
- [ ] — Total number of stitches in the round
Pattern: Tail Make 2
Using blue yarn
Rnd 1: (1sc, inc)* (6) Rnd 2: (1sc, inc)* (9) Rnd 3: (2sc, inc)* (12) Rnd 4: 12 sc (12)
Fasten off the first part. Do not cut the second part — instead, join it to the first with 1 sc.
Rnd 5: (3sc, inc) x3 around the first part, then (3sc, inc) x3 around the second part (30)
Rnd 6: 30 sc (30) Rnd 7: (3sc, dec)* (24) Rnd 8: (2sc, dec)* (18) Rnd 9: (1sc, dec)* (12) Rnd 10–11: 12 sc for 2 rounds (12)
Fasten off.
Pattern: Head and Body
Using blue yarn
Make a chain 15. Crochet around the chain, starting in the 2nd chain from the hook.
Rnd 1: 13 sc, 3 sc in last ch, 12 sc, inc (30) Rnd 2: inc, 12 sc, 3 inc, 12 sc, 2 inc (36) Rnd 3: 1 sc, inc, 12 sc, (1sc, inc) x3, 12 sc, (1sc, inc) x2 (42) Rnd 4: 2 sc, inc, 12 sc, (2sc, inc) x3, 12 sc, (2sc, inc) x2 (48) Rnd 5: 3 sc, inc, 12 sc, (3sc, inc) x3, 12 sc, (3sc, inc) x2 (54) Rnd 6–15: 54 sc for 10 rounds (54)
Make a chain 2 and join to the tail (choose your preferred side) with 1 sc. Continue with 5 sc — you should now be on the other side of the tail. Place a stitch marker at this point.
Rnd 16: 6 sc on the remaining stitches of the tail, 2 sc on the chain, 54 sc around the body, 2 sc on the chain, 6 sc on the tail (70)
Rnd 17: 2 dec, 62 sc, 2 dec (66) Rnd 18: 2 dec, 58 sc, 2 dec (62) Rnd 19: 1 dec, 58 sc, 1 dec (60)
Stuff the tail at this point.
Rnd 20: (3sc, dec)* (48)
Fasten off.
Insert the safety eyes between rounds 13 and 14, with 13 visible stitches apart between them.
Pattern: Bottom Belly Part
Using pink or blue yarn
Repeat rounds 1 to 4 of the head construction listed above.
Fasten off, leaving a long tail to sew the belly piece onto the body. Stuff before closing completely.
Sew the completed belly panel onto the underside of the whale, positioned centrally for a natural, balanced look.
Pattern: Fins Make 2
Using blue yarn
Crochet 8 sc in a MR. Fasten off, leaving thread for sewing.
Sew both fins symmetrically onto the sides of the body, positioned just below where the head meets the wider body section.
Pattern: Dots
Using pink yarn
In a magic ring, crochet 4, 6, or 8 sc depending on the desired dot size. Work 1 slst to close. Fasten off and sew or glue the dots scattered across the top of the head and body.
Assembly and Face
Insert the safety eyes carefully between rounds 13 and 14 as noted above, checking placement with pins first for a symmetrical, friendly expression.
Embroider a small curved smile below the eyes using black embroidery thread for the whale’s signature cheerful expression.
Attach the spout detail at the top of the head if desired, using a small loop of blue or white yarn.
Customization and Variation Ideas
- First, swap the blue and pink color scheme for lavender and white for a completely different but equally sweet pastel whale variation.
- Additionally, scatter dots of varying sizes across the body using the 4, 6, and 8 sc options together for a more playful, irregular polka dot pattern.
- Moreover, add a tiny crocheted water spout using a few rounds of white yarn attached to the top of the head for an extra ocean character.
- Furthermore, make a matching pod of whales in different sizes using different yarn weights for a charming ocean family display.
- Also, use variegated blue yarn for the body to create a natural gradient effect that mimics deep ocean water without any extra color change work.
- Finally, embroider small bubble shapes near the spout using white thread for a playful detail that suggests gentle movement through water.
Common Mistakes to Avoid
- First, cut the yarn on both tail parts: Only the first tail part should be fastened off. The second part continues directly into Rnd 5, joining both pieces together with a single sc connection.
- Additionally, losing track of the chain-based foundation in the head and body: Counting carefully around the initial chain 15 foundation is essential, since the stitch pattern differs slightly from a standard magic ring start.
- Also, joining the tail on the wrong side: Pay close attention to which side of the body you are joining the tail to, since this determines the whale’s final orientation and symmetry.
- Furthermore, placing safety eyes before checking visible stitch spacing: The pattern specifies 13 visible stitches between the eyes. Always count carefully and mark with pins before locking the eyes permanently in place.
- Moreover, stuffing the tail too early: Wait until Rnd 19 is complete before stuffing the tail section, as stuffing prematurely can distort the careful decrease shaping in the preceding rounds.
- Finally, sewing the belly panel off-center: Pin the belly piece in place and check from multiple angles before committing to final stitches, since an off-center belly noticeably affects the whale’s balanced, symmetrical appearance.
Finishing Tips
- First, when joining the tail to the body, work the connecting stitches at an even, consistent tension to avoid any visible puckering at the joint.
- Additionally, after closing each tail part, lightly steam-press the seam to help it sit flat and blend smoothly into the surrounding stitches.
- Moreover, use a tapestry needle to gently shape the fins outward after sewing for a more natural, swimming-pose silhouette.
- Furthermore, space the pink dots with slightly varied placement rather than a perfectly even grid for the most natural, organic polka dot effect.
- Also, weave in every yarn end through at least three direction changes before trimming, since cotton yarn can work loose more easily than other fibers without proper securing.
- Finally, photograph the finished whale against a soft blue or white background to let the pink details and friendly expression stand out clearly.
Gifting Ideas
- First, place the finished whale inside a small gift box lined with light blue tissue paper for an ocean-themed presentation that feels coordinated and complete.
- Additionally, pair the whale with a small picture book about ocean animals for a thoughtful gift set for a young child.
- Moreover, these whales make wonderful baby shower gifts, especially in soft pastel color combinations that suit a nursery theme beautifully.
- Furthermore, make a small pod of three whales in graduating sizes and present them together as a complete ocean family collection.
- Also, attach a small ribbon loop to the top of the whale for a nursery mobile piece or hanging decoration.
- Finally, these whales sell consistently well at craft markets, where their cheerful expression and soft cotton texture appeal to both children and adults shopping for gifts.
Conclusion
This little whale pattern proves that a chain-based foundation can create just as charming a finished piece as any magic ring start. The integrated tail joining technique is the heart of this entire design, producing a seamless connection that would otherwise require careful sewing. Therefore, count your foundation chain carefully, join the tail with attention to orientation, and take your time scattering those sweet pink dots across the finished body. In conclusion, this little whale is ready to bring calm, cheerful energy into your handmade collection.
Happy crocheting! Cannot wait to see your little whale swim to life.