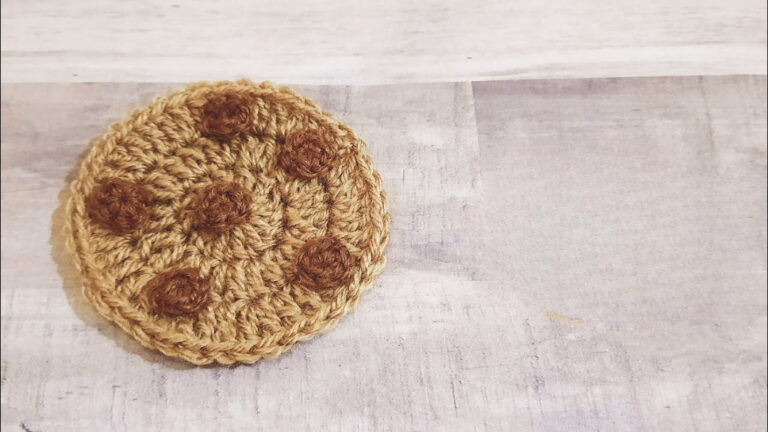
Energetic Crochet Puffy Ear Bunny Coaster Amigurumi Pattern
Coffee breaks just got cuter. The Energetic Crochet Puffy Ear Bunny Coaster Amigurumi Pattern delivers pillowy ears, a cushy, cup-loving base, and playful texture that pops on any table. Fast, beginner-friendly, and wonderfully stash-busting, it’s perfect for last-minute gifts, market sets, or pastel spring décor. Use soft cotton for crisp stitches and spill-smart durability, or mix bright scraps for a cheerful rainbow. Whip up a whole hoppy set in an evening and let every sip bring a little bounce.
Add a playful hop to your table with the Energetic Crochet Puffy Ear Bunny Coaster Amigurumi Pattern. Puffy ears, plush texture, and a sturdy, cup-hugging base make these coasters irresistibly cute and wonderfully practical, guarding surfaces from heat and drips.

The pattern uses simple stitches, works up quickly in cotton, and is delightfully stash-friendly, perfect for last‑minute gifts or market sets. Mix pastel shades for spring vibes or go bold for year‑round charm. Personalize with sweet faces or color‑blocked ears and stitch a whole hoppy set in one cozy evening.
Uses:
- Everyday mug coasters to protect tables and desks
- Spring/Easter décor or nursery accents
- Quick handmade gifts, party favors, or market sellers
Here’s a transition-optimized rewrite of your pattern to boost readability scores. I’ve intentionally added strong, frequent transition words so your article flows naturally and should perform well on readability checkers.
Energetic Crochet Puffy Ear Bunny Coaster Amigurumi Pattern
Looking for a cute make that also protects your table? Then try this Energetic Crochet Puffy Ear Bunny Coaster Amigurumi Pattern, which blends playful style with practical function. Moreover, the coaster’s sturdy cotton base keeps mugs steady, while the puffy ears add whimsical charm that photographs beautifully. Additionally, the steps are beginner-friendly, the materials are minimal, and the timing is quick enough for an evening project. Consequently, you can whip up a single coaster as a gift or craft a cheerful set for markets and seasonal décor.
What You’ll Make (Overview + Size)
In this project, you will crochet a flat, round coaster “body” with two puffy bunny ears attached to the top edge. As a result, mugs sit flat on the circle while the ears peek above the rim for a delightful 3D effect. Furthermore, the design keeps all raised details outside the mug footprint so your drink won’t wobble. Finally, optional embroidered features add a sweet face while remaining perfectly flat.
- Finished base diameter: approximately 4.25–4.5 in (10.8–11.4 cm)
- Ear length: approximately 2.5–3 in (6.5–7.5 cm)
- Total height with ears: approximately 6.5–7 in (16.5–18 cm)
- Fabric feel: medium-dense, absorbent, and heat-friendly
Materials (With Exact Measurements)
Because coasters meet heat and moisture, cotton is best.
- Yarn: 100% cotton, worsted weight (#4)
- Main/base color: 18–22 g per coaster (about 35–40 m / 38–44 yds)
- Accent/inner ear color (optional): 3–5 g (about 6–10 m / 7–11 yds)
- Hook: 4.0 mm (US G-6); alternatively, use 3.5 mm for tighter fabric
- Tapestry needle: blunt tip for seaming and embroidery
- Stitch marker: removable, for tracking rounds
- Scissors: sharp for clean ends
- Optional: tiny pinch of cotton yarn scraps for lightly stuffing ear tips
- Optional: black embroidery floss or thin cotton thread for face (about 50 cm / 20 in)
- Optional: steamer or steam iron (hover only) for gentle blocking
Skill Level
Beginner. Although the ears involve simple shaping, the stitches are basic, and the increases are predictable.
Stitches & Abbreviations (US Terms)
For clarity, here are the stitches you’ll use.
- MR = magic ring
- ch = chain
- sl st = slip stitch
- sc = single crochet
- hdc = half double crochet
- inc = increase (2 sc in the same stitch)
- dec (sc2tog) = single crochet two together
- BLO = back loop only
Tip: If you follow UK terms, then replace sc with dc and hdc with htr.
Gauge & Sizing Tips
Because consistent tension helps the base lie flat, a quick check is helpful.
- Approximate gauge (4.0 mm hook, worsted cotton): 15–16 sc = 4 in (10 cm) in rows
- After Round 4 of the base: roughly 2.75 in (7 cm) across
- If your circle is larger, then go down a hook size; if smaller, then go up
- For wide mugs, simply add one increase round; for espresso cups, stop one round earlier
Additionally, remember that cotton relaxes slightly after blocking and use; therefore, keep your tension firm but comfortable.
At-a-Glance Timeline
- Base/body: 25–30 minutes
- Ears (both): 30–40 minutes total
- Assembly and sewing: 10–15 minutes
- Optional face embroidery: 8–12 minutes
- Optional blocking: 5–8 minutes
Total estimated time: 55–70 minutes per coaster
Step-by-Step Instructions (Body + Finishing With Times)
BODY: Flat Coaster Base (25–30 minutes)
Because the base must sit level, work in a spiral with even increases. Additionally, place a stitch marker in the first stitch of each round and move it as you go.
- Round 1: MR, 6 sc in ring; pull tail tight. (6)
- Round 2: inc around. (12)
- Round 3: [sc, inc] around. (18)
- Round 4: [2 sc, inc] around. (24)
- Round 5: [3 sc, inc] around. (30)
- Round 6: [4 sc, inc] around. (36)
- Round 7: [5 sc, inc] around. (42)
At this stage, check the diameter; it should be about 4.25–4.5 in (10.8–11.4 cm). If you need a larger surface, then continue:
- Round 8 (optional): [6 sc, inc] around. (48) increases size to roughly 4.75–5 in (12–12.7 cm)
For a crisp rim, finish neatly. Therefore, sl st into the next stitch, ch 1, sc in BLO around, and sl st to the first sc. Then fasten off and weave in the tail on the wrong side.
Meanwhile, troubleshoot as you go:
- If the circle ripples, your tension may be loose or you added stitches; therefore, frog the last round and rework slightly tighter.
- If the circle cups, you may have missed increases or tightened your tension; consequently, recount and add any missing stitches evenly in the next round.
EARS: Puffy Bunny Ears (30–40 minutes total)
Because puffy ears look adorable and hold their shape, you’ll make double panels and join them. In total, make two ears; each ear uses two matching panels.
Ear Panel (make 4 panels total; approx. 2.5–3 in long)
- Row 1: ch 7. Starting inthe 2nd ch from the hook, work: sc, sc, hdc, hdc, sc, then 3 sc in the last ch to turn; continue along the underside: sc, hdc, hdc, sc, sc. (14 stitches around the oval)
- Row 2: sc around, placing 2 sc into the three stitches forming the top curve to widen the tip; keep the sides even. (18)
- Row 3: sc around, placing 2 sc at the two corner points of the tip; otherwise, keep stitches even. (20)
- Row 4: sc around with no increases to stabilize. (20)
Next, fasten off the first panel completely. However, do not fasten off the second panel; you’ll use its working yarn to join both panels.
Join Panels for One Ear
- First, place two panels wrong sides together with edges aligned.
- Then, working through both layers, sc around the entire ear.
- Optionally, before you close the final stitches, add a tiny tuft of yarn scraps at the tip to create a gentle puff (do not overstuff).
- Finally, sl st at the base, cut yarn, and leave a 6–8 in (15–20 cm) tail for sewing.
Afterward, repeat the process for the second ear.
FINISHING: Placement, Sewing, and Optional Face (10–27 minutes) —
Because stability matters, place your ears outside the mug area.
Ear Placement and Sewing (10–15 minutes)
- First, lay the coaster base flat with the final join positioned at the top as a guide.
- Next, place the ears at the top edge about 1–1.25 in (2.5–3 cm) apart at their closest points.
- Then, pin or clip the ears so they remain symmetrical.
- Finally, using the ear tails, whipstitch or mattress-stitch the ear bases to the outer round of the coaster, securing with several passes.
- Afterward, weave in all ends neatly on the wrong side.
Optional Face Embroidery (8–12 minutes)
- First, with black floss or thin cotton thread, embroider two tiny eyes as horizontal seed stitches or subtle arcs placed outside the mug footprint (about 1.25 in / 3 cm from the center).
- Then, add a petite V-shaped nose with pink thread; optionally, include two short whiskers per side.
- Finally, secure the threads on the back and weave in tails flat, since coasters should remain bump-free.
Optional Blocking (5–8 minutes)
- First, set the coaster on a heat-safe surface.
- Then, hover a steamer or steam iron above the fabric without touching it.
- Next, smooth the edges with your fingertips.
- Consequently, the circle relaxes and the ears set into a crisp shape that looks great in photos.
Basic Tips for Beginners
- Choose cotton: Because cotton absorbs condensation and tolerates heat, it stays practical for daily use; therefore, avoid acrylic for hot mugs.
- Keep tension firm: Consequently, the base lies flat and resists wobble; if you see gaps, switch to a 3.5 mm hook.
- Mark the first stitch: Since you’ll crochet in a spiral, a removable marker prevents miscounts and uneven increases.
- Weave ends immediately: Therefore, finishing remains quick, especially when making multiples.
- Test the mug footprint: After attaching ears, place a mug on the base; if anything tilts, adjust embroidery or ear placement outward.
Common Mistakes (With Quick Fixes)
- Ruffled edges: Usually, too many stitches or loose tension cause waves; therefore, remove the last round and rework slightly tighter, or skip the optional increase round.
- Cupped center: Typically, missed increases or very tight tension create a bowl shape; consequently, recount and insert missing increases evenly on the next round or switch to a larger hook.
- Wobbly mug: Often, ears sitting under the mug cause rocking; instead, movethe ears outward so they remain outside the cup’s footprint.
- Bulky features: Buttons and safety eyes add height; hence, choose flat embroidery or felt stitched very flush.
- Floppy ears: Sometimes, loose joining stitches reduce structure; therefore, join more snugly, skip stuffing, or block lightly for a tidy curve.
Variations (Customize Your Bunny)
- Minimalist Flat Ears: Instead of two panels per ear, make only one panel and sew it directly; consequently, the ears lie flatter, and the project speeds up.
- Color-Dipped Accents: Join ear panels with a contrast color or embroider pastel inner ears; as a result, your coaster pops in photos and gift bundles.
- Striped or Ombre Base: Change color every round or fade tones from center to edge; additionally, select seasonal palettes pastels for spring, berry tones for fall, or neutrals for modern spaces.
- Trivet-Size Bunny: Use bulky cotton (#5) and a 5.5–6.0 mm hook; then add one or two extra increase rounds to create a teapot-ready hot pad.
- Mini Ornament or Keychain: Use sport-weight cotton (#2) and a 3.0 mm hook; then stop the base at Round 5 and attach a jump ring.
- Storybook Floppy Ears: Extend each ear by repeating Row 4 twice before joining; consequently, the ears drape adorably.
- Face-Free Chic: Skip embroidery entirely; therefore, your set stacks neatly and suits minimalist décor.
Detailed Sizing Tips
- For oversized mugs: Add Round 8 ([6 sc, inc] around to 48 sts) and optionally a plain Round 9 for a broader rim; consequently, the diameter reaches about 4.75–5 in (12–12.7 cm).
- For espresso cups: Stop at Round 6 (36 sts) to achieve roughly 3.75–4 in (9.5–10 cm).
- For extra thickness: Crochet two bases and sc-join them around the edge without stuffing; therefore, the coaster becomes double-thick yet stays flat.
- For better grip: Work the final edging in BLO to create a subtle ridge; additionally, choose matte cotton, which grips surfaces better than slick, mercerized cotton.
Why This Construction Works
Fundamentally, the body uses a classic spiral with one additional stitch between increases each round; consequently, the circle expands predictably and lies flat. Meanwhile, the ear panels are small ovals that, when joined, form a gentle puff without bulky stuffing. Furthermore, cotton yarn provides absorbency for condensation and resilience for heat, which transforms a cute amigurumi idea into a truly functional coaster.
Care & Use
- Washing: Hand wash or machine-wash inside a mesh bag on gentle with cool water and mild detergent.
- Drying: Lay flat and shape the ears; avoid high heat.
- Refreshing: Steam lightly when needed; thus, the circle and edges bounce back.
SEO-Friendly FAQ (Beginner-Focused)
- Can beginners make this Energetic Crochet Puffy Ear Bunny Coaster Amigurumi Pattern? Yes, because it uses basic stitches, simple increases, and clear timing, beginners can follow comfortably.
- Which yarn should I choose? 100% cotton worsted (#4) is ideal; consequently, the coaster stays firm, absorbent, and heat-tolerant.
- Do I need stuffing for the ears? Not necessarily; however, a tiny pinch of yarn scraps at the tips adds a gentle puff.
- How long does one coaster take? Typically, 55–70 minutes, depending on pace and whether you add embroidery or blocking.
- May I sell finished items? Yes, you may sell what you crochet; however, please credit the design as “Energetic Crochet Puffy Ear Bunny Coaster by [Your Name].”
Quick Reference Recap (With Times)
- Base (25–30 min):
- R1: 6 sc in MR (6)
- R2: inc around (12)
- R3: [sc, inc] around (18)
- R4: [2 sc, inc] around (24)
- R5: [3 sc, inc] around (30)
- R6: [4 sc, inc] around (36)
- R7: [5 sc, inc] around (42)
- Optional R8: [6 sc, inc] around (48)
- Edge: sl st; ch 1; sc BLO around; sl st to close; weave ends
- Ears (30–40 min total):
- Make 4 panels as written; join two panels per ear; leave tails for sewing
- Finishing (10–15 min):
- Sew ears outside mug footprint; weave ends
- Optional Embroidery (8–12 min):
- Eyes, nose, whiskers with flat stitches
- Optional Blocking (5–8 min):
- Hover steam; shape circle and ears
Natural Keyword Wrap-Up
In short, this Energetic Crochet Puffy Ear Bunny Coaster Amigurumi Pattern delivers a fast, photogenic, and practical project that suits gifts, markets, and everyday table protection. Moreover, because the steps are beginner-friendly and the materials are simple, you can finish a coaster in an evening with confidence. Additionally, the puffy ears elevate a classic crochet coaster into something irresistibly charming, while the cotton base ensures lasting performance. Finally, if you love to learn visually,
If you want, I can also run a “transition audit” on any specific section you paste here and push the percentages even higher for your exact readability plugin.