Handmade Crochet Sleeping Dragon Amigurumi Pattern
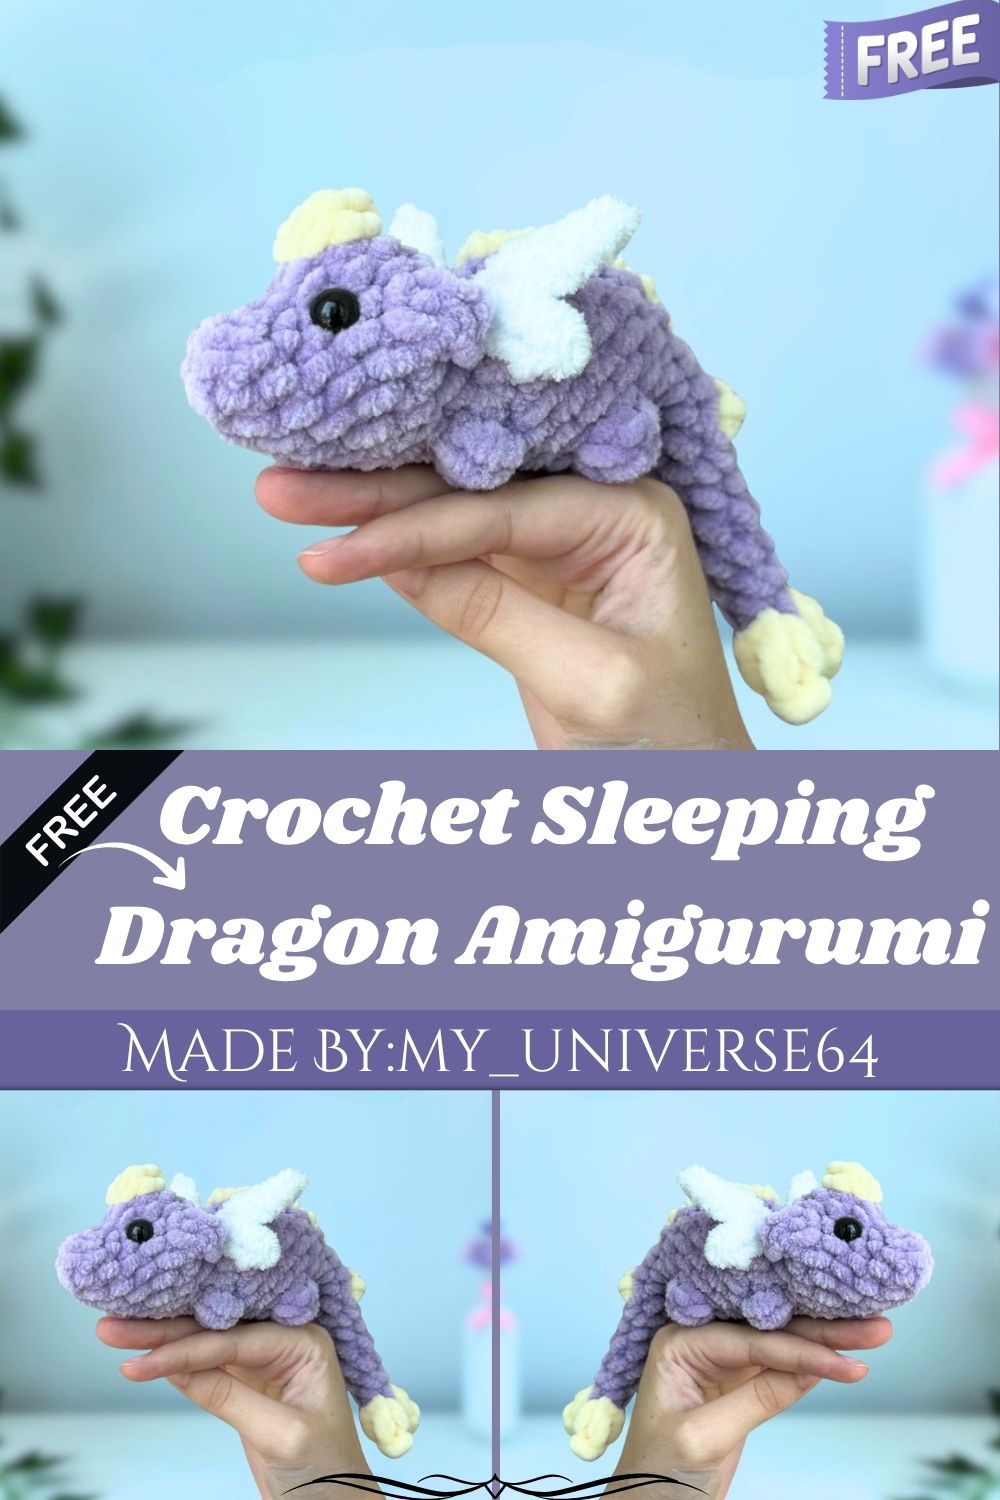
Curl up with a cozy crochet sleeping dragon amigurumi pattern. Honestly, tiny wings, spikes, and a coiled tail make this playful project genuinely fun and truly satisfying to stitch overall.
Sleeping dragon amigurumi toys bring a playful fantasy touch to any handmade collection. Low-key, this pattern builds the whole creature in one continuous piece, working from the head down through the wings, spikes, and curled tail. Bulky yarn keeps the stitching quick, while bobble legs add charming texture all around.
Skill Level
Rated intermediate, this pattern suits crocheters comfortable with bobble stitches, front and back loop work, and shaping. Ngl, the wings and horns take patience, though nothing here feels impossible.
Pattern Overview
- The whole dragon works as one continuous piece, starting at the head and ending at the tail
- Horns get crocheted directly into the body using double crochet stitches and a pull-through loop
- Ears use front-loop-only single crochet to create a raised, dimensional shape
- Wings are worked in white yarn using front-loop stitches and chain spaces for shape
- Bobble stitches form the back legs and spikes along the dragon’s back and tail
- Safety eyes get placed early, between rounds 4 and 5, before the head closes
Materials
- Super bulky yarn in three colors (purple, yellow, and white used here)
- 4mm crochet hook
- 12mm safety eyes
- Stuffing
- Scissors
- Sewing needle
- Stitch markers (recommended)
Abbreviations
- MR – Magic Ring
- SC – Single Crochet
- INC – Increase
- DEC – Decrease
- BO – Bobble Stitch
- DC – Double Crochet
- CH – Chain
- FLO – Front Loop Only
- BLO – Back Loop Only
Special Techniques
- The horn technique uses two double crochets into one stitch, a chain-2 space, then a third double crochet, finished by pulling a loop through the first stitch for a curved shape
- Ears form with a front-loop single crochet, a two-chain gap, then another front-loop stitch in the same base stitch
- Wings combine front-loop stitches with long chain spaces worked back into themselves for a layered, feathered look
- Bobble stitches with five loops over the hook create raised spikes and textured back legs
- Working front loops only on certain rounds keeps earlier stitches free for attaching ears and wings later
Full Pattern Instructions
Body, Head and Tail
Start with purple yarn.
Round 1: 8 SC in MR (8) Round 2: SC around (8) Round 3: 2 SC, 4 INC, 2 SC (12) Round 4: 4 SC, 4 INC, 4 SC (16) Round 5: 7 SC, then switch to yellow for the horn, then purple for 8 SC (16)
Horn: Work 2 DC into the same stitch, chain 2, work 1 DC into the same stitch. Take the hook out, leaving a loop, insert it through the first DC, and pull the loop through.
Round 6: 4 SC, ear, 5 SC, ear, 5 SC (16)
Ear: Front-loop SC, chain 2, SC into the second chain from the hook, front-loop SC in the same stitch.
Round 7: 4 SC, back-loop SC, 5 SC, back-loop SC, 5 SC (16)
Attach the safety eyes between rounds 4 and 5, spacing them four stitches apart, using the ears as a placement guide.
Round 8: (2 SC, DEC) x 4 (12)
Stuff the head firmly at this point.
Round 9: 10 SC, bobble stitch with 5 loops over the hook, SC (12)
Switch to white yarn for the wings in the next round.
Round 10: SC, bobble, INC, SC, white wing 1, purple INC, SC, INC, white wing 2, purple INC, 2 SC (16)
Wing 1: Front-loop SC, chain 4, front-loop SC in the same main-round stitch, chain 5, SC 4 starting in the second chain from the hook, front-loop SC in the same main-round stitch.
Wing 2: Front-loop SC, chain 5, SC 4 starting in the second chain from the hook, front-loop SC in the same main-round stitch, chain 4, front-loop SC in the same main-round stitch.
Now crochet the back spikes using yellow yarn, and add the back legs with bobble stitches. Small tension differences may shift these slightly out of line, so nudge them into place if needed.
Round 11: 5 SC, back-loop SC, 2 SC, yellow DC, purple 2 SC, back-loop SC, 4 SC (16) Round 12: 8 SC, yellow DC, purple 7 SC (16) Round 13: 8 SC, yellow DC, purple 6 SC, bobble stitch (16) Round 14: 2 SC, bobble stitch, 5 SC, yellow DC, purple 7 SC (16) Round 15: (2 SC, DEC) x 2, yellow DC, purple SC, DEC, 2 SC, DEC (12)
Stuff the body firmly before continuing.
Round 16: (SC, DEC) x 2, yellow DC, purple DEC, SC, DEC (8) Round 17-18: SC around, 2 rounds (8) Round 19: 4 SC, yellow DC, purple 3 SC (8)
Begin stuffing the tail and continue stuffing as the rounds progress.
Round 20: (2 SC, DEC) x 2 (6) Round 21-22: SC around, 2 rounds (6) Round 23: (SC, DEC) x 2 (4) Round 24: SC around (4)
Crochet the tail horns the same way as the head horn. Adjust their placement gently if tension shifts them out of alignment.
Round 25: yellow horn, purple 2 SC, yellow horn (4) Round 26: slip stitch in the first stitch (1)
Fasten off and close the tail tip.
Customization and Variation
- Swap purple and yellow for green and gold tones for a more classic dragon look
- Use a soft pastel palette for the wings and spikes for a gentler, baby-friendly version
- Add a tiny crocheted flame accent near the mouth for extra character
- Skip the wings entirely for a simpler, wingless dragon variation
- Try a longer tail by adding a few extra rounds before starting the tail horns
Common Mistakes
- Rushing the horn technique often leaves the loop pull-through too loose or uneven
- Placing safety eyes too close together throws off the dragon’s sleepy expression
- Skipping front-loop-only instructions on ear and wing rounds flattens the dimensional shape
- Under-stuffing the tail before closing causes it to flop instead of holding its curl
- Losing track of color changes between purple, yellow, and white disrupts the spike pattern
Finishing Tips
- Steam-block the wings lightly to help the layered chain spaces lie flat
- Use stitch markers on every round to avoid losing your place during color changes
- Shape the tail gently into a curl while stuffing for a natural sleeping pose
- Weave in every color-change tail twice for extra durability during handling
- Test spike and leg placement with pins before committing to permanent stitches
Gifting Ideas
- Pair the dragon with a small crocheted egg for a nesting-themed gift set
- Wrap it inside a fantasy-themed gift box for a birthday surprise
- Add a handwritten name tag to personalize the dragon for its new owner
- Bundle it with a dragon-themed storybook for a cozy bedtime gift
- Include it in a fantasy-lover’s care package alongside other mythical crochet creatures
Frequently Asked Questions
Can I make this dragon without safety eyes? Yes, embroidered eyes work as a safer alternative for gifts intended for very young children.
What yarn weight works best for this pattern? Super bulky yarn paired with a 4mm hook keeps the stitches chunky and the project quick to finish.
Why does my dragon’s spikes look misaligned? Tension differences are common here, so gently nudge the yellow spike stitches into place after finishing each round.
Can I resize this pattern for a bigger dragon? Switching to thicker yarn and a larger hook scales the whole design up while keeping proportions consistent.
Conclusion
Real talk, this sleeping dragon amigurumi packs a lot of charm into one continuous project. Every detail, from the pull-through horns to the curled tail, adds real personality to the finished piece. No joke, this cozy little dragon makes a genuinely delightful handmade gift for any fantasy fan.