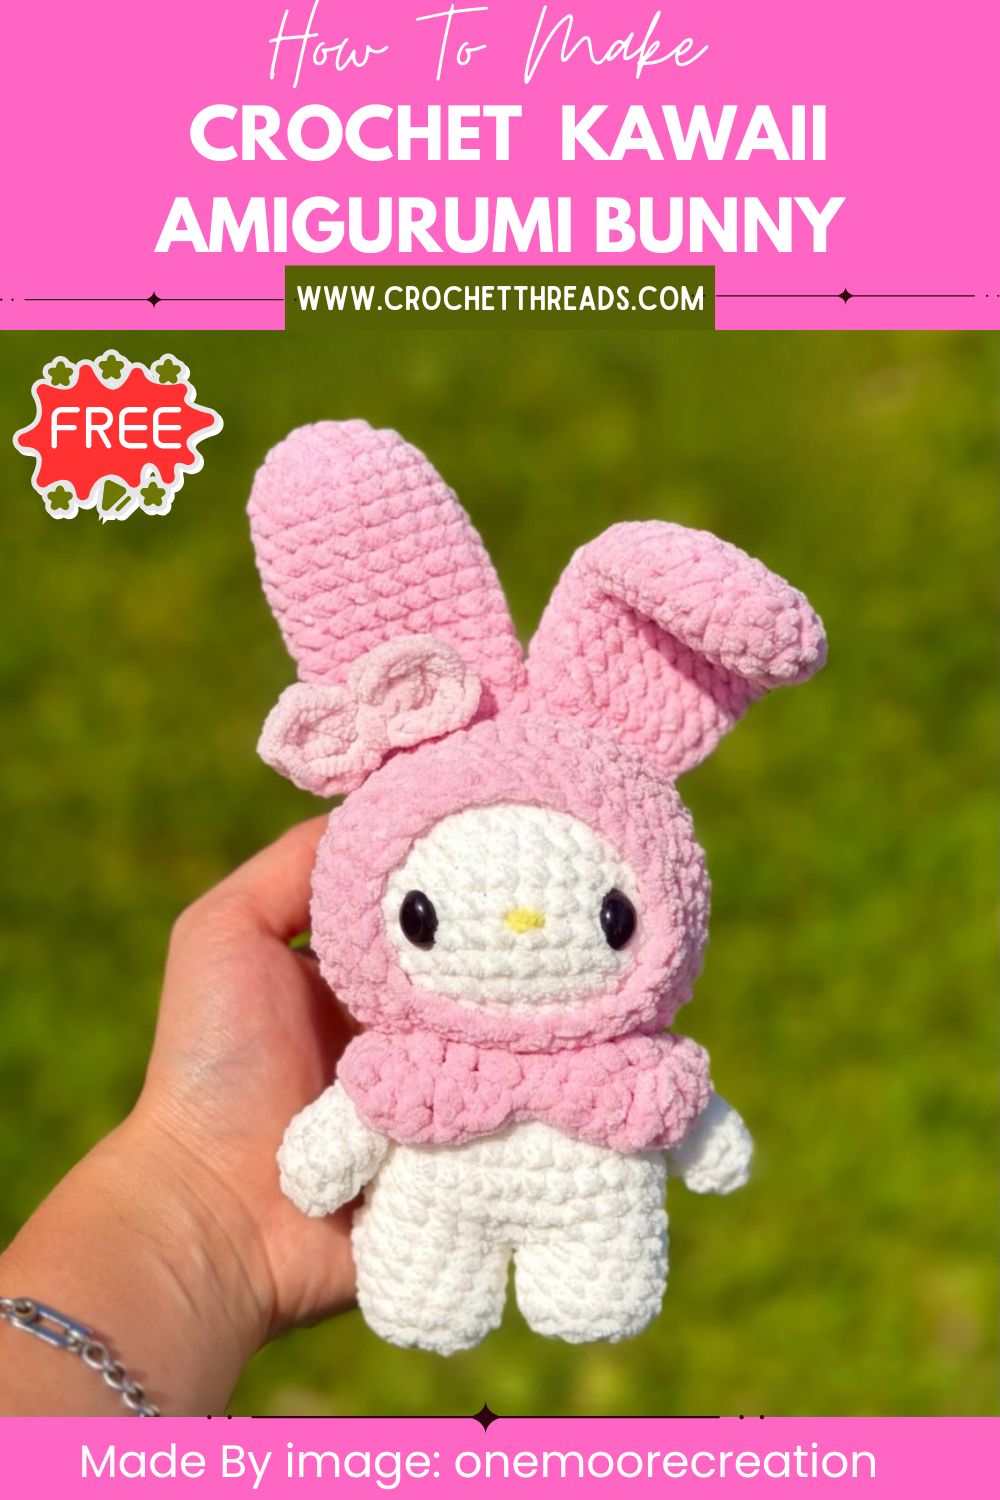
My Melody Crochet Plush | Kawaii Amigurumi Bunny
This pink and white bunny with its signature pointed ears and bow is a no-sew amigurumi adventure from start to finish!
There is something special about a no-sew crochet pattern. Everything comes together as you go, without separate pieces left waiting to be joined later. This kawaii bunny pattern is exactly that kind of project. Arms, legs, body, head, and a hood are all worked in careful sequence, with each piece picked up and joined directly into the next round. Furthermore, the long pointed ears give this bunny its instantly recognizable silhouette. In addition, the soft pink and white color combination, paired with safety eyes and a yellow felt nose, creates a face that is sweet, simple, and full of personality. Moreover, because this is a no-sew pattern, the order of construction matters enormously. Each step builds directly on the last. As a result, the finished bunny feels seamless and cohesive in a way that separately assembled amigurumi simply cannot match. Whether you make this bunny for yourself, as a gift for a Sanrio fan, or as a sweet addition to a kawaii collection, this pattern rewards careful, sequential work with a truly polished result.
Skill Level
Intermediate. This pattern requires careful sequencing since pieces are joined as you go rather than sewn on afterward. Additionally, basic single crochet, increases, and decreases are the main stitches used throughout.
Materials You Will Need
Yarn:
- Pink and white yarn in any weight
- Any color yarn for the bow detail
Other Supplies:
- Crochet hook to suit your chosen yarn weight
- Safety eyes or black felt for the eyes
- Yellow yarn or felt for the nose
- Scissors
- Darning needle
- Polyfill stuffing
- Paper or a hair clip for shaping the bow
Abbreviations
- MR — Magic Ring
- ST — Stitch
- SLST — Slip Stitch
- CH — Chain
- SC — Single Crochet
- INC — Increase (2 sc in same stitch)
- DEC — Decrease (invisible)
- HDC — Half Double Crochet
- DC — Double Crochet
- TRBL — Treble Crochet
- R — Round
- FO — Fasten Off
- BLO — Back Loop Only
Critical instruction: This is a no-sew pattern. You must work the pattern in the exact order it is written so each piece is ready exactly when needed. Do not fasten off unless directed.
Pattern: Legs Make 2
R1: 6 sc in MR (6) R2: 6 inc (12) R3: BLO 12 sc (12) R4–6: 12 sc for 3 rounds (12) R7: sc on first leg to join, 11 sc around, sc in stitch joining the first leg, 11 sc around second leg (24)
Fasten off for the first leg only. Do not fasten off the second leg; it continues directly into the body.
Begin stuffing both legs, and sew the small gap between the legs closed if needed before continuing.
Pattern: Body (Legs Continued)
R8: (3sc, inc) x6 (30) R9–10: 30 sc for 2 rounds (30) R11: (3sc, dec) x6 (24) R12: (2sc, dec) x6 (18) R13: 18 sc (18)
Pattern: Arms Make 2
R1: 6 sc in MR (6) R2: (2sc, inc) x2 (8) R3–7: 8 sc for 5 rounds (8)
Stuff lightly.
R8: 4 sc across both sides, folding the arm flat (4)
Chain 1 and fasten off. Leave both arms ready to be joined to the body during R14.
Joining the Arms
R14: 3 sc, 4 sc in first arm, 5 sc, 4 sc in second arm, 2 sc (18)
This round attaches both arms directly to the body in a single pass. Position the arms evenly on either side of the body before working this round to ensure a balanced, symmetrical placement.
Pattern: Head (Body Continued)
R15: (2sc, inc) x6 (24) R16: (3sc, inc) x6 (30) R17: (4sc, inc) x6 (36) R18–24: 36 sc for 7 rounds (36)
Begin stuffing the body and head section firmly. Place safety eyes 5 stitches apart and add the yellow nose between R20–21. Mark all positions with pins first and check the face from the front before locking anything into place.
R25: (4sc, dec) x6 (30) R26: (3sc, dec) x6 (24) R27: (2sc, dec) x6 (18) R28: (sc, dec) x6 (12)
Finish stuffing the head firmly at this point before continuing.
R29: 6 dec (6)
Fasten off, close the hole, and hide the tail securely.
Pattern: Ears Make 2
R1: 6 sc in MR (6) R2: 6 inc (12) R3: (sc, inc) x6 (18) R4–13: 18 sc for 10 rounds (18) R14: (8sc, inc) x2 (20)
Fasten off and leave a long tail for sewing. These long, slim ears are the defining feature of this bunny and are attached to the top of the head once the hood section is complete.
Pattern: Hood
R1: 6 sc in MR (6) R2: 6 inc (12) R3: (sc, inc) x6 (18) R4: (2sc, inc) x6 (24) R5: (3sc, inc) x6 (30) R6: (4sc, inc) x6 (36) R7–9: 36 sc for 3 rounds (36)
This rounded hood section sits over the top of the head and frames the face. Once complete, attach the two long ears to either side of the hood, positioned symmetrically and angled slightly outward for the most characteristic finished look.
Customization and Variation Ideas
- First, swap the pink and white color scheme for lavender and cream for a completely different but equally sweet kawaii bunny variation using the same construction.
- Additionally, add a small crocheted flower instead of a bow for a softer, more botanical accessory that still adds a personalized finishing touch.
- Moreover, try making the ears slightly shorter by reducing R4–13 to 6 rounds instead of 10. Shorter ears create a rounder, more compact bunny silhouette.
- Furthermore, embroider small blush circles on the cheeks after finishing the face for an extra sweet, rosy-cheeked expression that enhances the overall kawaii effect.
- Also, use a fluffy or boucle yarn for the body for a softer, more textured finished plush that feels even more huggable than smooth yarn.
- Finally, make a matching mini version using fingering-weight yarn and a small hook for a tiny bunny that pairs beautifully with the full-size version as a display set.
Common Mistakes to Avoid
- First, fastening off too early: This pattern explicitly states not to fasten off unless directed. Fastening off prematurely breaks the no-sew construction and forces unnecessary sewing later.
- Additionally, losing track of the leg joining sequence: R7 joins both legs into one continuous round. Count carefully and use a stitch marker to track exactly where the join occurs.
- Also, forgetting to prepare the arms before R14: Both arms must be completed through R8 before reaching R14 in the body. Working ahead without the arms ready means stopping mid-round to crochet them, which disrupts tension and stitch count.
- Furthermore, placing eyes after the head is too close: Safety eyes and the nose must go in during R20–21 while the head is still open enough to access from the inside. Waiting until later makes placement very difficult.
- Moreover, attaching ears before completing the hood: The hood section must be finished first. Ears attached directly to the head without the hood in place sit at the wrong height and angle.
- Finally, working BLO incorrectly on R3 of the legs: This round must be worked in back loops only. Working both loops removes the texture detail that defines the top edge of each leg.
Finishing Tips
- First, when joining the arms at R14, work slowly and check the tension on both sides. Uneven tension between the two arm attachments creates a lopsided body that is difficult to correct later.
- Additionally, after closing the head at R29, give the entire plush a firm overall squeeze and reshape it into an even, balanced form before the stuffing fully settles.
- Moreover, position the ears with a slight forward lean rather than straight up. This small adjustment gives the bunny a softer, more approachable expression.
- Furthermore, use a darning needle to weave in every tail through at least three direction changes. The no-sew construction still leaves several small tails that need careful securing.
- Also, attach the bow using a hair clip or a small piece of paper as a stiffener inside the loops before sewing. This keeps the bow shape crisp and prevents it from flopping over time.
- Finally, photograph the finished bunny from the front at eye level to show off the long ears, the bow, and the sweet face all together in one balanced composition.
Gifting Ideas
- First, package the finished bunny in a small pastel gift box with tissue paper in a matching color scheme for a presentation that feels coordinated and intentional.
- Additionally, pair the bunny with a small Sanrio-themed sticker sheet or notebook for a kawaii gift bundle that feels cohesive and thoughtful.
- Moreover, these bunnies make wonderful birthday gifts for fans of cute character collectibles, especially when the color scheme matches a favorite character’s palette.
- Furthermore, attach a small keychain ring to a mini version for a handmade bag charm that kawaii enthusiasts will use and enjoy every single day.
- Also, make a matching pair in two different color schemes and gift them together as a kawaii bunny duo for someone who loves collecting plush characters.
- Finally, these bunnies sell consistently well at conventions and craft markets focused on kawaii and character-inspired handmade goods. The recognizable silhouette draws attention immediately from across a display table.
Conclusion
This no-sew kawaii bunny pattern is a wonderful exercise in sequential construction. Every piece is exactly where it needs to be at exactly the right moment. Furthermore, the long pointed ears and sweet pink and white color combination create a finished plush that is instantly recognizable and deeply charming. Therefore, follow the order of construction carefully, prepare the arms before R14, and place your face details with care during R20–21. In addition, take your time attaching the ears to the finished hood; their angle and position define the entire personality of the bunny. In conclusion, this little bunny rewards patience and careful sequencing with a result that feels genuinely seamless and complete.
Happy crocheting! Cannot wait to see your kawaii bunny come together.