Cute Crochet Ghost Plush Pattern for Beginners
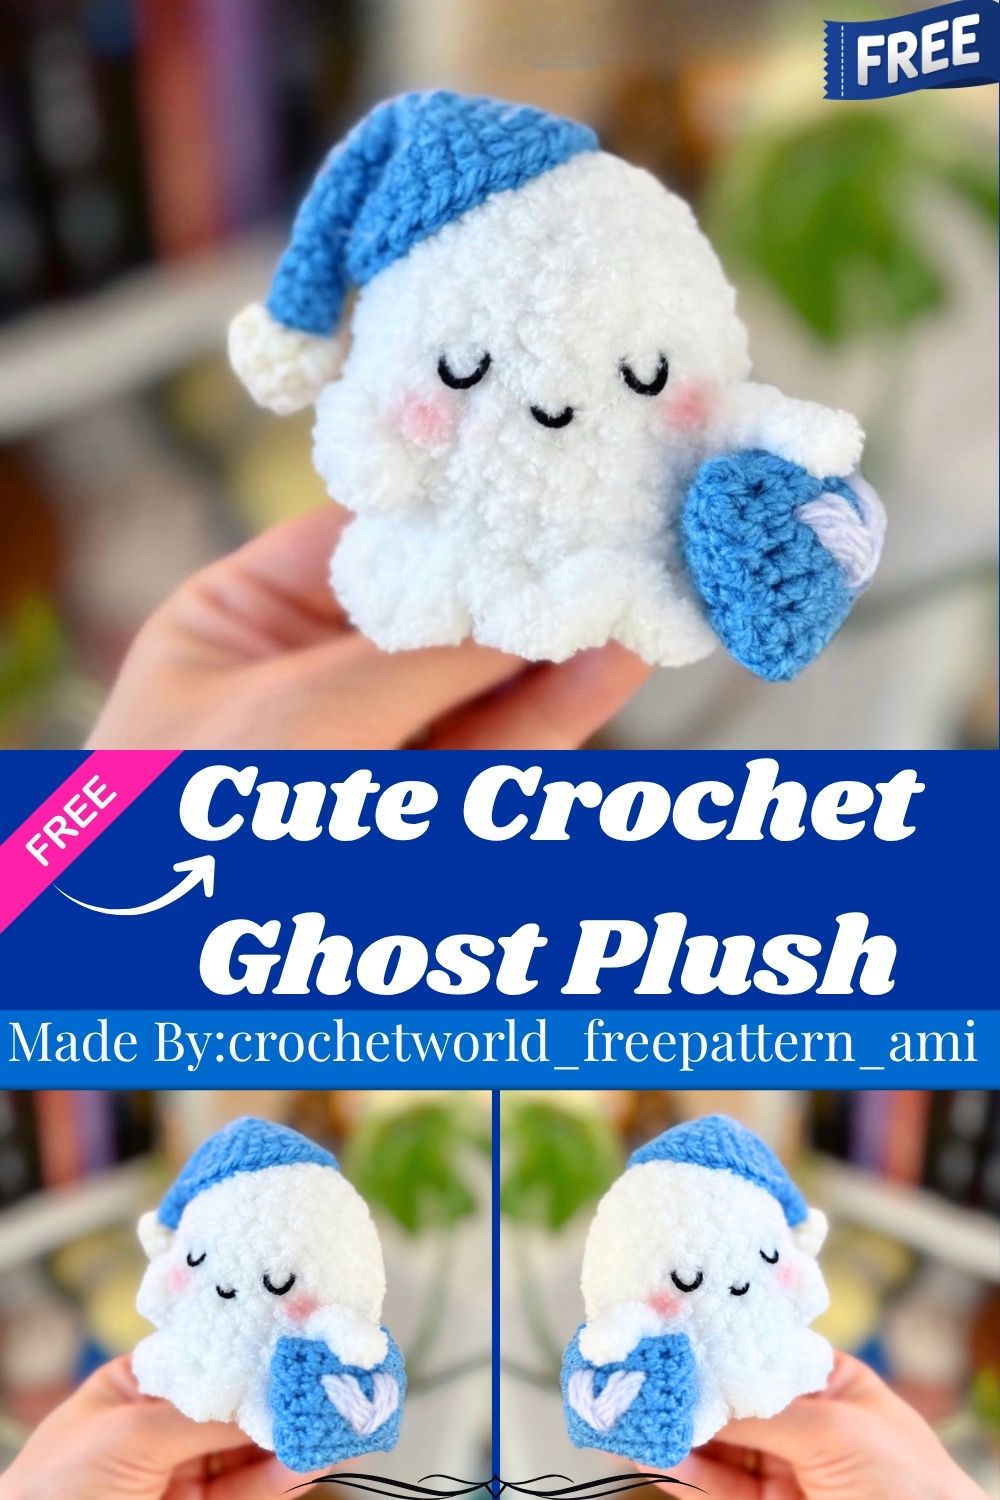
Soft chenille yarn turns into the coziest little ghost plush you will ever stitch up. Real talk, this pattern works up fast with simple rounds and a sweet night cap detail. Perfect for shelves, gifts, or a quick weekend project.
Sweater weather calls for a plush this sweet, and the cute crochet ghost plush delivers that cozy charm. Ngl, the wavy bottom edge and tiny arms give it a personality that stands out from typical amigurumi shapes. A soft night cap with a matching bobble adds a playful touch. Working mostly in single crochet rounds, this design stays approachable for beginners while looking polished enough for gifting or shop listings.
Skill Level
Great for newer crocheters comfortable with basic single crochet and simple increases. Fasten off and sew steps take real patience. Most shaping repeats the same pattern, easy to follow.
Pattern Overview
- Worked in continuous rounds using single crochet, starting from a magic ring
- Body shaped through standard increase rounds, then eight plain rounds before decreasing
- Wavy bottom edge created using back loops only, then front loop shell stitches for texture
- Tiny arms added directly into the body using short chains and slip stitches
- Matching night cap and bobble worked separately, then stitched to the top of the head
- Optional pillow accessory made from two single crochet panels joined and stuffed
- Requires soft chenille or acrylic yarn, a small hook, safety eyes, fiberfill, scissors, a stitch marker, and a yarn needle
- Two hook sizes are used, a slightly larger one for the chenille body and a smaller one for the night cap and pillow
- The wavy hem is what gives this ghost its signature silhouette, so that step is worth taking slowly
- Beginners can complete the entire plush, including accessories, within a single relaxed crafting session
Materials Snapshot
- Soft chenille yarn (or a yarn of your choice) for the body and arms
- Acrylic or fine chenille yarn in a contrasting color for the night cap and bobble
- A 5mm hook for the chenille sections and a 4mm hook for the finer details
- 12mm safety eyes, fiberfill stuffing, a stitch marker, scissors, and a yarn needle with a wide eye
Special Techniques
Honestly, the standout technique here is the front loop only shell stitch used to create the wavy bottom edge. Working three double crochets into a single front loop, framed by slip stitches on either side, produces the scalloped wave pattern that makes this ghost recognizable at a glance. Placing a stitch marker at the starting point before switching to this round keeps the waves evenly spaced around the entire hem, so the finished edge looks intentional rather than uneven. The arm attachment method is worth noting too, since chaining directly from the body and slip stitching back in avoids extra sewing later, keeping the whole assembly process quicker and cleaner.
Common Mistakes
- Forgetting to stuff the body gradually, which leaves the finished shape lumpy or hollow in spots
- Working the wavy edge into both loops instead of the front loop only, which flattens the wave texture
- Placing the stitch marker inconsistently, leading to uneven spacing between the shell stitch waves
- Making the arms too long or too short, which throws off the overall proportions
- Skipping the back loop only round before the wave edge, which changes how the hem sits
- Rushing the night cap increases, which leaves the brim looking pointed instead of rounded
- Not leaving a long enough tail on the bobble, making it hard to attach securely later
- Sewing the arms at uneven heights, which makes the finished plush look lopsided when it sits upright
- Using a hook that’s too large for the accessory yarn, leaving gaps in the night cap stitches
Uses & Benefits
Once finished, this ghost plush fits right into seasonal decor, a nursery shelf, or a cozy gift for someone who loves quirky handmade items. Trust me, its small size makes it easy to slip into a gift bag or display alongside other seasonal makes, and it holds up well on a busy shop shelf. Shop owners often find soft plushies sell well during autumn and winter, since buyers love pieces with personality. Making one also strengthens core amigurumi skills like shaping rounds, working front and back loops, and attaching small details neatly.
Helpful Beginner Tips
- Keep a stitch marker on the current round so you never lose your place
- Stuff a little at a time rather than waiting until the very end
- Practice the shell stitch wave on a small swatch before working the full round
- Hold consistent tension throughout so the chenille sections don’t look looser than the rest
- Use a smaller hook for the accessories to keep the stitches tight and neat
- Weave in tails securely so the arms and bobble stay firmly attached over time
- Take your time counting stitches after every increase or decrease round
- Keep your safety eyes loosely in place before locking them, so you can adjust spacing first
- Work in a well-lit space so front and back loop stitches stay easy to tell apart
Assembly
- Complete the body through the decrease rounds, stuffing firmly as each round closes
- Switch to front loops only on the marked round to prepare for the wave edge
- Work the shell stitch pattern around the entire hem, keeping tension even throughout
- Attach the arms by inserting the hook directly into the body and working short chains
- Space both arms evenly apart, checking that they sit at a matching height
- Crochet the night cap separately, shaping the brim through the final increase rounds
- Make the small bobble, close the opening through the front loops, and set it aside
- Stitch the bobble to the top of the night cap, then place the cap on the head
- Assemble the optional pillow by joining two panels and stuffing lightly before closing the seam
- Weave in any remaining loose ends across the body, arms, and accessories once everything is attached
- Step back and check the finished plush from several angles to confirm the pose sits evenly
Where Can You Use This Case?
Beyond seasonal shelf decor, this plush works well as a lunchbox surprise, a small gift topper, a handmade shop item during autumn, or a soft companion piece for a child’s room throughout the year. Its small footprint also makes it easy to bundle a few together as a themed gift set.
Why Beginners Will Enjoy This Pattern
No joke, the repeated single crochet rounds and simple shaping make this a low-stress project for anyone still building confidence. At the same time, the wavy hem still gives a satisfying, more advanced-looking result. Watching the plain rounds gradually build into a recognizable shape keeps the process rewarding from start to finish.
Tips and Tricks for Success
- Mark the starting point of the wave round clearly before you begin
- Keep the arm chains short and even so the proportions stay balanced
- Test the bobble size against the night cap before attaching it permanently
- Store loose ends until the very end in case a repair stitch is needed
- Photograph each stage so future plush projects go even more smoothly
- Double-check the arm spacing against the pattern notes before slip stitching them in place
- Keep the night cap slightly snug so it sits securely without slipping off the head
Why This Crochet Pattern Is Trending
Low-key, cozy seasonal plushies have been showing up everywhere on Pinterest and handmade shop feeds, and this ghost design fits right into that wave. Its soft, friendly shape appeals to buyers who want something charming rather than spooky, which keeps it relevant well past a single season.
- Soft, non-scary plush designs are trending across handmade seasonal decor
- Wavy hem details give a simple project a distinctive, shareable look
- Compact plush patterns continue to perform well as quick, giftable makes
Conclusion
For real, this ghost plush pairs a beginner-friendly build with a distinctive wavy hem that makes it stand out on any shelf. It stitches up quickly, uses simple techniques throughout, and leaves plenty of room for creative color choices. Once you finish one, don’t be surprised if a whole little ghost family follows.