Crochet Gingerbread Twinkle Star Pattern for Holiday Decor
Soft velvet yarn in peach, mustard, and cookie brown gives the Crochet Gingerbread Twinkle Star Pattern for Holiday Décor its plush, bakery-shelf look. Small round pieces, a golden accent, and white icing dots then come together into one cheerful piece of Christmas crochet décor.
Because the crochet gingerbread twinkle star works up from small, separate parts that you shape, tidy, and join, each stage stays manageable. What sets it apart is the velvet yarn, which gives every part a soft, bakery-fresh finish. The guide below covers starting the round pieces, closing the center neatly, attaching yarn at an edge, and working the golden accent in rows. Along the way, you’ll also find velvet yarn amigurumi tips and ideas for holiday crochet decorations.

Crochet Gingerbread Twinkle Star Pattern Overview
The crochet gingerbread twinkle star isn’t worked as one continuous shape. Instead, it comes together from several velvet-yarn parts:
- A peach or soft pink round piece worked in continuous rounds
- A mustard gold piece worked back and forth in flat rows
- Cookie-brown parts finished with white icing dots
Each part is finished and tidied before anything gets joined. Because plush yarn hides stitch definition, stitch markers and steady counting matter more here than they do with smooth cotton.
In short, you’ll feel comfortable if you already know the magic ring, single crochet in rounds, basic increases, and how to sew small parts together.
Materials for the Crochet Gingerbread Twinkle Star
- Velvet (chenille-style) yarn in cookie brown, peach or soft pink, and mustard gold
- White yarn for the icing details
- A crochet hook that suits your yarn weight (the screenshots show an aluminum hook with a soft green grip)
- Locking stitch markers
- Large-eye tapestry needle
- Polyester fiberfill, if your version is stuffed
- Sharp scissors
Velvet yarns vary a lot in thickness, so check the label first. The Craft Yarn Council’s yarn weight chart also explains how the weight categories compare. Then pick a hook slightly smaller than the label suggests, because tighter stitches keep the stuffing from peeking through.
Abbreviations (US Terms)
- MR: magic ring
- ch: chain
- sc: single crochet
- inc: 2 sc in the same stitch
- dec: single crochet two together
- sl st: slip stitch
- FO: fasten off
Before You Start
First of all, work a small test circle of three or four rounds in your velvet yarn. You’ll quickly see how the pile hides the top loops.
Also, keep a locking marker in the first stitch of every round, because with plush yarn, losing your place by even one stitch changes the shape.
Finally, crochet in good daylight or under a bright lamp, since dark or fuzzy colors are much harder to read in dim light.
Time Box
- Prep: 10–15 minutes to gather yarn and work a test swatch
- Stitching: about 2–3 hours for all parts, depending on size and yarn
- Finishing: 45–60 minutes for sewing, icing dots, and weaving ends
However, these times are only general estimates, so they will vary with your pace and chosen yarn.
How to Make the Crochet Gingerbread Twinkle Star Step by Step
Step 1: Start the Round Pieces
Begin the peach piece with a magic ring. Then work the first rounds in single crochet, increasing evenly around. The video below also shows each round if you’d like to follow along stitch by stitch.
Notice how the working yarn wraps over the index finger to hold steady tension. Velvet yarn slides easily, so uneven tension shows up as loose, gappy stitches. Since the piece is still small and flat at such an early stage, it’s also the easiest point to count and fix mistakes.
Pro tip: If you can’t find the top loops, gently stretch the piece sideways. As a result, the “V” of each stitch opens up and becomes easier to see through the pile.

Step 2: Tidy the Center Before Moving On
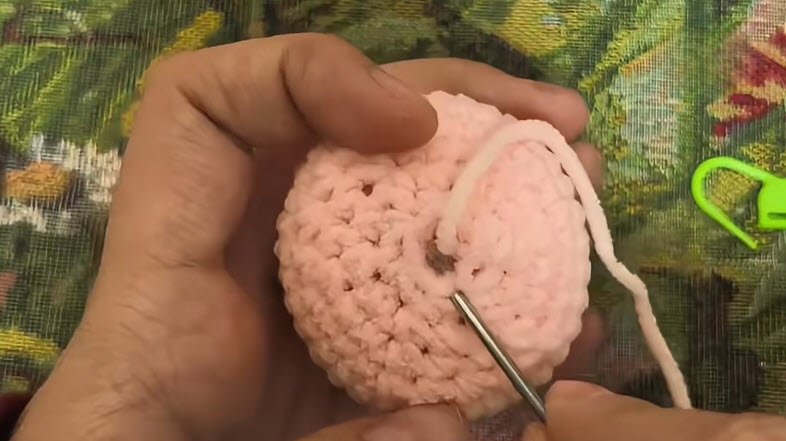
When the round piece reaches its finished size, thread the starting tail onto your tapestry needle.
Pull the tail snug to close the magic ring completely, then weave it through the stitches on the wrong side. A small hole in the middle stands out on plush yarn, so close it now rather than trying to hide it later.
Center check: Press the middle with your thumb. No gap should open up, but if one does, pull the tail a little tighter before weaving.
Also notice the green locking marker set aside in the frame. Keep your markers close, because you’ll need them again for the next stage.
Step 3: Attach Yarn Along the Edge
Some sections continue from the edge of a finished piece. For those, insert your hook under a stitch along the top edge and pull up a loop of yarn.
Go under both loops of the edge stitch so the join sits firmly. Meanwhile, the cookie-brown parts with white icing dots in the background show the gingerbread color the peach piece will sit beside once everything comes together.
Edge check: Tug the new loop lightly. If the stitch stretches open, you’ve caught only one strand, so remove the hook and go under both loops again.

Step 4: Work the Golden Accent in Rows
Switch to mustard velvet yarn for the gold accent piece. Unlike the round parts, however, the piece is worked back and forth in flat rows.
Make sure the hook goes into the stitch at the very end of each row, because missing edge stitches is the most common reason flat velvet pieces slant or shrink. Also, count every row before turning.
Row check: Lay the piece flat after a few rows. Both side edges should run straight, so a narrowing edge usually means a skipped end stitch.

Step 5: Assemble the Twinkle Star
Lay every finished part on a table and arrange the layout before sewing. Then pin the pieces in place and check them from the front, and again from a slight distance.
Sew with matching yarn, working small stitches through the outer loops so the seams sink into the pile. Stuff lightly as you close any stuffed sections, and shape the crochet gingerbread twinkle star with your fingers as you go.
Common Mistakes With a Crochet Gingerbread Twinkle Star
- Skipping markers: Velvet yarn makes rounds nearly impossible to count by eye, so keep a marker in every round.
- Leaving the center open: A loose magic ring leaves a visible hole, so pull the tail snug before weaving.
- Catching one loop when joining: The join then stretches and gaps.
- Missing end stitches in rows: As a result, flat pieces start slanting.
- Overstuffing: Plush yarn stretches, so the stuffing soon starts to show between stitches.
Personalization Ideas for Your Crochet Gingerbread Twinkle Star
Swap the Icing Color
Pale pink or soft blue dots give a candy-shop feel instead of classic white.
Add a Hanging Loop
Chain a short loop at the top and secure it firmly. Then hang the star on a tree branch or a doorknob.
Go Bigger
A thicker velvet yarn and a larger hook turn the star into a cushion-sized piece, so it can sit on the sofa too.
Change the Accent
Silver or red in place of mustard also gives the star a different holiday mood.
Bonus: Keeping Velvet Yarn Under Control
Velvet yarn looks lovely once finished, but it can fight you while you work. Pull only a short length off the skein at a time, since loose strands shed and snag.
If a stitch goes wrong, cut and rejoin rather than frogging several rounds, because repeated ripping out leaves bald patches in the pile. Also, secure every tail with a small knot before weaving, since velvet ends slip out more easily than cotton.
Bonus: Storing Your Crochet Gingerbread Twinkle Star Between Holidays
When the season ends, store the crochet gingerbread twinkle star somewhere dry, because damp can leave velvet pile limp and musty. A breathable cotton bag or a box lined with tissue paper also works better than a sealed plastic bag.
In addition, keep it on top of other decorations rather than underneath, since heavy items crush the pile. Then, before displaying it next year, fluff the pile gently with your fingers.
Crochet Gingerbread Twinkle Star FAQs
Can I use regular acrylic yarn instead of velvet?
Yes. Stitches will be easier to see, although the finished star will look flatter and less plush.
How do I see stitches in dark brown velvet?
Stretch the fabric gently and work under a bright light. A contrasting marker in every round also helps.
Is the crochet gingerbread twinkle star safe for small children?
Embroidered details are safer than plastic parts. Still, sew every piece securely and avoid small attachments for babies.
How should I clean my crochet gingerbread twinkle star?
Spot clean with cool water and a mild soap, then air dry flat. Avoid ironing, because heat crushes velvet pile.

Before It Goes on the Mantel
Before your crochet gingerbread twinkle star goes on display, give it one last look in daylight. Check that the seams are hidden, the icing dots sit evenly, and no tails are poking out. After all, a small tidy-up at the end is what makes a handmade piece look shop-finished, whether it sits on a shelf, hangs on a tree, or waits on a gift table.