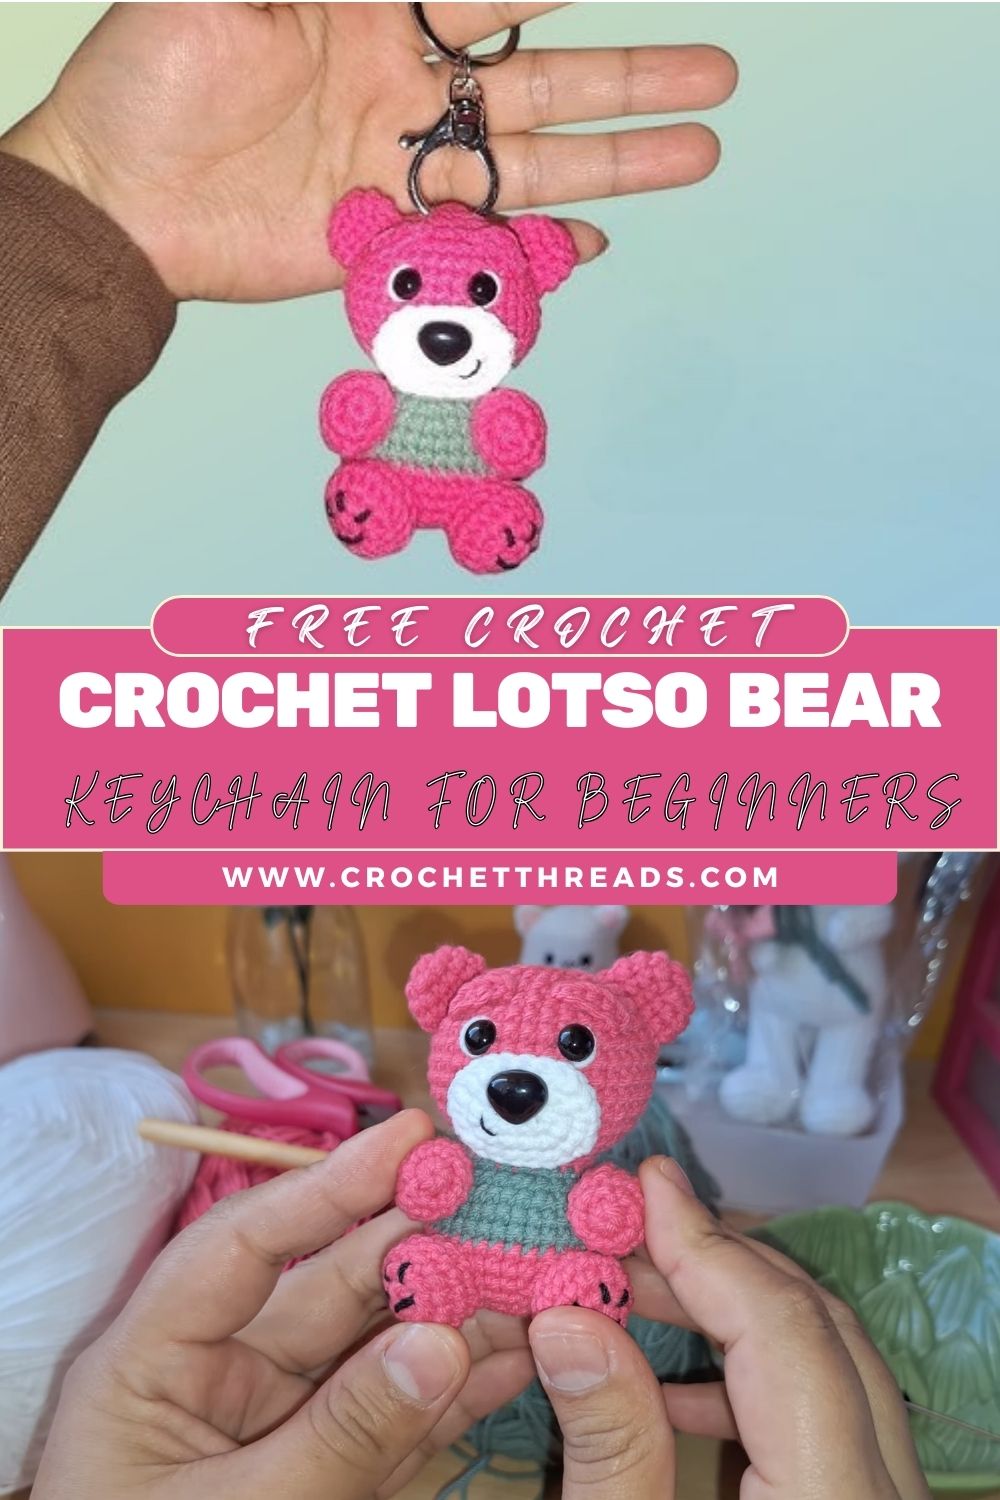
Crochet Lotso Bear Keychain for Beginners Amigurumi Pattern
This crochet Lotso bear keychain is a mini amigurumi bear made in a sweet pink teddy crochet style, inspired by Toy Story’s Lotso. It’s popular because it’s tiny, giftable, and irresistibly cute on keys and bags. Lotso Bear (Toy Story) is loved for his iconic pink teddy look,k soft color, cuddly shape, and a face that instantly feels nostalgic. This ToStory-inspired mini plush turns that vibe into a practical accessory: a mini amigurumi crochet keychain you can take anywhere.
Amigurumi toys are trending worldwide because they’re customizable, beginner-friendly, and perfect for quick, satisfying makes. You can change colors, scale up or down, and add personality with simple embroidery, with no complicated shaping required. This project is especially great for beginners because it uses basic amigurumi techniques: single crochet in continuous rounds, increases, decreases, simple sewing, and light embroidery. The pieces are small, so you can finish quickly and learn fast.
Use your mini pink Lotso bear as:
- a crochet keychain (everyday accessory)
- a gift topper or party favor
- a cute desk/nursery decor accent
- a handmade business product (great for craft fairs and online shops)
This mini amigurumi bear keychain features:
- a pink body with a soft, plush-like crochet texture
- a white muzzle that stands out on the face
- a black nose (embroidered or crocheted)
- round eyes (safety eyes or embroidery)
- small,l rounded ears placed high on the head
- a slightly sitting posture with short legs
- compact mini keychain size, perfect for bags and keys
The overall look is a sweet, simplified “Lotso-style” bear, cute, clean, and instantly recognizable.
Materials Required
- Pink yarn (main body)
- White yarn (muzzle; optional belly patch)
- Black yarn (nose, mouth, optional eye embroidery)
- Crochet hook: 3.0mm–4.0mm
- Safety eyes (6–8mm) or black embroidery thread
- Fiberfill stuffing
- Yarn needle (assembly + weaving ends)
- Stitch marker
- Scissors
- Keychain ring (split ring) or lobster clasp
Note: You can adjust yarn weight and hook size to change the final size. For amigurumi, choose a slightly smaller hook than the yarn label recommends to keep stitches tight.
Abbreviations (Beginner-Friendly)
- MR = Magic Ring (adjustable loop to start rounds)
- ch = chain
- sc = single crochet
- inc = increase (2 sc in the same stitch)
- dec = decrease (turn 2 stitches into 1; use invisible decrease if possible)
- sl st = slip stitch (joining/finishing neatly)
- hdc = half double crochet
- dc = double crochet
- FO = fasten off (cut yarn and secure)
Pattern Information
- Skill level: Beginner (basic amigurumi skills)
- Estimated time: 1.5–3 hours (depending on experience)
- Finished size: approx. 7–10 cm tall (with keychain loop)
- Usage: Designed specifically as a crochet keychain or bag charm
Step-by-Step Crochet Pattern (Mini Lotso Bear Keychain)
Pattern notes before you begin
- Work in continuous rounds unless stated otherwise.
- Use a stitch marker to mark the first stitch of each round.
- Stuff firmly but gently, aim for shape, not stiffness.
A. Head
Start (pink yarn):
- Round 1: MR, 6 sc (6)
- Round 2: inc around (12)
- Round 3: (1 sc, inc) x6 (18)
- Round 4: (2 sc, inc) x6 (24)
- Round 5: (3 sc, inc) x6 (30)
- Rounds 6–8: sc around (30 for 3 rounds)
Place eyes (before closing):
- Insert safety eyes between Rounds 6–7, about 6–7 stitches apart.
- If embroidering eyes later, simply mark the spots with pins.
Shape + stuff:
7. Round 9: (3 sc, dec) x6 (24)
- Round 10: (2 sc, dec) x6 (18) start stuffing firmly
- Round 11: (1 sc, dec) x6 (12)
- Round 12: dec x6 (6)
FO, leave a long tail. Close the opening with a needle (weave through front loops, pull tight).
Head shaping tip:
After stuffing, gently roll the head between your palms to smooth out any lumps.
B. Muzzle (White Piece)
White yarn:
- Round 1: MR, 6 sc (6)
- Round 2: inc around (12)
- Round 3: (1 sc, inc) x6 (18)
- Round 4: sc around (18)
FO, leave a tail for sewing. Lightly stuff or keep flat (both look good at mini scale).
Attach muzzle:
Center it below the eyes. Sew around the edges neatly.
Nose:
- With black yarn, embroider a small oval/triangle nose near the top center of the muzzle.
- Optional: add a tiny vertical line under the nose.
C. Body
Pink yarn:
- Round 1: MR, 6 sc (6)
- Round 2: inc around (12)
- Round 3: (1 sc, inc) x6 (18)
- Round 4: (2 sc, inc) x6 (24)
- Rounds 5–6: sc around (24)
Shape the body (taper slightly):
6. Round 7: (2 sc, dec) x6 (18)
- Round 8: sc around (18) start stuffing
- Round 9: (1 sc, dec) x6 (12)
- Round 10: sc around (12)
FO, leave a long tail for attaching to the head. Stuff to a rounded shape.
Optional belly patch (white):
Make a small oval (ch-4, work sc/hdc around) or a mini circle (MR 6 sc, inc to 12), and sew onto the front.
D. Ears (Make 2)
Pink yarn:
- Round 1: MR, 6 sc (6)
- Round 2: (1 sc, inc) x3 (9)
- Round 3: sc around (9)
FO, leave tail. Do not stuff; flatten slightly.
Attach ears:
Sew to the top sides of the head, symmetrical and slightly forward-facing,g for a cute look.
E. Arms (Make 2)
Pink yarn:
- Round 1: MR, 6 sc (6)
- Round 2: sc around (6)
- Round 3: sc around (6)
- Round 4: (1 sc, dec) x2, then 2 sc (4–5 approx.)
FO, leave tail. Lightly stuff the bottom only (optional), flatten the top for easy sewing.
Attach arms:
Sew to the sides of the body, slightly toward the front.
F. Legs (Make 2)
Pink yarn:
- Round 1: MR, 6 sc (6)
- Round 2: inc around (12)
- Round 3: sc around (12)
- Round 4: (2 sc, dec) x3 (9)
FO, leave tail. Lightly stuff for a rounded “paw” look.
Sitting posture tip:
Attach legs slightly forward at the bottom front of the body. This helps the bear look like it’s sitting.
G. Face Details (Nose, Mouth, Expression)
- Nose: satin stitch embroidery in black on the muzzle (small oval/triangle).
- Mouth: a short curved line under the nose (simple and cute).
- Expression tips:
- Lower mouth placement looks “sweet/soft.”
- Slightly curved embroidered eyebrows (optional) create a more expressive ToStory-inspired feel.
H. Assembly (Clean, Symmetrical Finish)
Recommended order:
- Sew muzzle onto head
- Add nose + mouth embroidery
- Attach ears
- Sew head to body (centered, strong stitches)
- Attach arms
- Attach legs and adjust to sitting position
Shaping tips:
- Pin every piece first and check symmetry from the front and side.
- Use the yarn tail to sew in a circle, then reinforce with a second pass if it’s a keychain.
I. Keychain Attachment (Secure Loop)
Option 1: Yarn loop (simple and matching)
- Insert the needle at the top of the head and come out 1 stitch away.
- Create a loop, then wrap/sew through the same area several times to reinforce.
- Attach the keychain ring to the loop.
Option 2: Metal eye pin or strong cord (extra durable for selling)
- Use a short, strong cord/thread loop anchored through multiple stitches inside the head, then attach the ring.
Durability tip:
Keychains get pulled a lot, and reinforce the top loop more than any other section.
Important Notes (Pro Tips)
- Keep stitch counts accurate; miscounts change the shape fast at mini size.
- Use tight stitches (smaller hook) to prevent stuffing from showing.
- Avoid overstuffing; it can stretch fabric and distort the face.
- Use invisible decrease for a smoother finish.
- Maintain symmetry: pin pieces before sewing and measure spacing (especially eyes and ears).
Customization Ideas
- Color options: pastel pink, rose, lavender, or classic brown teddy.
- Larger plush version: use chunky yarn + a larger hook; keep the same shaping concept.
- Strawberry-themed scented bear: add a tiny crocheted strawberry accessory and lightly scent the stuffing (use skin-safe scent beads and secure them in fabric).
- Gift packaging: clear box, ribbon bow, and a “Handmade with love” tag.
- Couple bear set: two bears with different muzzle colors or tiny heart patches.
Common Mistakes (And How to Avoid Them)
- Uneven stitches: keep consistent tension; use a smaller hook if gaps appear.
- Overstuffing: add stuffing gradually, stopping when the shape is smooth rather than hard.
- Wrong proportions: if the muzzle looks too big, reduce the size by one and increase the round.
- Loose sewing: keychains need a strong attachment,tightt whip stitches, and reinforcement
Who This Pattern Is For
- Beginners learning amigurumi basics
- Crochet hobbyists who love small, quick projects
- Handmade sellers needing cute, fast inventory items
- Gift creators looking for a Toy Story-inspired mini plush
Selling Tips (Handmade Business Friendly)
- Sell as a crochet keychain or bag charm (offer both ring and lobster clasp).
- Offer customization: eye style (embroidered/safety), blush cheeks, heart belly patch, name tag.
- Create bundles: “Pink Teddy Keychain Set” or “Mini Bear Couple Set.”
- Package professionally: clear pouch/b, + care card (“spot clean only, and + brand sticker.
Conclusion
This mini crochet Lotso bear keychain is the perfect mix of nostalgia and cuteness, small enough to finish in an afternoon, but detailed enough to look truly special. Whether you’re making it for yourself, gifting it, or adding it to your handmade shop, this amigurumi bear is a fun, beginner-friendly project you’ll want to repeat in every color.