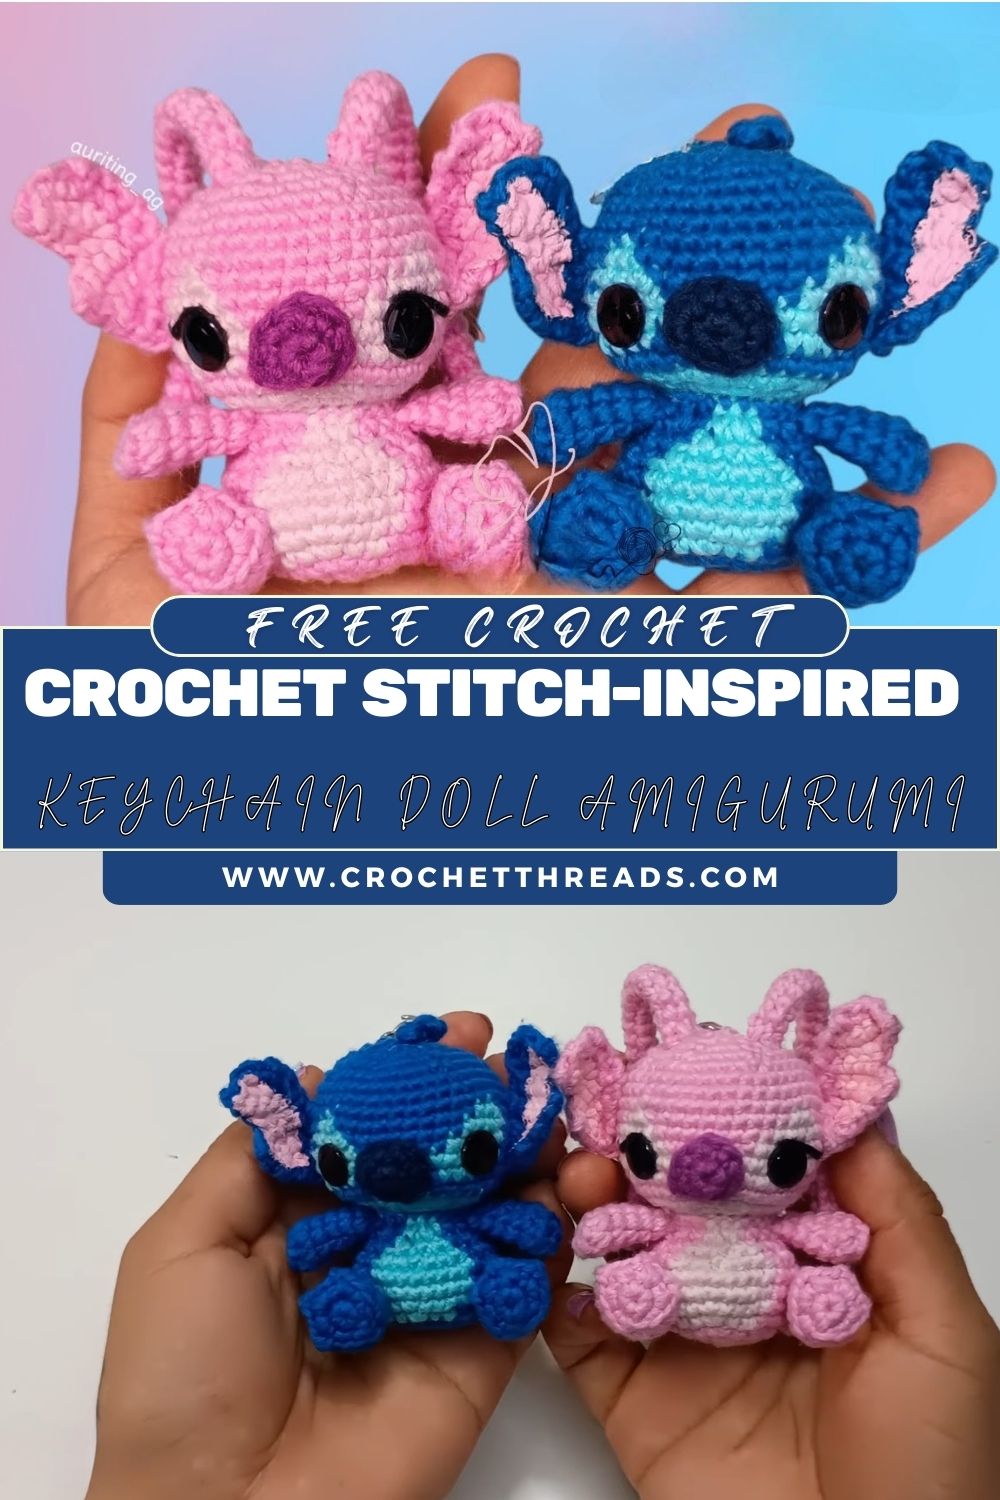
Cute Crochet Stitch-Inspired Keychain Doll Amigurumi Pattern
This Mini Crochet Stitch Amigurumi Pattern (Cute Plush Doll / Keychain) is a fun way to create a mini crochet plush toy with a big head, tiny body, wide ears, and sweet cartoon charm. If you’re searching for a crochet Stitch pattern, an amigurumi Stitch doll idea, or a cute crochet keychain project, this beginner-friendly guide will walk you through every step.
If you love small character dolls, you’ll enjoy this Stitch-inspired mini amigurumi tutorial in two versions: blue and pink. The goal is a palm-sized plush with large-head-and-small-body proportions, big, round black safety eyes, wide, flat ears with inner-ear colour contrast, a small, round nose, a light-coloured belly patch, and short little arms and legs.
Amigurumi is the Japanese art of crocheting small stuffed toys, and it’s perfect for making cute mini plushies like this. These toys are usually made in parts (head, body, limbs) and then assembled, which helps you control the shape and keep details neat. Most amigurumi patterns use basic stitches like single crochet, increases, and decreases, so once you learn the rhythm, you can crochet many different dolls.
Important note: This is an inspired pattern based on the image details and common amigurumi methods. It is not an exact copy of any original tutorial.
Materials
Yarn (DK or worsted works well):
- Main colour: Blue or Pink
- Inner ear contrast: lighter shade (light blue for blue doll, light pink for pink doll)
- Belly patch: cream/light beige
- Nose: blue-purple/lavender (or deeper blue/purple tone)
- Option: a small amount of black yarn for embroidery (if not using safety eyes)
Tools:
- Crochet hook: 2.5–3.25 mm (use a smaller hook for tight stitches)
- Fiberfill stuffing
- Tapestry needle (assembly)
- Stitch markers
- Scissors
Eyes:
- Safety eyes: 8–10 mm round black (size depends on your yarn; choose what looks “big and cute”)
- Optional: white embroidery thread for tiny eye highlight dots
Keychain option:
- Keychain ring + short chain
- Jump ring
- Strong thread (for reinforcing loop)
Crochet Abbreviations
- MR = magic ring
- ch = chain
- sc = single crochet
- inc = increase (2 sc in one stitch)
- dec = invisible decrease (sc2tog)
- sl st = slip stitch
- st(s) = stitch(es)
- rnd = round
- FLO/BLO = front/back loop only (only if noted)
- FO = fasten off
Finished Size
Palm-sized mini plush: approx. 9–12 cm (3.5–4.75 in) tall (varies with yarn/hook/tension).
Great size for a handmade crochet doll or cute crochet keychain.
Skill Level
Beginner to Intermediate
- Beginner: basic amigurumi shaping (sc, inc, dec)
- Intermediate: neat assembly, ear placement symmetry, optional belly patch + nose shaping
Colour Details (Blue & Pink Variations)
Blue Version
- Main: medium blue
- Inner ears: light blue
- Belly: cream/light beige
- Nose: blue-purple/lavender tone
Pink Version
- Main: medium pink
- Inner ears: light pink
- Belly: cream/light beige
- Nose: purple or deeper pink-purple tone
Both versions use:
- Big black eyes
- A light belly patch
- Same body proportions (big head, small body)
Pattern Overview
This beginner amigurumi pattern is crocheted in continuous spiral rounds (no joining unless stated). You will make:
- Head (large, round)
- Nose (small round piece)
- Ears (wide, flat, with inner contrast)
- Body (small, rounded)
- Belly patch (oval appliqué)
- Arms (2)
- Legs (2)
Then you will sew everything together carefully to keep the face centred and the ears even.
11. Step-by-Step Pattern (Detailed)
Gauge is not critical in amigurumi. Use a hook size that creates a tight fabric so stuffing won’t show.
H2: Head (Main colour) Make 1
Big head = most of the cute “cartoon” look.
Rnd 1: MR, 6 sc (6)
Rnd 2: inc x6 (12)
Rnd 3: (sc, inc) x6 (18)
Rnd 4: (2 sc, inc) x6 (24)
Rnd 5: (3 sc, inc) x6 (30)
Rnd 6: (4 sc, inc) x6 (36)
Rnd 7: (5 sc, inc) x6 (42)
Rnd 8–12: sc around (42)
Eye placement (while the head is still open)
Place eyes between Rnd 10 and Rnd 11, about 8–10 stitches apart.
Tip for a cute expression:
- Keep eyes slightly low on the head (not too close to the top).
- If you want extra “baby-cute,” place them a little wider.
Continue shaping:
Rnd 14: (4 sc, dec) x6 (30)
Rnd 15: (3 sc, dec) x6 (24)
Start stuffing firmly (round, smooth shape).
Stuff more; smooth bumps with your fingers.
>Rnd 17: (sc, dec) x6 (12)
Rnd 18: dec x6 (6)
FO, close the hole.
H2: Nose (Blue-purple tone) — Make 1
Small, round nose that sits between the eyes, slightly lower.
Rnd 1: MR, 6 sc (6)
Rnd 2: inc x6 (12)
Rnd 3: sc around (12)
FO, leave a long tail.
Lightly stuff or leave flat (flat often looks cleaner on mini dolls).
H2: Ears (Wide + Flat with Inner Contrast) — Make 2 Outer + 2 Inner
These ears make the doll instantly recognisable: wide, slightly oval, and flat.
H3: Outer Ear (Main colour) — Make 2
Rnd 1: MR, 6 sc (6)
Rnd 2: inc x6 (12)
Rnd 3: (sc, inc) x6 (18)
Rnd 4: (2 sc, inc) x6 (24)
Rnd 5: sc around (24)
FO, leave tail. Do not stuff (keep flat).
H3: Inner Ear (Contrast colour) — Make 2
Work one round smaller so it fits nicely inside.
Rnd 1: MR, 6 sc (6)
Rnd 2: inc x6 (12)
Rnd 3: (sc, inc) x6 (18)
Rnd 4: sc around (18)
FO, leave tail.
H3: Assemble each ear
- Placthe e inner eacentreded othe n outer ear.
- Sew around the inner ear edges with small, neat stitches.
- Optional shaping: add 2–3 stitches at the base of the ear to create a gentle fold.
H2: Body (Main colour Make 1
Small body to keep the “big head, tiny body” proportion.
Rnd 1: MR, 6 sc (6)
Rnd 2: inc x6 (12)
Rnd 3: (sc, inc) x6 (18)
Rnd 4: (2 sc, inc) x6 (24)
Rnd 5–7: sc around (24)
Rnd 8: (2 sc, dec) x6 (18)
Stuff firmly (rounded but not stretched).
Rnd 9: (sc, dec) x6 (12)
Rnd 10: dec x6 (6)
FO, close hole.
H2: Belly Patch (Cream/light beige) — Make 1
A light belly patch adds contrast and helps the doll look polished.
Oval patch (worked in rows):
- ch 6
- Row 1: starting in 2nd ch from hook, sc 4, 3 sc in last ch; continue on other side: sc 3, 2 sc in last ch (12)
- Row 2: inc, sc 3, inc x3, sc 3, inc x2 (18)
- Row 3: sc around (18)
FO with tail.
Sea with a patch to the front of the body centred.
H2: Arms (Main colour) — Make 2
Short and cute.
Rnd 1: MR, 6 sc (6)
Rnd 2–4: sc around (6)
Lightly stuff (or leave unstuffed for a flatter look).
FO with tail.
H2: Legs (MaMaincolour— Make 2
Small legs so the doll can sit.
Rnd 1: MR, 6 sc (6)
Rnd 2: (sc, inc) x3 (9)
Rnd 3–4: sc around (9)
Stuff lightly.
FO with tail.
H2: Assembly
Take your time here—assembly is what makes your amigurumi Stitch doll look neat and professional.
1) Attach the nose
- Centre it between the eyes, slightly below eye level.
- Sew around the edge neatly.
2) Attach ears
- Place ears on the sides of the head, slightly angled outward.
- Good placement: ear base around Rnd 9–11 area of the head.
- Sew the base firmly; add a few stitches up the side of the ear base for stability.
Symmetry tip:
Pin both ears first, look from the front, then the top—adjust until they match.
3) Attach the head to the body
- Centre head on the body.
- Sew with small, strong stitches all around.
- Add a little extra stuffing into the neck area right before closing the seam if needed (helps prevent wobble).
4) Attach belly patch (if you haven’t yet), centred on
- the body front.
5) Attach arms
- Sew to the upper sides of the body, slightly forward, like a gentle hug.
6) Attach legs
- Sew to the bottom front/sides of the body so the doll can sit.
Optional keychain loop
- Stitch a strong loop on top of the head (through several stitches).
- Attach jump ring + chain.
- Reinforce with extra passes of thread/yarn.
Round-by-Round / Stitch Guidance (Standard Amigurumi Method)
This pattern follows classic amigurumi structure:
- The magic ring starts with a tight centre.
- Increase rounds to grow the circle evenly
- Straight rounds to build height
- Decrease rounds to close and shape
- Worked in continuous spiral rounds (keep a stitch marker in the first stitch)
If your stitches drift, that’s normal in spirals—just keep facial placements based on the visible “front” of the head.
Stuffing and Shaping Tips
- Stuff the head firmly for a smooth, round look (but don’t stretch stitches).
- Use small pieces of stuffing and push them into curves.
- If lumps appear, remove a bit and reinsert in smaller pieces.
- For a keychain version, avoid overstuffing the very top of the head so the loop sits neatly.
Assembly Tips (Ears + Face Symmetry)
- Use pins or scrap yarn to “try on” ears before sewing.
- Count stitches from the top centre to each ear base so they match.
- Place the nose exactly on the centerline between the eyes.
- Keep the belly patch centred with the head (front-to-front alignment matters).
Common Beginner Mistakes to Avoid
- Hook too big: creates holes and visible stuffing (go down a hook size).
- Eyes placed too high: makes the face look less cute; place them mid-low.
- Uneven ears: always pin and measure before sewing.
- Overstuffing limbs: makes arms/legs stiff; lightly stuff or leave soft.
- Weak keychain attachment: Reinforce loop stitches multiple times.
Customisation Ideas (Colours, Expressions, Keychain Version)
- Make pastel versions (mint, lavender) for a “kawaii” look.
- Add a tiny embroidered smile under the nose.
- Add blush cheeks with a little pink embroidery or cosmetic blush.
- Change ear size:
- Bigger ears = more cartoon style
- Slightly smaller ears = more “mini plush” style
- Turn it into a cute crochet keychain:
- Add a crocheted loop (ch 12–15, sl st into a ring) and sew it down firmly.
Care Instructions
- Best care: spot clean with mild soap and cool water.
- Squeeze gently, reshape, and air dry fully.
- If used as a keychain, check the loop and seams occasionally and reinforce if needed.
Uses of Finished Doll
This mini crochet plush toy is perfect for:
- Keychain for bags, backpacks, and keys
- Gift for crochet lovers and cute character fans
- Desk decor (small and cheerful)
- Handmade product idea (be mindful of “inspired character” wording and your selling platform rules)
Conclusion
These Stitch-inspired mini dolls are small, soft, and full of personality, especially with their big eyes, wide, contrasting ears, and tiny noses. Whether you choose the classic blue or the sweet pink variation, you’ll end up with a palm-sized plush that feels truly handmade and gift-ready. And the best part? Once you learn the simple amigurumi rhythm (sc, inc, dec), you can confidently make a whole collection of mini dolls.
Try this crochet Stitch pattern today, save this pattern for later, and share it with a friend who loves amigurumi. If you make one, create both colours—blue and pink look adorable as a matching pair.